Use the Add Bulk Transactions screen when you have multiple donations or payments to enter that share the same date, payment method, account code, and/or campaign - for example, a collection of cash donations received on a Sunday, or a batch of direct credit payments for the same appeal.
The Add individual transaction screen provides more flexibility including splitting transactions, matching pledges and memberships, and is designed to easily facilitate entering multiple transactions. The bulk screen provides for the most simple case of a list of transactions only.
Each row you enter on this screen becomes one transaction with a single line, for the person and amount on that row. A row saved here is not linked to the person's pledge, even when they have one. To split a payment across account codes, or to pay pledge instalments or membership instalments, use Add a transaction on the Transaction Processing screen instead. For how to do this, see Adding Individual Transactions.
Before you start
Role Permissions
- Manage, Read and report on transactions: needed to add, edit and delete transactions.
- Search People: needed to find the person on each row.
- Limit finance admin to just users own groups: if your role has this, you can only enter rows for people in your groups. You only see batches made available to your group or created by someone in your groups.
For what each role permission allows, see Finance Permissions.
- You will need at least one batch. You can create one from this screen with + New, or see Adding a Batch.
Step 1: Open the Add Bulk Transactions screen
- Click Finance in the navigation menu.
- On the Transaction Processing screen, click Transactions.
- Select Add in bulk.
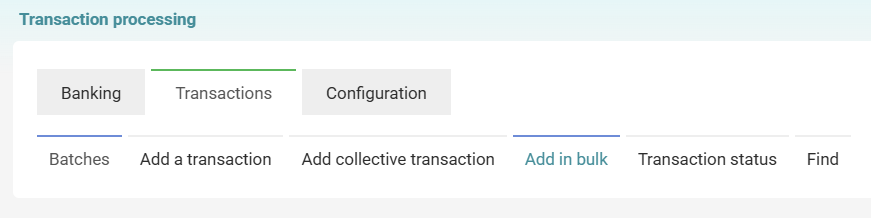
Then the Add Bulk Transactions page opens.
You can also start from a batch: on the Batches list, open Choose a function beside the batch and select Add bulk. The screen opens with that batch already selected.
Step 2: Configure Transaction Settings
In the Transaction Settings section, set up the batch and bank account for this entry run.
| Field | Description |
|---|---|
| Batch (required) | Select the batch you want to add transactions to from the dropdown. Only open batches are listed. To create a new batch without leaving this screen, click + New beside the dropdown. If your role is limited to your own groups, choose your group in Available to Group when you create the batch, so that you can see it. |
| Bank account | Optionally select the bank account these transactions came from. |
| Collective Transaction | Not available in bulk mode. Use individual or collective entry if you need line-specific recipients and receipt settings. |
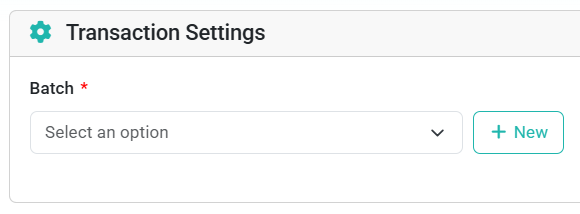
Below Transaction Settings, a guidance line reads: "This screen writes one line per row. To split a payment across account codes, or to allocate it to pledge instalments, use Add a transaction." Click Add a transaction in that line to go to the screen for those payments. The line is shown until you click Start, so check it before you set up the run.
Step 3: Set the Transaction Date and Note
In the Transaction Info section:
- Date (required) - This date is applied to all transactions you enter on this screen. It defaults to today. Click the date field or the calendar icon to change it.
- Note - Add an optional note for this run. It fills in the Note on each row. Change a row's Note to replace it for that row.
Step 4: Choose a Payment Method
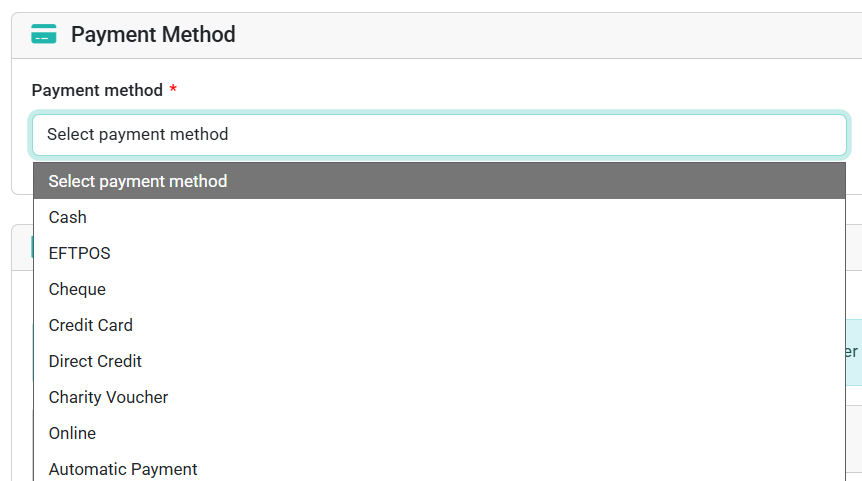
In the Payment Method section, select how the money was received (for example, Cash, Cheque, Direct Credit, or Online).
Note that this is a fixed list of ways people have paid. The payment methods such as stripe or gocardless are not in this list - they are used when people make a payment themselves.
This payment method is applied to all transactions you enter on this screen.
The payment details you enter here are saved on every row of the run:
- Cheque: Name on cheque, Branch code and Cheque/Account number.
- Credit Card: Card number (last 4 digits).
- Direct Credit, Charity Voucher, Online, Automatic Payment, Envelope and Other: Reference number.
To record each payment with its own cheque details or reference, use Add a transaction instead. See Adding Individual Transactions.
Step 5: Set the Default Transaction Details
In the Transaction Details section, configure the settings that will be applied to every line you enter:
| Field | Description |
|---|---|
| Transaction Type | Defaults to Account code (a standard donation). Change this if the transactions are for stock items, memberships, events, or in kind items. Choosing Membership records a new membership for each person. It does not pay an instalment of a membership they already have. |
| Account Code | Select the account code (fund or income category) these transactions should be posted to. |
| Tax Settings | Choosing an account code ticks GST and Tax rebatable to match that account code's settings. Change them if these transactions are different. |
| Campaign | Optionally assign all transactions to a specific campaign. This field shows when your site has campaigns set up. |
These are the default settings for all lines. In bulk mode you set them once here, rather than per line.
Step 6: Start entering transactions
Once all settings are configured, click Start. If a required setting is missing, infoodle shows Missing required fields and lists what still needs filling in, for example Batch, Payment method or Account code.
The settings sections close and the Quick Transaction Entry section opens. Its summary shows the Batch, the Batch total, the Date, the Payment method, the Bank, the Account code and the Campaign (when you set one) for this run.
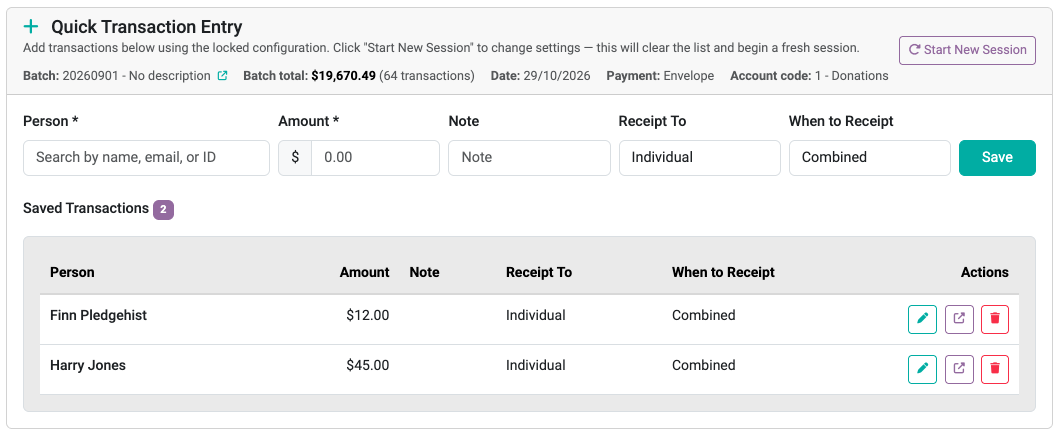
For each person making a payment, fill in a row:
- Person: start typing the person's name in the search field.
- Select the correct match from the dropdown.
- Amount: enter the amount this person paid.
- Note: optionally enter a short note for this row (up to 30 characters).
- Receipt To: choose Individual or Household for who gets the receipt, or No receipt if no receipt is required.
- When to Receipt: select One-off to receipt this transaction on its own, Combined to include it in a combined receipt run, or No receipt.
- Click Save (or press Enter) to save the row.
To search by something other than the name, such as email address, phone number or ID, click change beside the Search by label before you type.
The row appears in the Saved Transactions list below, and the Batch total in the summary updates. The entry fields clear, ready for the next person. The Note, Receipt To and When to Receipt you chose carry over to the next row. Repeat for each person in the batch.
When you pick a person who has their own receipt settings, Receipt To and When to Receipt change to match that person. Check them before you save the row.
The person search only finds people who are already in infoodle. Add any new person first, then search for them here. See Adding a Person. The search also only finds people you can see. If your role does not have Has Staff view of all people or Online Directory, that means people who share a group with you.
Pledge and membership payments
A row saved on this screen does not pay any pledge or membership instalments, whatever the Transaction Type. If the person has a pledge, their pledge dates stay open. To record a payment against a pledge or a membership paid in instalments, use Add a transaction instead. See Adding Individual Transactions.
Changing or removing a saved row
Each row in the Saved Transactions list has three buttons under Actions:
- Edit (pencil): loads the row back into the entry fields, as it is now saved. You can change the person, amount, note and receipt settings. Click Update to save the change, or Cancel to discard it.
- Open full edit (arrow): opens the row on the Edit Transaction screen in a new tab, where you can change anything this list does not show. See Editing a Transaction.
- Delete (bin): deletes the transaction after you confirm. This cannot be undone.
If you try to update a row that has been receipted, is in a closed batch, or is part of a Gift Aid claim filed to HMRC, infoodle refuses the change when you click Update. It also refuses it once the row has been matched to a pledge instalment on the Edit Transaction screen. infoodle shows, for example, "This transaction is allocated to a pledge date (15 Oct 2026). Open it from the transaction list to change the allocation."
A row cannot be deleted from this list if it has been receipted, is in a closed batch ("Cannot delete transactions in closed batches"), or has been claimed to HMRC. If a row was matched to a pledge instalment on the Edit Transaction screen after you saved it, deleting it reopens that instalment for payment.
The Saved Transactions list only shows the rows saved since you clicked Start. To change a row after you leave the screen or start a new session, click the link icon beside Batch in the summary to open the batch, or see Viewing Transactions.
Changing settings mid-entry
To switch to a different batch, date, payment method, account code or campaign partway through, click Start New Session.
- If you have saved rows, infoodle asks you to confirm. The transactions you have already saved stay in the batch. Only the list on screen is cleared.
- The settings sections open again with the batch, bank account, payment method, account code, campaign and the GST and Tax rebatable ticks cleared, so you can set up the next run. The Date and Note stay as they were.
- Receipt To and When to Receipt go back to Individual and One-off.
When you're done
All rows are saved as you go - there's no final "submit" step. Once you've entered all your transactions, navigate away from the screen, or click the Back link in the top right corner if it shows (for example, Back to Transaction Processing).
Your transactions are now in the batch and ready to be receipted. See Adding a Receipt or Statement Template for the next step.
Common questions
Can I use Add in bulk for pledge payments?
No. The bulk screen writes one line per row and has no pledge panel. To split a payment across account codes, or to allocate it to pledge instalments, use Add a transaction. See Adding Individual Transactions.
Why was my row refused with a permission message?
If your role has Limit finance admin to just users own groups, a row for a person outside your groups is refused with "You don't have permission to use some of the data on this transaction. Check the account code, campaign and donor, or ask an administrator." The same message shows if your role cannot use the account code or campaign on the run. Ask an administrator to check your role permissions.
I saved a bulk row for someone with a pledge. How do I put it on their pledge?
Open the row with Open full edit, or find it in the batch, and use the Recurring Pledges panel on the Edit Transaction screen. See Editing a Transaction.