Connecting infoodle to Xero lets your transactions, contacts and account codes flow between the two systems on a regular schedule. This article walks through where the connection lives in infoodle, what each configuration option does, how to authorise infoodle to talk to your Xero organisation, and what to know on the governance side: the donor data that crosses the boundary, the OAuth access you are granting, and how to do a clean disconnect.
Before you start
- You will need a Xero account with permission to connect a Connected App to your organisation. If your accountant set up your Xero, they may need to do this step. Details are on the Xero help site: Getting started with Xero Connected Apps.
- You will also need a role in infoodle with the right role permissions. The role permissions required for connecting to Xero are:
- Manage finance configurations: gives access to the Xero Setup page.
- Read and Report on Transactions (read-only) or Manage, Read and report on transactions (full transaction admin): to work with transactions inside infoodle.
- Update System information: useful if you need to change site-wide settings while you set up the connection.
- Note, only one infoodle site connects to one Xero organisation. If you manage multiple Xero organisations, decide which one infoodle should connect to before you start.
There is one Xero connection for the whole infoodle site, it is not scoped to a cluster. If you use cluster restrictions for donor-data segregation, treat Manage finance configurations as a privileged grant: the holder can change a setting that controls how every cluster's donor data is shared with your accounting system.
Step 1: Open the Xero Setup page in infoodle
- From the left-hand menu, click or hover over Finance, then click Transaction processing.
- On the page, click Configuration, then Xero Setup.
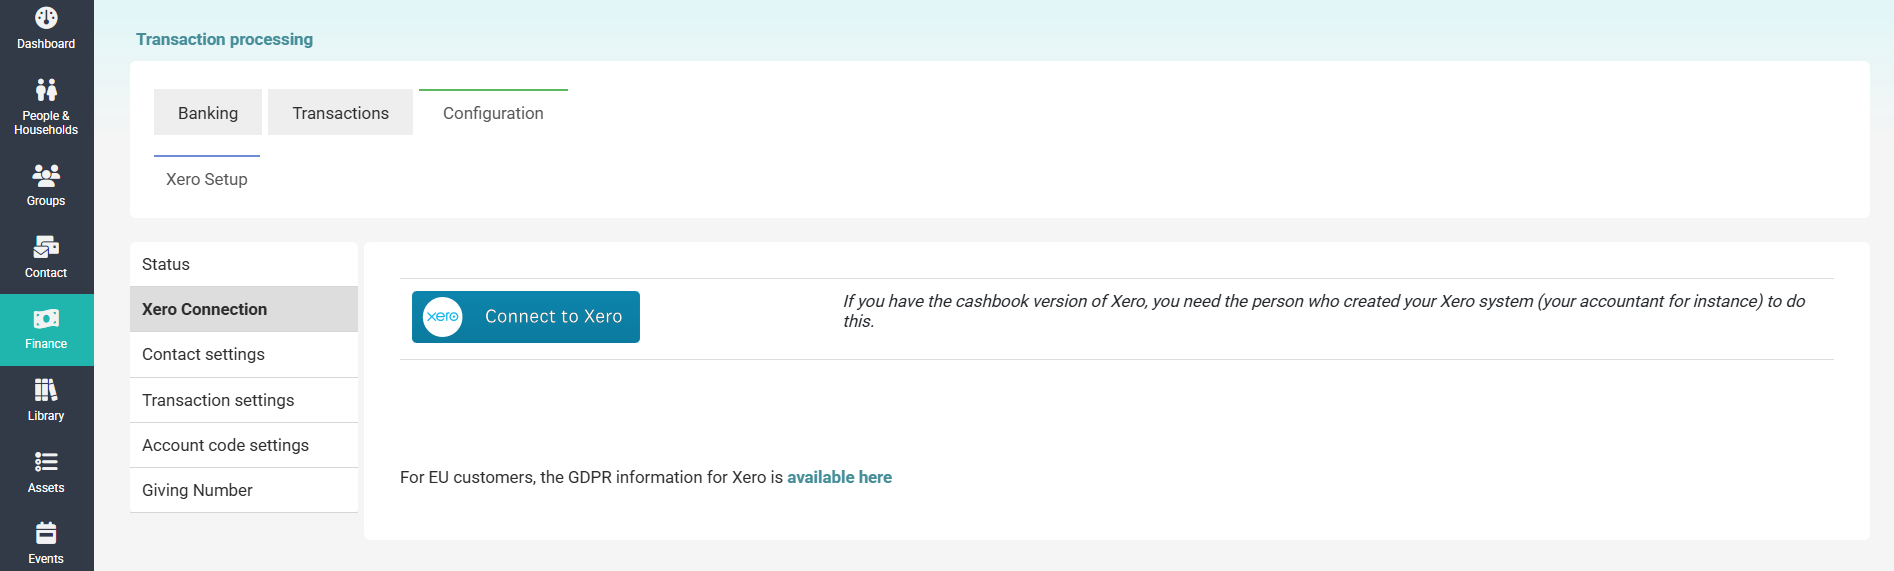
The Xero Setup page is divided across several tabs:
- With Manage finance configurations you see Status, Xero Connection, Contact settings, Account code settings, and Giving Number.
- With the broader Manage, Read and report on transactions role permission you also see Transaction settings, which controls how Xero line-item descriptions are matched to people in infoodle.
You can fill these in before you connect, or come back to them later.
Step 2: Check the current connection state
Click the Status tab. Before you have connected infoodle to Xero, the status fields are all empty.
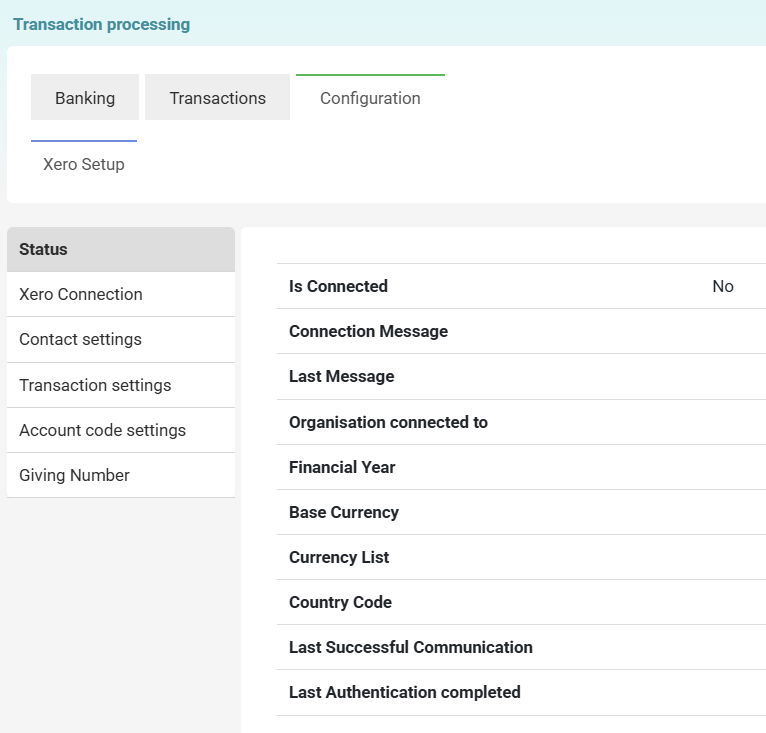
Once the connection is in place, the Status tab is where you check the organisation name, base currency, country code, and the timestamp of the last successful communication with Xero. The Status tab also shows a Connection Message and a Last Message field with the most recent response from Xero.
Step 3: Connect to Xero
Open the Xero Connection tab. While infoodle is not yet connected, this tab shows a button saying: Connect to Xero.
If you have the cashbook version of Xero, the person who created your Xero system (typically your accountant) needs to do this step.
The Connect to Xero link takes you to login.xero.com, where Xero asks you to sign in and choose which organisation to connect to infoodle. Make sure you are signing in to the correct Xero login. If your accountant manages multiple organisations, double-check which one you grant access to.
Step 4: Authorise infoodle on the Xero side
Clicking Connect to Xero opens Xero in a new window.
Here you can:
- Sign in to your Xero account if you are not already signed in.
- Choose the Xero organisation you want infoodle to connect to.
- Review the access infoodle is requesting, and click Allow access.

Xero then redirects you back to infoodle and confirms the connection. You will be asked to re-confirm the details on the infoodle screen.
What you are granting infoodle on your Xero organisation
The Xero consent screen lists four scopes. In plain English, granting them means infoodle can:
| OAuth scope | What infoodle can do on your Xero org |
|---|---|
accounting.contacts |
Read and write contacts: create, update and look up the people and organisations in your Xero contacts list. |
accounting.transactions |
Read and write invoices, bills, bank transactions and similar transactional records. |
accounting.settings |
Read and write the organisation's chart of accounts, tracking categories, tax rates and similar org-wide settings. This is the broadest of the four scopes. |
offline_access |
Hold a long-lived refresh token so infoodle can keep talking to Xero on the regular three-hourly poll without anyone being signed in. This is what makes the unattended scheduled sync possible. |
If your governance posture requires four-eyes approval for write access to your accounting system, the time to record that approval is here, at the consent step.
infoodle connects to a single Xero organisation per site. If you manage more than one organisation in Xero, the consent screen prompts you to pick the one you want to grant access to. To swap organisations later, disconnect the existing one first (see Disconnecting from Xero below) and then repeat this connection step.
Step 5: Confirm the connection
Return to Finance, Transaction processing, Configuration, Xero Setup and click the Status tab.
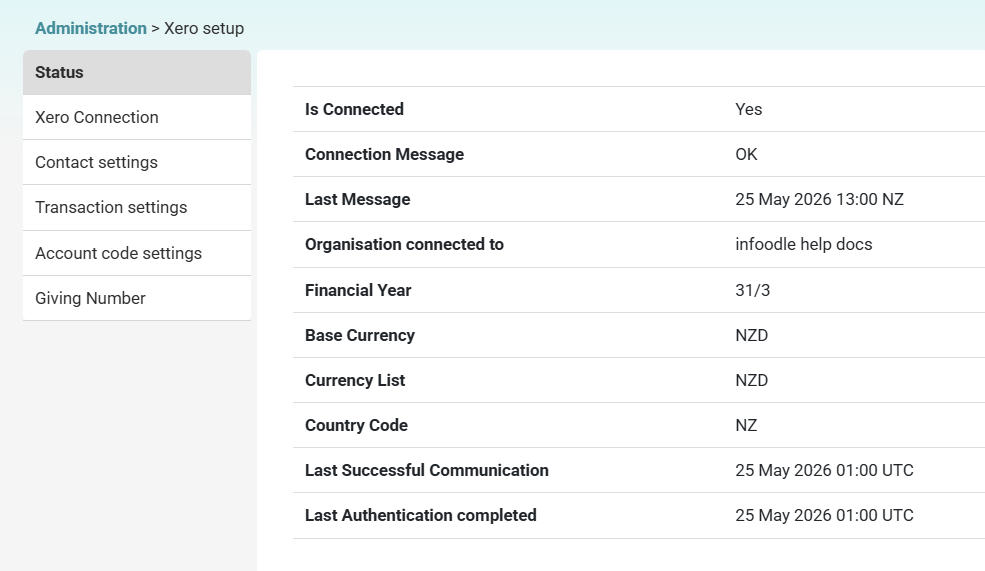
Once authorised, the page shows:
- Is Connected: Yes
- Organisation connected to: the name of your Xero organisation
- Financial Year, Base Currency, Currency List, Country Code: pulled from Xero
- Last Successful Communication and Last Authentication completed: timestamps of the most recent sync and the most recent OAuth refresh
- Connection Message and Last Message: the most recent response or error message infoodle received from Xero
To re-check the connection (for example after Xero prompts for a re-authentication), open the Xero Connection tab and click Check Xero connection and Authorise.
Step 6: Configure how contacts flow between infoodle and Xero
Open the Contact settings tab.
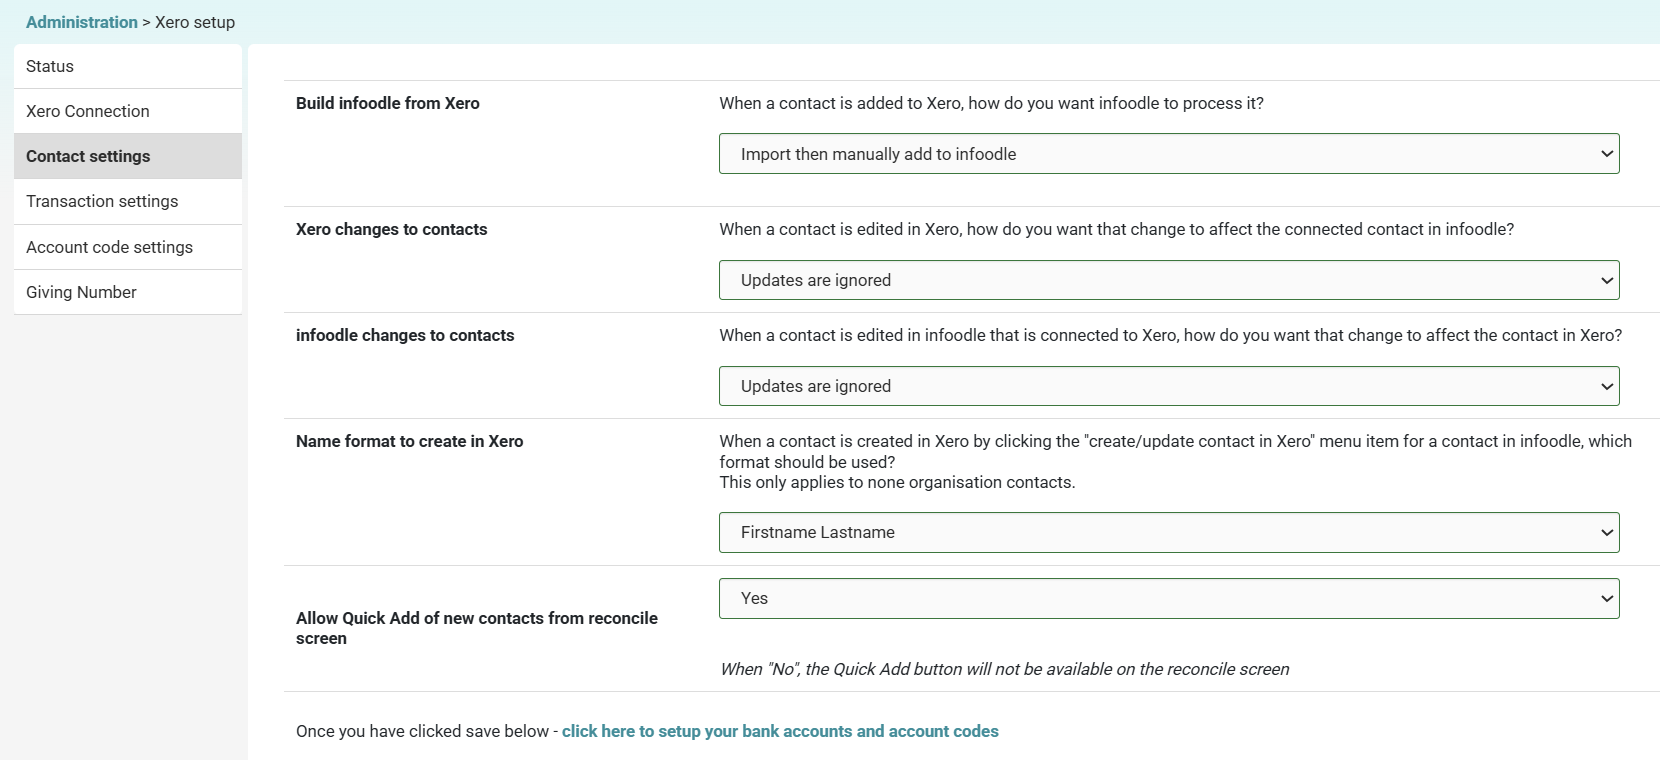
The settings options are:
- Build infoodle from Xero: what infoodle does when a new contact is added in Xero. Choose Import then manually add to infoodle to review each new contact, or Automatically add to infoodle to match Xero to skip the review. Manual is the safer default for most organisations.
- Xero changes to contacts: what infoodle does when a contact is edited in Xero. Options: Updates are ignored, Manually update changes, Automatically update infoodle to match Xero.
- infoodle changes to contacts: what Xero receives when a contact is edited in infoodle (where that contact is connected to Xero). Options: Updates are ignored or Update Xero.
- Name format to create in Xero: the name format used when you create a new contact in Xero from infoodle. Choose Firstname Lastname or Lastname Firstname. Individual contacts only.
- Allow Quick Add of new contacts from reconcile screen: set to No to hide the Quick Add button on the reconciliation screen for transactions whose contact is not yet in infoodle.
Click Save at the bottom of the tab when you are finished.
Step 7: Configure how transactions are matched
Open the Transaction settings tab. This tab tells infoodle how to read the descriptions on Xero line items so it can match incoming transactions to people in infoodle.
You only see this tab if your role has Manage, Read and report on transactions. Users with the narrower Manage finance configurations or Read and Report on Transactions role permissions see the other five sub-tabs but not this one.
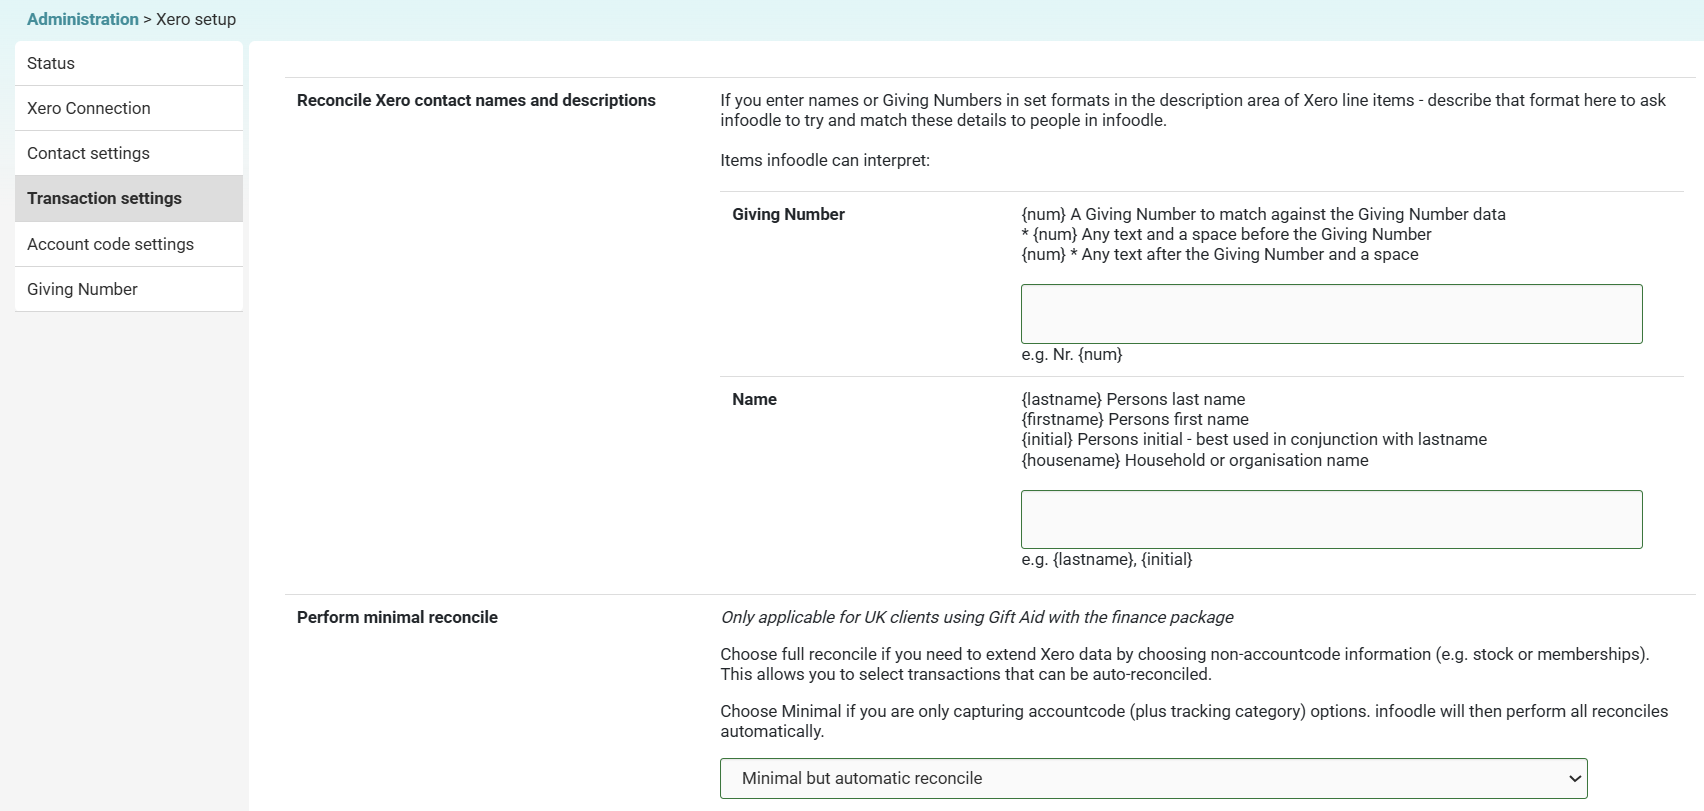
Reconcile Xero contact names and descriptions: the placeholder tokens infoodle understands.
- num: a Giving Number, matched against the person's Giving Number in infoodle
- any text num: any text and a space before the Giving Number
- num any text: any text after the Giving Number and a space
- lastname: person's last name
- firstname: person's first name
- initial: person's initial (best used with lastname)
- housename: household or organisation name
Example: Nr. {num} would match a description like Nr. 1042 to the person who has Giving Number 1042. Example: {lastname}, {initial} would match Smith, J.
If you adopt a placeholder pattern that includes firstname, lastname, initial or housename, the donor's name will appear in Xero transaction descriptions and will be visible to anyone with access to your Xero books, often a wider audience than donor-data viewers in infoodle. If your privacy notice does not cover that disclosure, consider a Giving-Number-only pattern (num or Nr. num) instead.
Perform minimal reconcile (UK customers using Gift Aid should review carefully):
- Full reconcile with automation where specified: choose this if you need to extend Xero data with non-accountcode information (stock, memberships, etc.). You can still flag transactions for automatic reconcile.
- Minimal but automatic reconcile: choose this if you are only capturing account codes (and optionally tracking categories). infoodle will reconcile everything automatically with no manual step.
Step 8: Account code settings

Update descriptions: when set to Yes, each time infoodle polls Xero it refreshes the account code descriptions in infoodle to match Xero. Set to No to keep your infoodle descriptions exactly as you have entered them.
Step 9: Giving Number settings
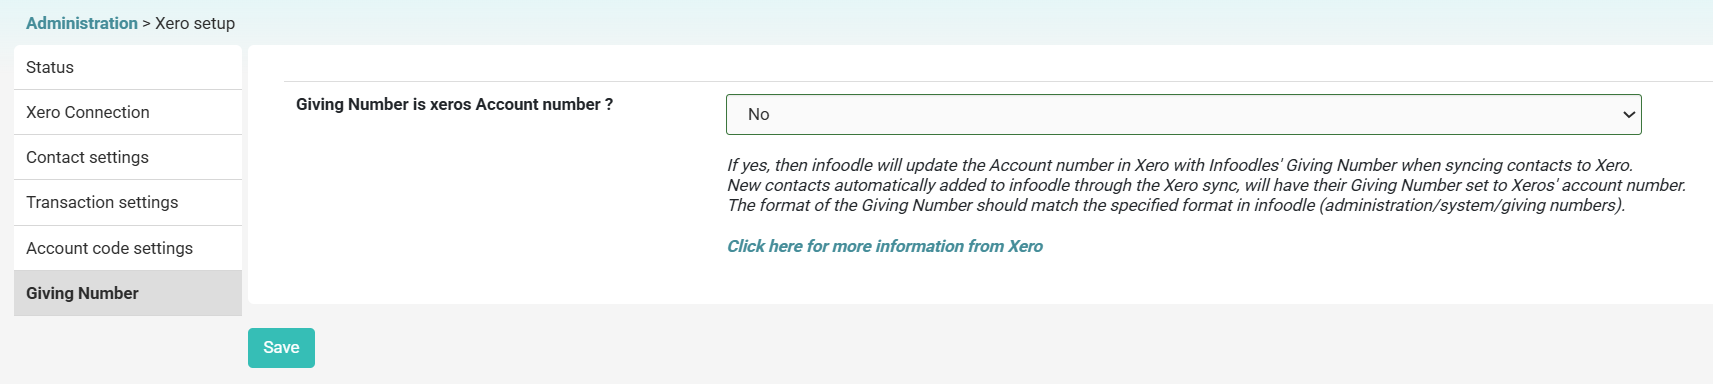
Giving Number is xero's Account number?
- Yes: infoodle uses the Giving Number as Xero's Account Number when syncing contacts to Xero, and any new contact imported from Xero gets its Giving Number set from Xero's account number.
- No: infoodle and Xero each keep their own numbering; neither field is written to the other system.
The format of your Giving Number must match the format you have configured under Administration, System, Giving Numbers. See Giving Number Settings.
Step 10: Set up the import schedule
Once infoodle is connected, tell it which bank accounts and account codes to pull transactions from on its regular three-hourly poll. This is the Xero Schedule: see the Viewing the Xero schedule article for the setup steps.
After the schedule is in place, infoodle pulls the following on each poll:
- Contacts that have changed since the last poll
- Bank accounts that are still active in your schedule
- Account codes that are still active in your schedule
- Transactions that have been reconciled or updated in Xero since the last poll
- Tracking categories
What syncs between infoodle and Xero
- Contacts: two-way, subject to your Contact settings.
- Transactions: mostly Xero to infoodle; infoodle to Xero is via Upload to Xero.
- Bank accounts and account codes: Xero to infoodle, for the items in your Xero Schedule.
- Tracking categories: Xero to infoodle.
What donor data flows to Xero
When the connection is active and the infoodle changes to contacts, Update Xero option is selected, the following fields on each affected person record in infoodle are written to Xero as a contact:
- Name (first name and last name, or organisation name)
- Email address
- Phone numbers
- Postal address (street, suburb, city, state, postcode, country)
- Giving Number (written into Xero's Account Number field if Giving Number is xero's Account number? is set to Yes)
When the Upload to Xero feature is used, donation amounts and transaction dates also flow to Xero alongside the contact name. If the reconcile pattern includes a name token, the donor's name appears in the Xero line-item description.
Xero is a separate data controller (or processor, depending on your Xero contract). Customers under UK GDPR, NZ Privacy Act 2020, the Australian Privacy Principles or equivalent should add Xero to the recipients of your data list in their privacy notice, and to their ROPA or Article 30 record where applicable.
Audit trail
infoodle's per-record logging for Xero sync events is limited: each poll updates timestamps and message fields on the Status tab, but infoodle does not expose a per-contact or per-transaction sync log inside the Xero Setup area.
On the Xero side, every contact or transaction that infoodle creates, updates or reconciles is recorded in Xero's History & Notes panel against that record. For external-auditor questions about automated entries into the accounting system, History & Notes is the right place to point the auditor.
Disconnecting from Xero
Open the Xero Connection tab on the Xero Setup page. Once connected, the tab offers a disconnect option alongside the Check Xero connection and Authorise action.
If your charity has separate live and test infoodle sites connected to the same Xero organisation, revoking the grant from inside Xero will disconnect every infoodle site using that connection, not just the one you are working in. Disconnecting from the infoodle side affects only the infoodle site you are signed in to.
What data stays after disconnect
- Contacts and transactions previously written to Xero stay in Xero.
- Contacts and transactions previously imported into infoodle stay in infoodle.
- Schedule, contact-settings and account-code settings are kept on the infoodle side, so reconnecting to the same Xero organisation restores the same configuration.
How to do a clean two-sided revocation
- In infoodle, on the Xero Connection tab, click the disconnect option. This stops the scheduled sync.
- Sign in to Xero, go to Settings, Connected apps, find the infoodle entry, and click Disconnect. This revokes the refresh token.
- If a donor has asked you to erase their record, delete or anonymise the record in Xero directly as well as in infoodle. The disconnect itself does not remove anything.
Changing the connected Xero organisation
If you swap the connected Xero organisation, account codes, contacts and historical mappings do not transfer. Past sync history is meaningful only in the context of the previous Xero organisation. Multi-entity charities running several legal entities through one infoodle site should plan this change carefully.
Common questions
Why is the Xero Setup page not in my Finance menu?
Your role needs the role permission Manage finance configurations. Without it, the Configuration, Xero Setup sub-menu is not available. Ask an administrator to update your role under Administration, Roles. If you can see the page but the Transaction settings tab is missing, that is expected, Transaction settings requires the broader Manage, Read and report on transactions role permission.
I clicked Connect but ended up authorising the wrong Xero organisation, what now?
Disconnect from the infoodle side, then go to Xero's Settings, Connected apps and revoke infoodle's access from the unwanted organisation. Then click Connect to Xero again in infoodle and pick the correct organisation on the Xero consent screen.
I am connected, but no transactions are appearing in infoodle. Why?
The connection only opens the door. Transactions follow the Xero Schedule. Until you tell infoodle which bank accounts and account codes to import, nothing is pulled. See the Xero Schedule article.
The Status tab shows "Failed to retrieve information". What does this mean?
There are two cases. The first is a transient comms error: it clears on the next poll and the Last Successful Communication timestamp updates. The second is a persistent error caused by the Xero side revoking the grant. To tell them apart, sign in to Xero and check Settings, Connected apps. If infoodle is still listed there, the issue is transient; if it has been removed, reconnect from the Xero Connection tab in infoodle.