If you have one or more lists of contacts that you wish to archive in bulk, then you can achieve this either by Bulk Archive using Reports & Workflows or via the Data Import tool using a File created from a Report. The choice of option depends largely on what/how you can generate the list.
- Can you generate a list or lists ONLY of people to archive via reports?
If so you can Bulk archive via Workflow - Do you need to edit the list from the report first and remove some contacts?
In this case you will need to Bulk Archive Via Export/Import
Bulk Archive Via Workflow
In this process, you use the Reports area to generate a list only of contacts to archive. From the Report results you can then add the list to a Group that then Triggers an Archive Workflow.
This is a very powerful & potentially dangerous workflow in the hands of inexperienced users. For example, someone could generate a report with everyone in your database, and accidentally add to this the Bulk Archive Group, triggering the workflow. This would cause your entire database to be archived. Once you have completed the Bulk Archiving, consider making the Workflow inactive until the next time you next it in order to prevent accidental triggering of the workflow.
Step 1: Create a Bulk Archive Workflow
Create a new group to use as the Workflow trigger, such as a Bulk Archive group
Then create a Bulk Archive workflow via Administration > Workflows using at minimum:
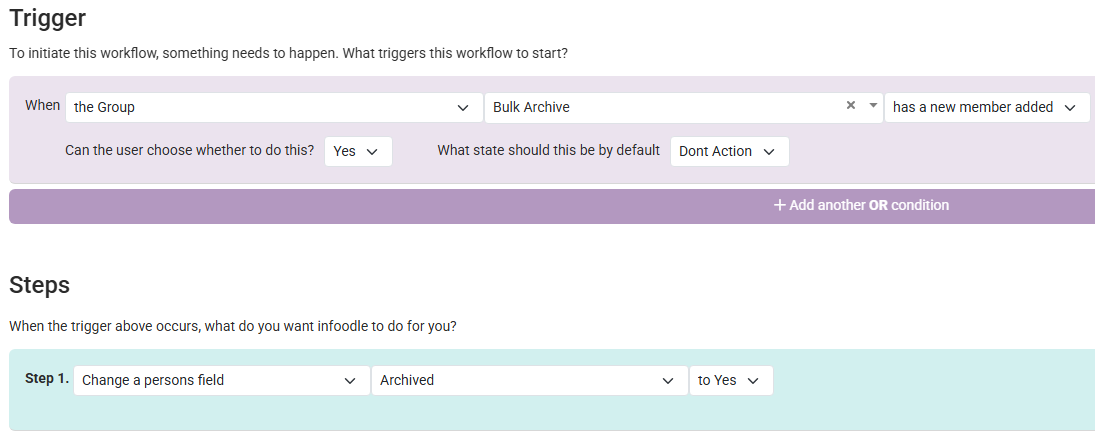
- Workflow Trigger: When a Group [Select Archive Group] Has a New Member Added
- Workflow Step: Change a person's field Archived to Yes
Feel free to include additional (Optional) steps if needed, such as:
- Adding a Note to the Profile (e.g. "Archived Via Workflow")
- Removing the contact from one or more Groups
- Changing the Group Permissions of the Contact to be Past member in Groups
- Any other workflow step relevant to your needs
For more information see Workflows
Step 2: Create Report(s) to list contacts
Once the Workflow is set up, use the Reports area of infoodle to create one or more reports to list the contacts that you wish to Archive. When Creating and checking the report please be sure that the listed contacts will exclude any Active User Accounts needed for users to Log into infoodle. If a User Record is archived they will not be able to log in to infoodle.
All Contacts listed by the Report you use will be Archived by the workflow, so be sure to check the Report criteria is working as expected, and is only listing contacts needing to be Archived.
If you cannot get a list in one large report, then using several smaller reports can work.
For more information see: Reports
Step 3: Trigger the Workflow via Reports
Once you have set up the Report needed, we recommend Generating this On screen to check, before using it to trigger the workflow. When you are Ready to trigger the Bulk Archive.
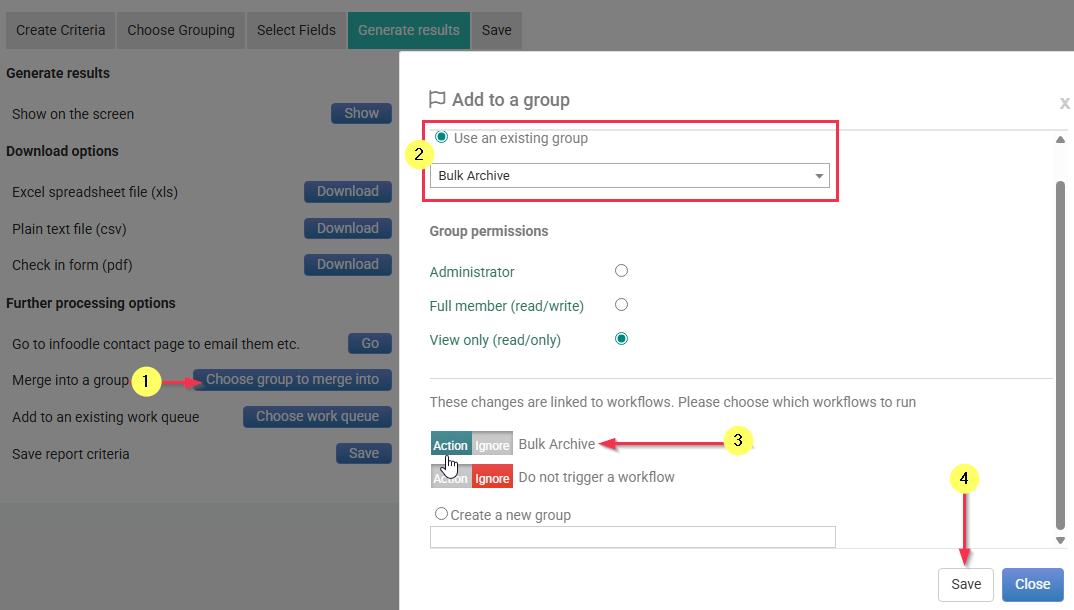
- Click Choose Group to merge into
- In the Pop Up select your Workflow Trigger Group
- Choose to Action your Archive Workflow
- Click Save to apply the changes
Note that for Large report lists, it may take a bit of time to save and complete the Bulk Archive.
Once the Group Pop Up window disappears, the Bulk Archive will be completed.
You can check this by generating the Report on Screen again, and this time it should return Zero results, as the listed contacts will now be archived.
You can use the same process as above with a few small changes in order to Bulk Un-Archive records via Reports and Workflows.
For the Workflow: Use an "Un-Archive" Trigger Group, set the "Archived" field to "No" in the workflow step, and include a step at the end of this to remove the contacts from the Un-Archive" Group.
For the Report: Create the Report criteria as usual but include the Archived Equals Yes report criteria so that Only archived records are included in the report results.
Bulk Archive Via Export/Import
At times it is not possible to create a report that lists just those records that are to be archived. In these cases a user may need to manually check for and remove contacts from the report results, which can be done by exporting this list to a CSV file for manual editing.
Step 1: Create the Report & CSV File
Using the Reports area of infoodle create a report to list all the contacts that you wish to Archive. You will be able to remove contacts from the Exported CSV File, but to keep things simple try and limit the report so that there are as few extra contacts included as possible.
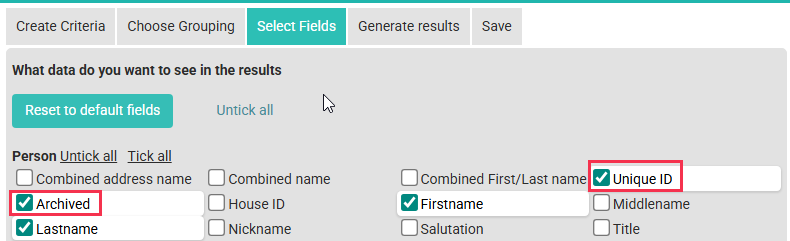
Under Select Fields for the report be sure to include at minimum the infoodle Unique ID and Archived fields in the output as these will be used later.
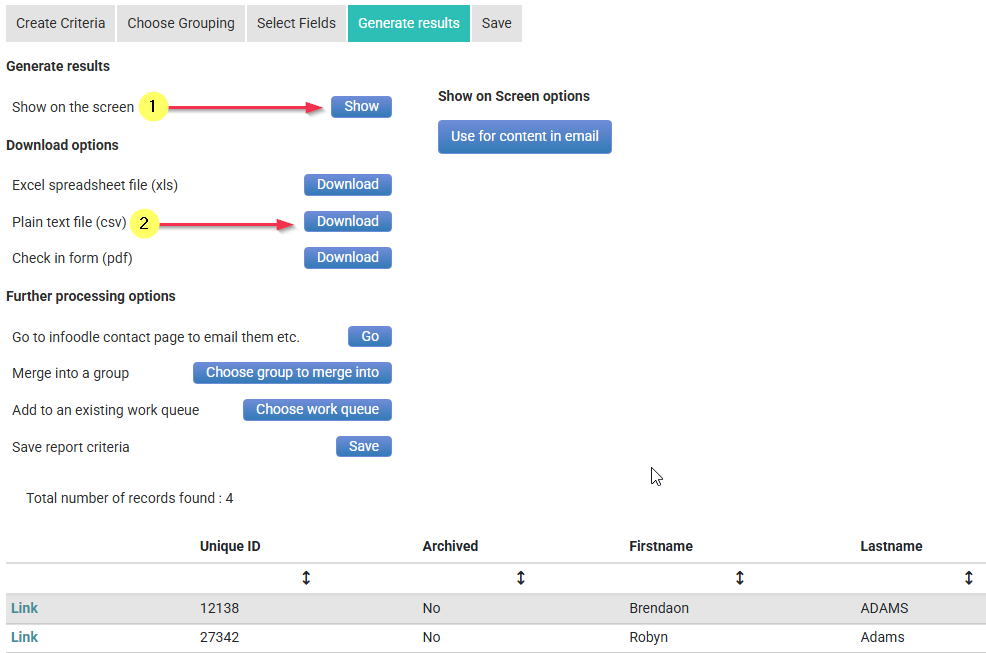
Generate the Report on screen to double check it, then use the option to Download as a CSV file
Step 2: Make changes to the Data File
In your new Report Export CSV file, you can now review the list of contacts and are able to make changes as needed to the list.
Ideally the only changes that you should need to make in this CSV File are:
- Delete Rows: Delete any Row that has a contact you do not want to bulk archive
- Set Archived: In the Archived Column, ensure all rows have a Yes value set
If there are other Bulk changes you wish to include feel free to do so. Once you have made the changes, Save the updated file and then you can import this to carry out the Bulk Archive.
Step 3: Import and Archive
Once the Data file is ready, go to Administration > Data import and start a new People Import. You likely will need to create a new import Template for Bulk Archive if this is the first case, but for later Bulk Archiving you can re-use this import template.
Import Mapping
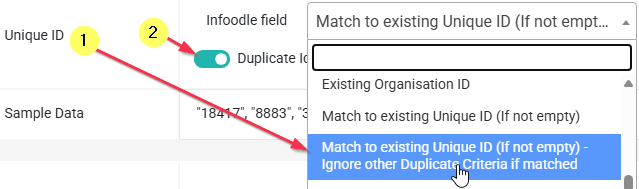
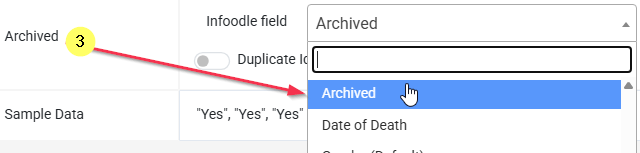
On the import mapping stage, only the Unique ID and Archived fields are required to be mapped, any other fields can be ignored unless they are needed for added bulk updates.
Map the Columns as shown below:
| Unique ID | Archived |
|---|---|
 |
 |
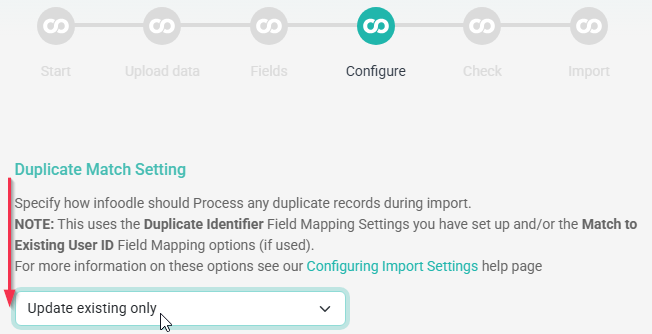
Import Configuration
Ensure that you use the Update Existing Only Duplicate Match Setting
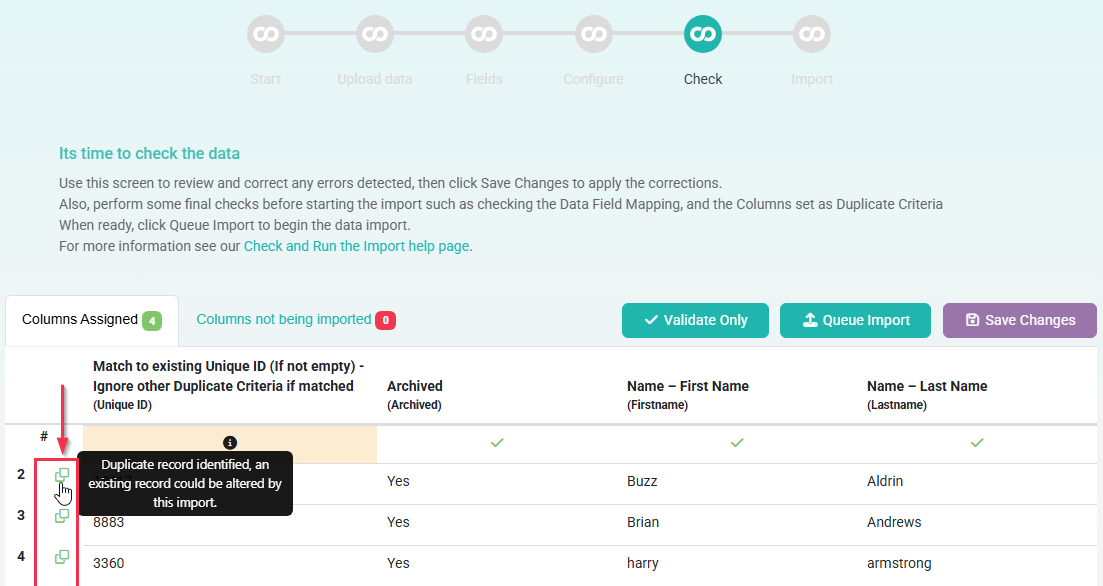
Import Review
On the Import Review Screen, all Records should have the green icon indicating the Import Row has matched to an existing contact in the database. These matched Records will be updated by this import and set as archived. Click Queue Import to set this running.
Once the import has completed, the Updated records will now be archived.
You can use the same process as above with a few small changes in order to Bulk Un-Archive records via Reports Export and Import.
For the Report: Create the Report criteria as usual but include the Archived Equals Yes report criteria so that Only archived records are included in the report results.
For the Import File: In the Archived Column, ensure all rows have a No value set. When the import is completed these contacts will be set as not archived