The Final step before setting the import running is to review the current configuration, as well as check for any errors in the supplied Data or Data Field Mapping.
There are 2 Key tabs available on this page, that can be reviewed:
- Columns Assigned - Contains all Mapped Columns from the Data File
- Columns Not being Imported - Contains all set to be Skipped/Not imported
Be sure to double check both the assigned and not imported tabs, to ensure that you have not missed out on Mapping a field that is required for your import..
Import Review
While the import tool will automatically check and highlight certain errors, it is always advised that you carry out some checks prior to setting the import running.
Suggested Review Checklist
Before queuing the import we recommend the following:
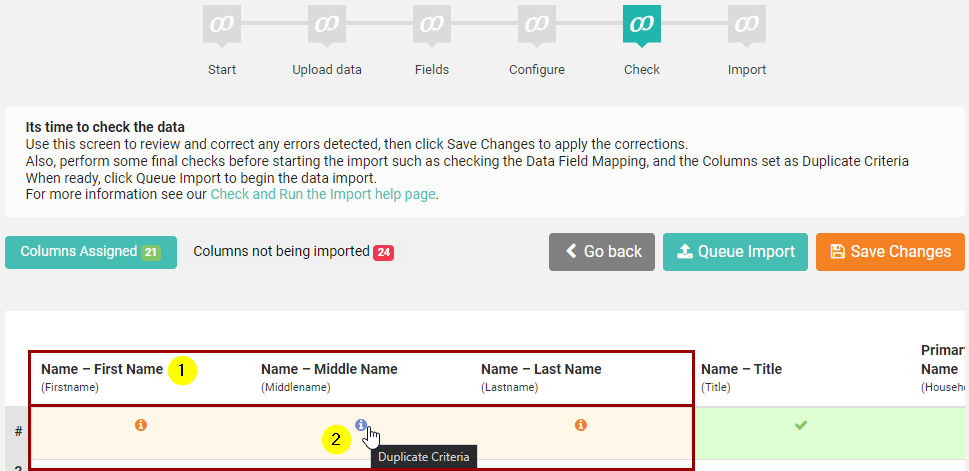
- Review Data Mapping - Check each Data Column, ensuring the infoodle Field Name (Listed in Bold) correctly relates to the Data File Header (Listed Below in Brackets).
- Review Duplicate Criteria - Double-check Duplicate Criteria columns to ensure they are correct. They will have an Orange Background with the info i icon
- Error Correction (If required) - You can review and correct any highlighted errors and then click Save Changes to apply any changes made
For large imports, error correction page by page may not be viable.
A data validation check will run after an import is queued but before data is loaded.
This check will stop an import if errors are detected, and list these for you to review.
Review Duplicate Checking
If your database has existing records, the Check screen will allow you to review if the Duplicate Criteria fields that you configured have matched to an existing record.
- Any Row which has been matched to an existing contact will show the Duplicate icon

- Click this icon to open the Matched record in a New tab, and check if the match is correct.
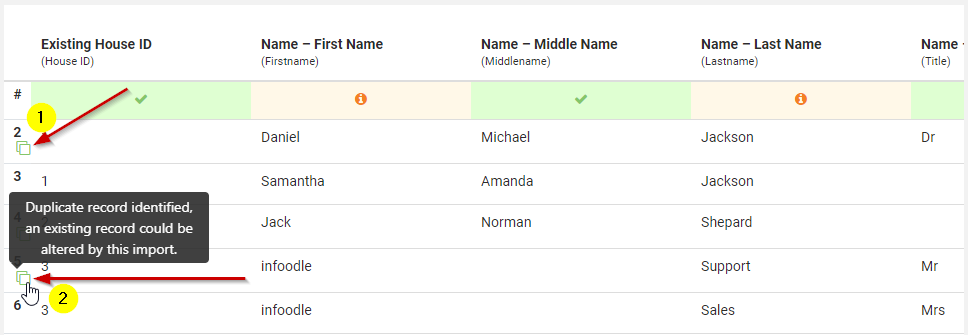
Duplicate Matches are only listed this way when using the Update existing only or Update existing and create new import criteria.
When using to use Create new only the duplicates rows are marked to be Skipped.
When using Always create new there is no Duplicate check performed, each row will always be used to create a new contact record/.
Skipped Data Rows
Depending on the import settings that you have configured, in regards to how Duplicates are managed, you may find that some rows of data might be skipped, and not imported.
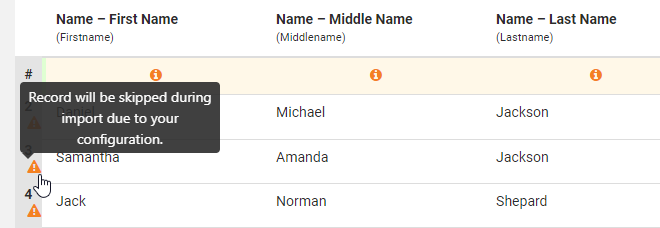
These Data Row Numbers will be flagged with an Orange alert triangle ![]()
Moving the mouse cursor over that icon will give you additional info.
In the example below, were have specified to only Create new only so any rows of Data that have a match to an exisitng contact record will be skipped.
Correcting Errors
The import tool is designed to try and highlight key errors in the data, so that these can be corrected prior to running an import. If Errors are detected, these will be highlighted on the Check Screen with an alert icon ![]()
We advise correcting the errors before you proceed, if feasible.
You can still queue the import to run even if errors are not fixed. However, the import tool will stop an import from processing if there are Data errors detected.
If your data file is very large, and/or you have numerous errors in the data:
In this situation, it may be easier to queue the import without correcting the errors. This will run a Validation Check, and create a list detected errors for you to review; the data will not be uploaded.
You can then correct the listed errors directly in your data file, and start a fresh import with the updated file. A new import will be able to re-use the original Mapping Template that you configured. This means that you won't need re-map the data, unless there have been changes made to the column layout in the corrected data file.
The errors our system can detect are primarily relating to things such as:
- Required/Mandatory Data that is missing (e.g. No First or Last Name)
- Data errors for specific fields (e.g. Email addresses with an invalid format)
- Data not correctly formatted for the Destination Field (e.g. Text for a Date Field)
The Error checking is not able to detect errors within the data itself, if that data is formatted correctly. For Example we cannot detect spelling errors in Names and Text, or information that is missing from a colum, if that data is not for a Mandatory Field.
Review Errors in the Data File
When there is an error in data within your import File, that Column will be flagged with an Organge Alert Triangle, and a Count indicating the number of errors, in that column on the current page.
The Below example shows 3 Data Columns, each having 1 error on this page:
- Existing House ID
- Name - First Name
- Name - Last Name
You can also see that the Errors are indicated within the data itself, with Row #2 in the data having alert icons next to each Data Cell that has the error.
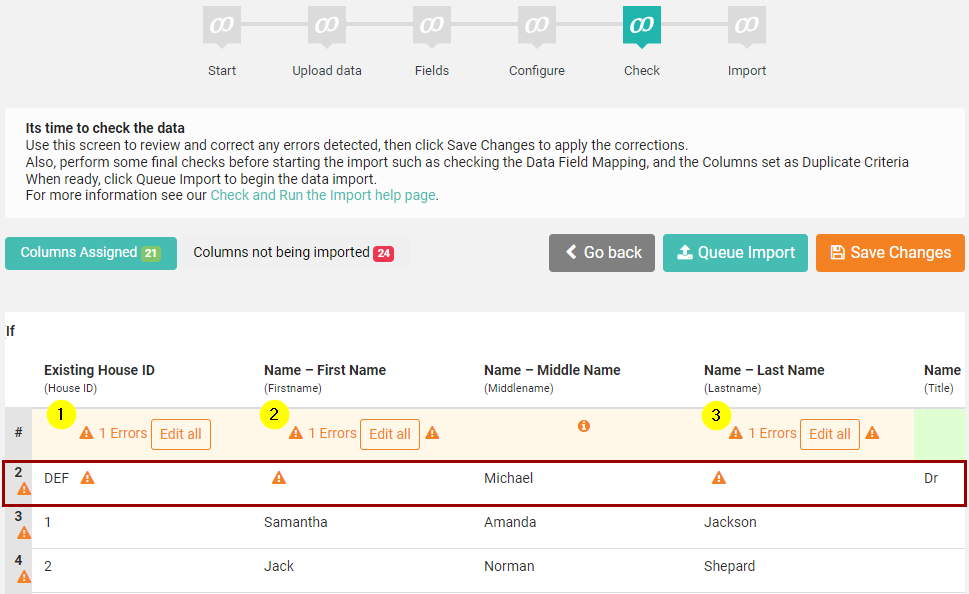
To see the details, move the mouse cursor over the Alert icon, and an error description will appear, advising what corrections are needed.
In the below example, you can see that First Name is mandatory data, but this has not been Provided for that Contact/Row in the data file.

Fix Data File Errors
The Import Check screen allows you to make corrections to the import data as needed, without needing to restart the entire import.
To make changes and correct errors:
- Click on any Data Cell with an error, or use Edit All for that column; then make the corrections to that data
- OPTIONAL: You can also Add or Edit data, even if it is not listed as an error, by clicking on that Data Cell and making changes
- Click on the Save Changes button, any time you wish to apply the current corrections
In the below example, I have added the Mandatory First/Last Names, but also added data to the Title column for 2 records, which was not listed as an error but had previously been blank for Rows 3 and 4 of Data.
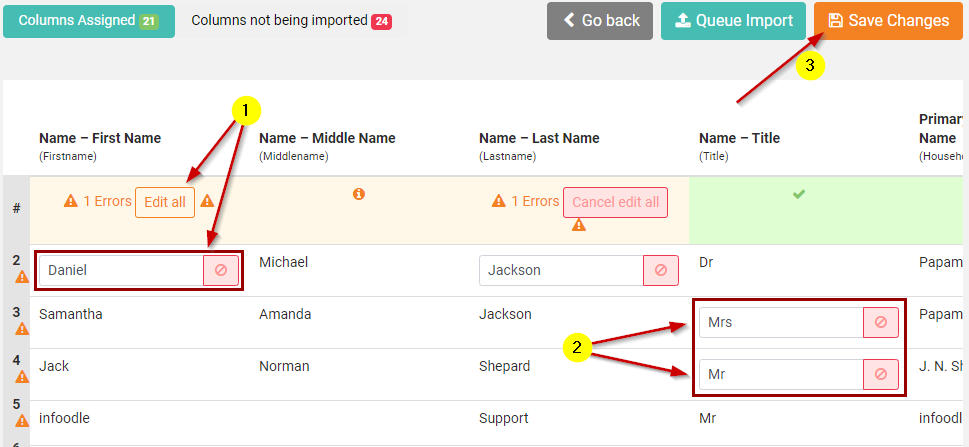
When you have fixed the errors in a Column, the Header will be either:
- Green with a Tick icon - Indicating no errors
- Orange with an i icon - Indicating no errors, but that this is Duplicate Criteria

Mandatory Field Errors
During an import, there are certain fields which are Mandatory and need to be included in the Data File. Most common are ensuring that you have First and Last Names for People Contacts. However, it is possible that your site may also have additional custom fields that have been specified as Mandatory Data Fields.
In many case, these mandatory custom fields may exist in your infoodle database, but not in the Data File you are importing. Alternatively, the column for that field may be present, but this may not have data for all contact rows.
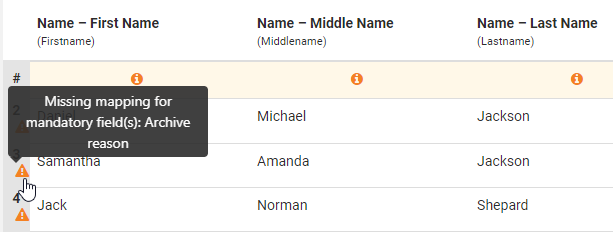
In this situation, there will be an Error alert for any Row in the Data File which will highlight any Mandatory Data fields that are missing. Moving the mouse cursor over that icon will give you additional info.
In the below example, you can see that there are errors for the import because we have not mapped data to the Archive Reason field in the database, which is a mandatory Field.
If Mandatory Field columns are present in the Data File:
Ensure that the data is mapped correctly, and that each row in the file has appropriate data for that field.
If Mandatory Field columns are Not present in the Data File:
If that Mandatory data is necessary for this import, then you will need to add this information to your data Ffile outside of infoodle. This would mean aborting the current import, and restarting a new import with an updated file.
Alternatively, you could temporarily turn off the Mandatory Status for the specified fields.
This would be done via Administration | Custom Fields | Manage Fields.
At this stage of the import, it is save to navigate to another screen, such as the Custom fields screen, as you will be able to resume the import you are currently working on.
Run the Import
Once you have double checked the Import data, and corrected any errors, you will be able to set you data import running. To do this click on the Queue Import Button.

Queuing an import will return you to the Main Import screen, and begin the Data Validation check for your Import. You can review the import progress on this screen.
Note that there will also be an email sent to your user email address once the import has been completed.