In addition to the standard Pledge vs Actual report settings, you now have the ability to configure additional options for the report, either when creating a new PvA report or after loading a previously saved PvA report. The Configuration options give you a more advanced control over what report controls and options will be listed as available, and also what configurations of Custom Field data you want to include in the report purpose options and/or report output data.
Pledge vs Actual Report configurations are a Per Report configuration allowing you to manage the additional settings to use for this specific report, and then save them as part of the report when saving/updating the report template.
These configurations will not be saved per user, or as a site wide configuration.
Each time when creating a new report the default configuration is loaded
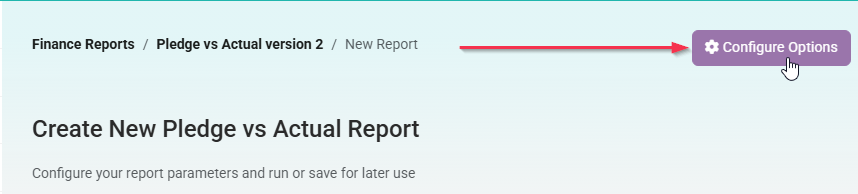
Click the Configure Options button at the top of the screen to view and change configuration
Note that for Report Configurations, any user (that has access to the Finance Reports area) can get to the configuration options screen. The normal permissions restrictions apply when saving these configurations as part of a new report, or for updating an existing report.
Report Controls and Options
Under the Configure Available Report Options you can choose to Show/Hide the various controls available when creating reports as well as configure additional options.
Any user (with access to Finance Reports) can get to the configuration options screen so that they can create a report based on an existing report - however, the permissions apply when saving the report.
Be sure to click the Apply Configuration button at the bottom of the screen to save any changes you have made, or use Reset to Defaults to restore the default configuration.

Date Range Controls:
Its preferrable to include some of these settings. Without any date fields, the report will use the current calendar year.
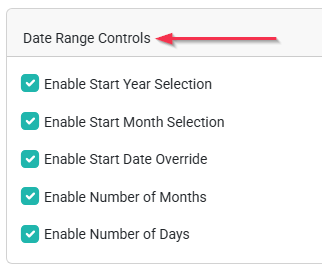
- Start Year - Allows you to specify which year you are starting from
- Start Month - Identifies which month within the start year to start from. All calculations are done on whole months unless using the override option.
- Start Date Override - OPTIONAL - Choose a specific calendar date to start the report from, overriding the "Year/Month" settings
- Number of Months - Allows you to limit or extend the output over many months from the start date/month unless overridden.
- Number of Days - OPTIONAL - Choose a specific number of days for the report output to extend for, overriding the "Number of Months" setting
Filter Controls:
Allows users to determine which aspects they want to filter on. Only enable this if you use them in your site and are useful to the way your data is managed.
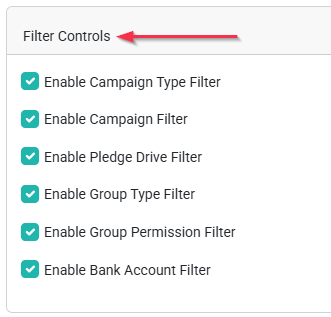
- Campaign Type - If you have configured campaign types - which are collections of campaigns, you can choose to filter the output here to one or more campaign types
- Campaign - Allows you to filter the output to a specific campaign. If using a Campaign Type filter, only campaigns of that type will be listed for selection
- Pledge Drive - If you configure pledge drives which transactions can be tagged to, then you can reduce the output to a specific pledge drive here.
- Group Type - If you have configured groups into group types, which are collections of groups, then you can filter the output to people in specific group types
- Group Membership Filter - Choose to filter between Active members of a Group, or contacts that are Past Members of a group
- Bank Account - Filter data to only financials tied to a specific Bank Account
Report Purpose Controls:
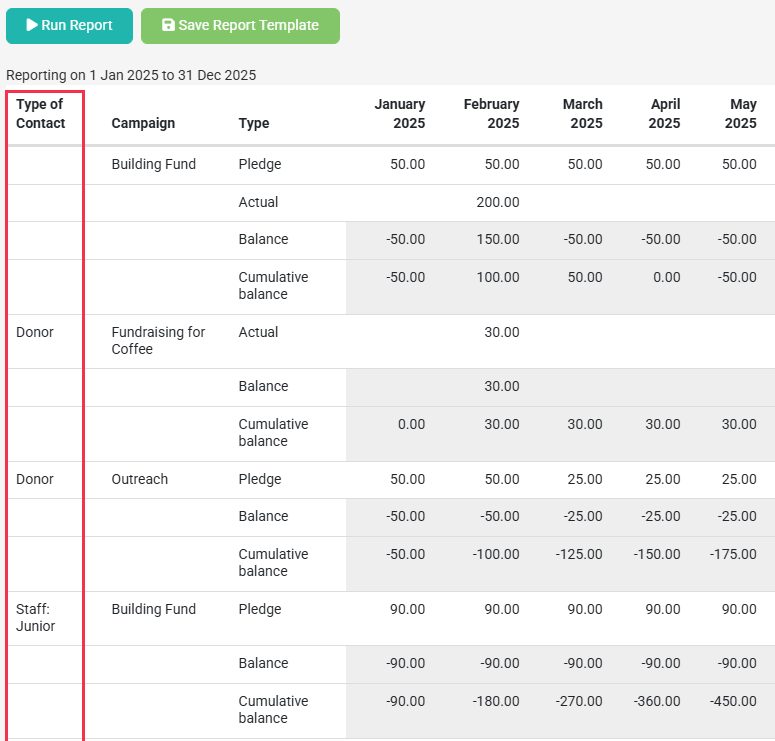
Identifies how the report output will be grouped together.
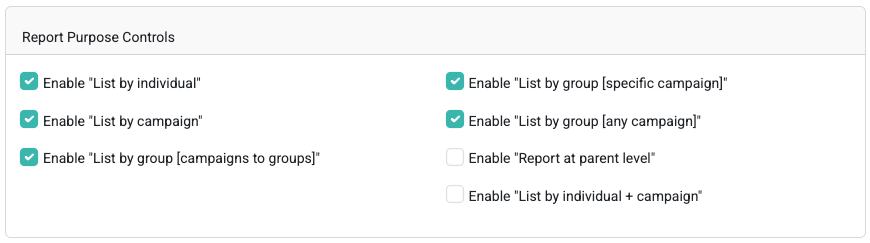
- List by Individual - Show the totals for the individual
- List by Campaign - Show the totals for the campaign
- List by group [campaigns to groups] - Shows totals for each group. Uses only those campaigns that are limited to specific groups.
- List by group [specific campaign] - Shows totals for each group and campaign combination where the campaigns are limited to specific groups.
- List by group [any campaign] - Shows totals for each group and campaign combination regardless of whether the campaigns are limited to specific groups.
- Report at Parent Level - Shows totals for each group found. This can be helpful to create a summarised view for specific groups. Enabling this option will allow you to chose if the report output should show data at the Parent Group Level, or at the Child Group level. This specifically applies only when you are using a Report Purpose option that is listed by group.
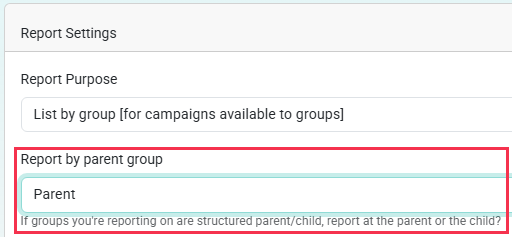
For example, if you use Country groups with child/subgroups for State/Region below each Country, you may want the Report output to be listed at the Country parent group level or listed at the child group level by the State/Region Subgroups.
- Enable List By "individual + campaign"
Breaks the report down by each individual and then for each individual their breakdown by campaign. This can be a long report if you have alot of donors.
Additional Options:
These give some additional choices for the output of your report. Typically the 'enable output options (pledge/actual/balances) would be selected.
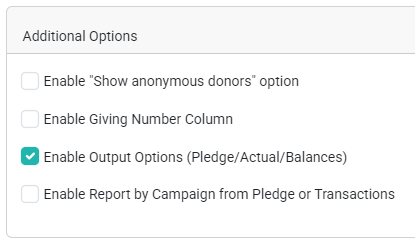
- Show Anonymous Donors - Adds an option to show Anonymous Donors. If you have donors configured to be anonymous, and tick this option, the names of the individuals are replaced with Anonymous. This can be helpful when internal staff are donating to other internal staff and the reports needs to anonymise that. See the Personal Fundraising Settings on the administration screen to use this. Finance Settings
- Giving Number Column - Adds an additional report output column to show Giving Number
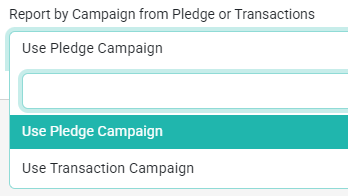
- Enable Report by Campaign from Pledge or Transactions - Adds the Report by Campaign from Pledge or Transactions option to the report filter options. This allows you to choose whether the Campaign allocated against the Pledge, or the Campaign allocated to the Transaction should be used when showing the Actuals.
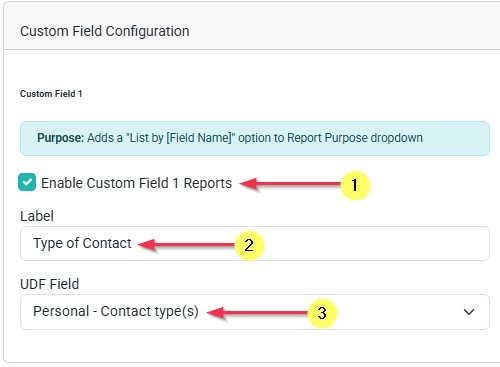
Custom Field Configuration
The Custom Field Configuration section allows you to add up to three of your Custom fields which will be included in the reports generated with this configuration.

Enabling Custom Fields
For any of the Custom field options, simply tick the box to enable this custom field, enter a relevant label to be used in display, and then select the relevant Custom field from your list of available custom fields.
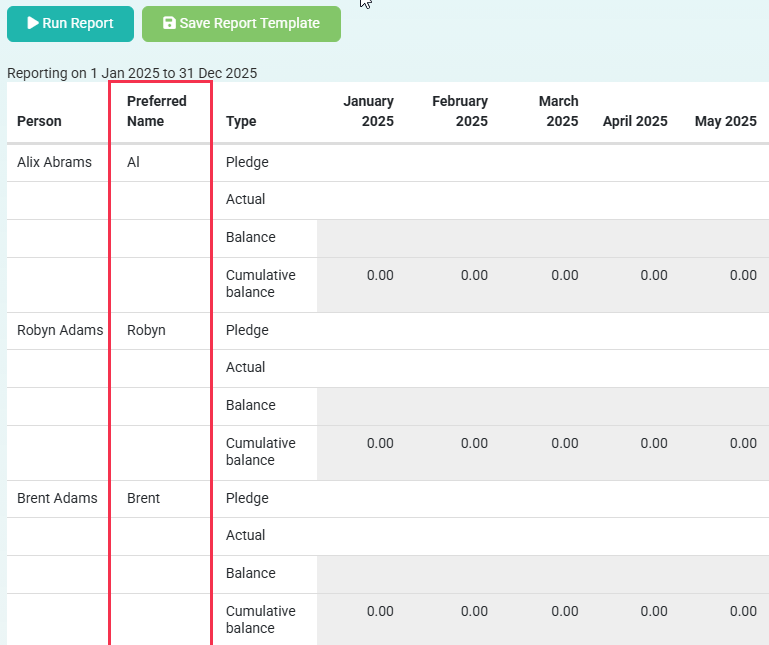
Below is an example of the output when the Preferred Name that has been added.
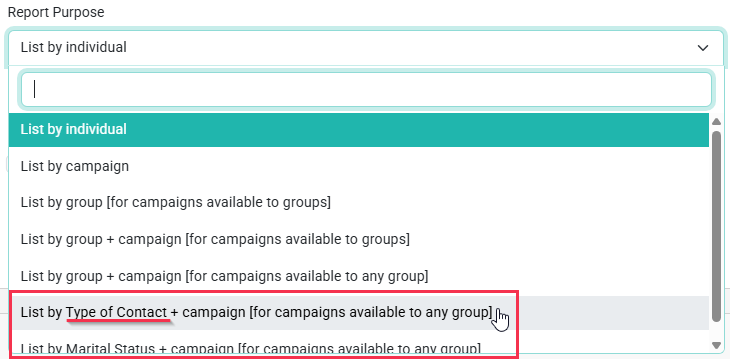
Custom List By Fields
As well as the break downs by Individual, Campaign etc, you can select up to two custom fields that can be used to break the report down by.
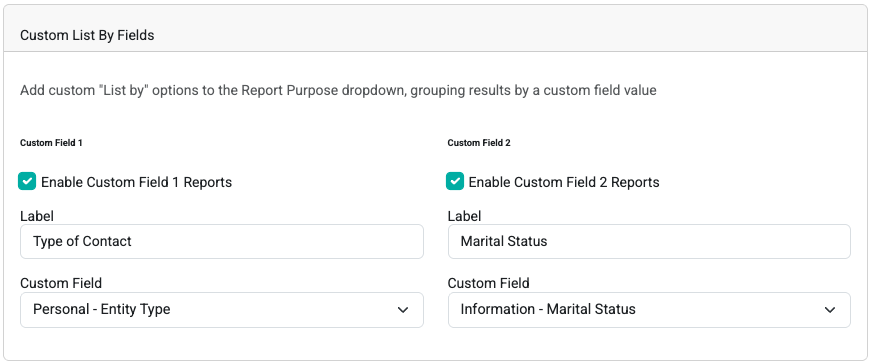
These appear in the Report Purpose field as new options.
In the report Output, the Selected field shows as an additional Column in the output and the data is grouped by the Value in that field, then by the Campaigns