The Donor Statements page lets you filter down to a list of contacts who have matching transactions or pledges in a chosen period. Once that list is on screen, you can fine-tune exactly who receives a statement using the checkboxes beside each name — ticking or unticking individuals before you print or email.
For example: your group filter returns 20 donors — uncheck 3 of them and only the remaining 17 receive a statement.
Before you start
- You need the Finance Admin permission to access Finance → Statements.
- You need at least one Statement Template. If you don't have one yet, see Adding a Receipt
Step 1 — Set your filters
- Click Finance in the navigation menu, then click Donor Statements. Then you will see this page:
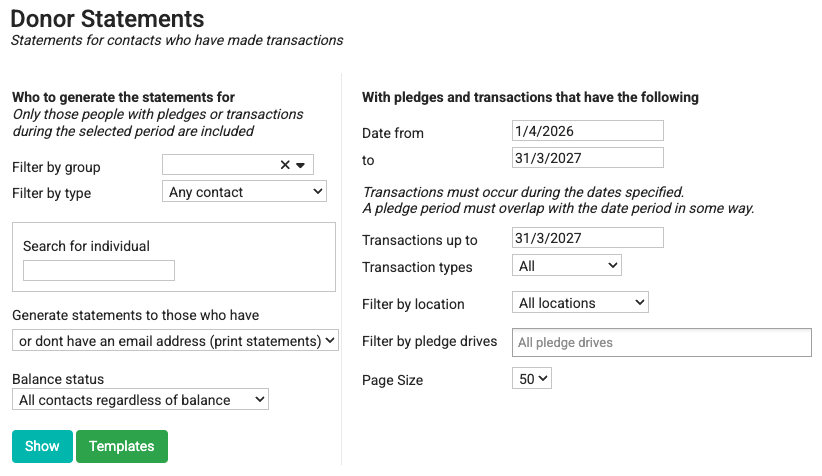
- Under Who to generate the statements for, set any of the following:
| Filter | What it does |
|---|---|
| Filter by group | Limits results to contacts in a chosen group |
| Filter by type | Limits to Any contact, Organisation Contact, or Individual Contact |
| Search for individual | Targets a single specific contact |
| Generate statements to those who have | Choose: an active email address (email statements), no active email address (print statements), or don't have an email address (print statements) — this is the most common way to split your print run from your email run |
| Balance status | Choose: All contacts regardless of balance, All pledges paid (Zero Balance), Pledges have not been fully paid, or More has been received than pledged |
- Under With pledges and transactions that have the following, set:
| Filter | What it does |
|---|---|
| Date from / to | Transactions must fall within these dates; pledge periods only need to overlap |
| Transactions up to | Only include transactions up to this date. This is intended to mark the date you have completed your reconciliation checks |
| Transaction types | All, Account code, Stock, Membership, or Campaign |
| Filter by location | Narrows to a specific location |
| Filter by pledge drives | Narrows to a specific pledge drive |
| Page Size | How many contacts to show per page |
- Click Show.
Step 2 — Review and adjust your selection
When the results appear, every contact is ticked by default — infoodle assumes you want to include everyone who matched your filters.
- To exclude someone, click their checkbox to untick it. They will be skipped when you print or email.
- To include them again, click the checkbox to tick it.
- To select or deselect everyone on the current page, click the checkbox in the column header at the top of the list.
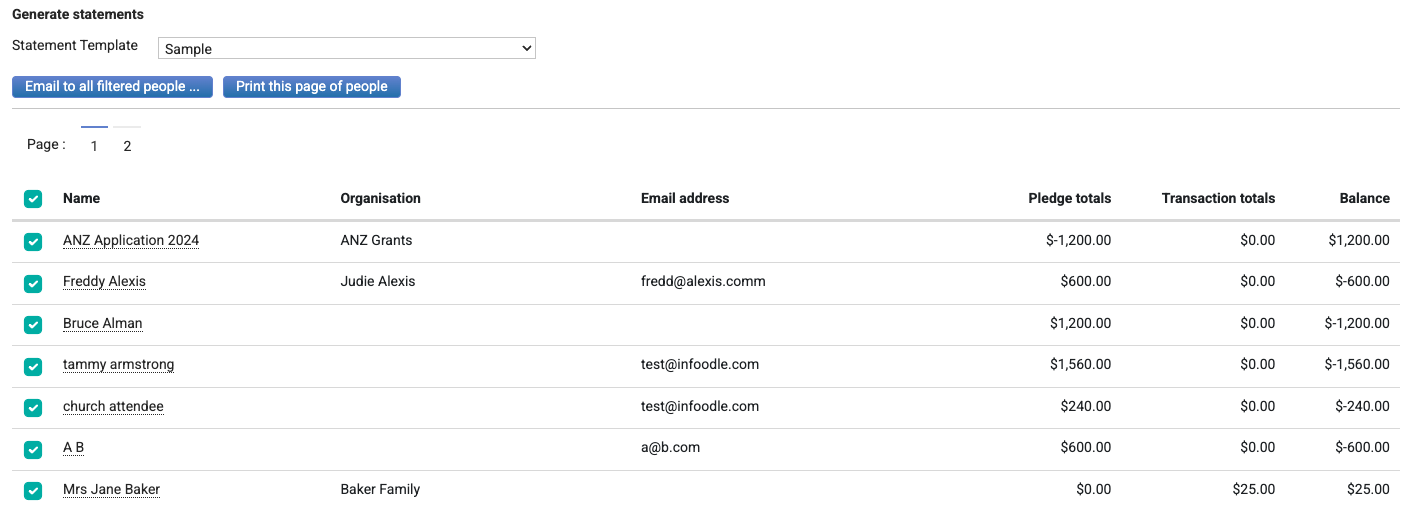
Note: Selections apply to the current page only and are remembered while you stay on that page. If your results span multiple pages, navigate to each page to adjust the selection there.
Step 3 — Generate statements for your selection
Once you're happy with who is ticked, scroll down to the Generate statements section.
- Choose a Statement Template from the dropdown.
- Then choose one of two actions:
Click Print this page of people to download a single combined PDF containing a statement for each ticked contact on this page.
Click Email to all filtered people to open the email setup panel. From here:
- Use an existing template - select a Designer, Mailchimp, or Basic email template from the dropdown. Click Review your templates here to manage your templates.
- Or click Create new Basic email to compose a new email from scratch.
The statement PDF will be automatically attached to the email for each recipient.
- Click Send.

Note: Unticked contacts are skipped in both the print and email actions.
Tips
Splitting print from email in one session
Use the Generate statements to those who have filter to separate the two audiences before you click Show:
- Run once set to an active email address (email statements) — adjust the selection and email them.
- Run again set to no active email address (print statements) — adjust the selection and download the PDF.
Using balance status to target specific donors
The Balance status filter is a quick way to focus your run:
- Pledges have not been fully paid — useful for following up donors who are behind on a pledge.
- All pledges paid (Zero Balance) — useful for sending a thank-you summary to donors who have completed their commitment.
- More has been received than pledged — catches donors who have given above their pledge, worth acknowledging.
Large lists
Increase the Page Size to show more contacts per page, reducing the number of pages you need to work through.
Filtering vs selecting
The filters are your broad tool — use them to define the right audience. The checkboxes are for last-minute adjustments once you can see the actual list. If you find yourself unticking the same people every run, it is worth reviewing whether your group membership or filter settings can exclude them automatically instead.