Before you can start a check-in, make sure you have done the following:
- Setup the check-in logins - Set up Check-in Logins
- Added groups to the attendees list of an event - Set up an Event to Use Check-in
- Configured the label server (if required) - Install and Set up Label Server
- Setup the label formats (if required) - Configure Check-in Labels
Great! You are ready to start a check in!
Now work through the steps below:
1. Log in
In your browser - go to your normal infoodle site - e.g. https://demo.infoodle.com and log in with your CHECK IN user details (not your regular login if you already have one).
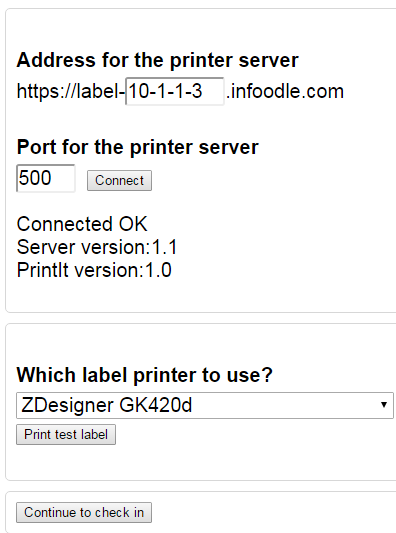
2. Choose Labels
You should be presented with a screen asking you about labels

Select No to switch it to Yes. You are then prompted for the details about the label server.
These details should default, but otherwise you need to complete them and select Connect. Once done, you are presented with a list of available printers. Choose which printer you want to use for this terminal and select Continue with check-in.
If you don't want labels select Continue
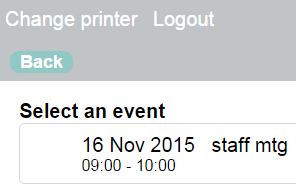
3. Choose an Event
You can check-in for only one event at each terminal. Select the event you want to check in from the list provided. If you don't see any events, make sure the event is correctly setup in infoodle. The Check-in only lists events that are on today.
4. Choose a group
You are now presented with a list of groups that you are able to check-in. Note that the groups must be on the Attendees list of the event, and they must be in your check-in login.
You can check-in one or more groups at this terminal.
You can set a capacity for each group that is used in the check-in. The group will be highlighted in yellow when the capacity is reached but it won't stop you from checking more people in. This capacity is remembered for next time.
You can re-order the groups by clicking and dragging the bars on the left. This order is used to present the groups to the users during check in.
Once you select a group - you are asked more questions.
a) Choose which labels to print, and what elements to output.
If you have selected to print labels - you are asked to specify how you want the labels. Click 'change' to see and adjust the settings.
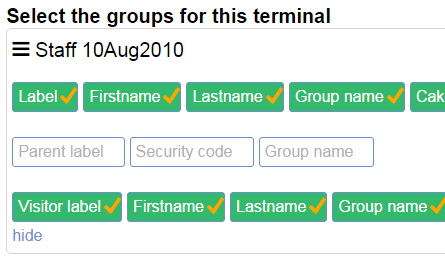
The items in the boxes are determined by the setup of the labels. Click 'label', 'parent label', 'visitor label' if you want them printed for this group - then tick the elements you want.
These settings are remembered for this group next time you have an event with this group.
5. Check-in Settings

Exclude those younger / older - this will ensure that the list of people found in any search are limited by age. In general you don't need these - but can be useful if you are likely to be adding people who are not listed in your groups.
Show birthdays in the past - for a weekly event, set this to 7 and people who had their birthday 7 days in the past will have a cake shown on their label, assuming you have that setting.
Setting within the event - if you have a single event with multiple separate sessions, you can choose which session you are running here.
Terminal lock pin code - this is a special code to unlock this specific device should you decide to lock the screen from admin functions (such as adding visitors, running reports, changing label printers).
Visitor lock pin code: - set a PIN number that visitors can use to unlock the terminal and log themselves in as a visitor.
Sort order: - names can be listed either as first name then last name, or, last name and first name order
6. Choose a Check-in Method
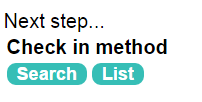
You can check people in using different methods:
Search. People need to search for their surname to check themselves in
List. Everyone in the group is listed on the screen and you just tick who is attending.
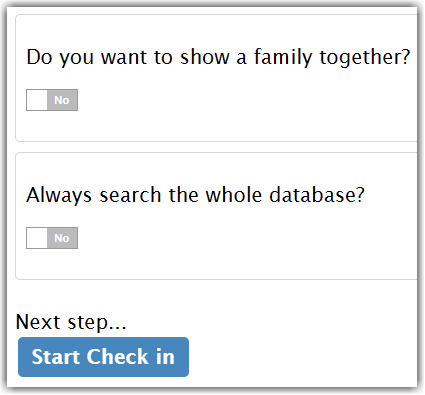
If you chose Search, you are asked if you want to do a family check-in. This will list all family members beside the person searched for, and the family can check themselves in together. If you choose No the people in the group found in the search are listed separately.
Additionally, you're also presented with the option to Always search the whole database - the default is No. If this option is set to Yes the results may take longer to display. Only select this option if the contacts to be checked-in exist in the database but are not found when the option is set to No.
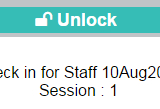
7. Lock Screen
Once you have chosen these options - and clicked Start check-in you are presented with the check-in screen. At the top of the screen is the list of admin options - and a padlock - which locks the screen. It's recommended you select this.
You are also shown the event, list of groups being checked-in at this terminal, and the session you are running.
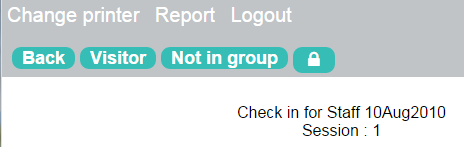
Once the padlock is selected you are reminded of the lock code, and the screen is locked.
If people come to an event and they are not in the attendees list, they can be added as a visitor. Learn how to do this here. If they are in your database, but not the group/s listed click here.