Overview of Merge Tags in the Email Designer
When you open the Email Designer, you will start with only a single column content row in the Design Window. In order to be able to use Merge Tags, you must first add in an appropriate contact block.
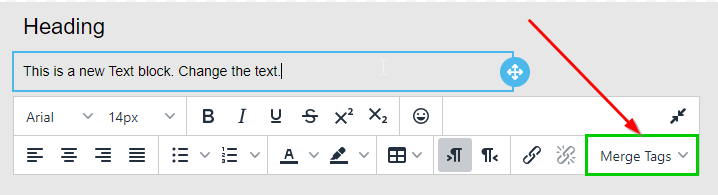
There are two different Contact block types that allow you to add merge tags: Heading and Text.
Here you can see an example with these two blocks added to the design by dragging and dropping from the Content Panel.
When you click on a Heading or Text content block to edit it, you will see the Text Toolbar appear. To access the list of merge tags that are available to you, click the Merge Tags dropdown menu at the right hand side of this toolbar.
Below you can see the Merge Tag dropdown menu expaned to list the different Headings.
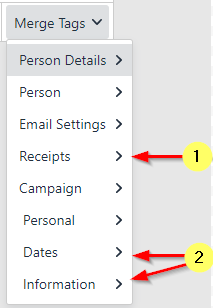
Note: You will only see the Receipts merge tag heading (1) if you have the Finance Package on your site, and you have access to the Finance area.
The Dates and Information merge tag headings (2) may display with a different name, or not display at all. This is because the Profile Tabs that these are linked to are customisable and so can be re-named or deleted as required .
As you create new custom profile tabs for managing data, you will see corresponding merge tag headings appear at the bottom of this list.
If you have a larger number of Headings in the list, then the dropdown menu will have a scroll bar on the right hand side. You can use this to navingate the list, or you can use the scroll wheel on your mouse to navigate if you wish.
Adding Merge Tags to email content from the Toolbar
Adding in a merge tag to your email can be done in a few simple clicks
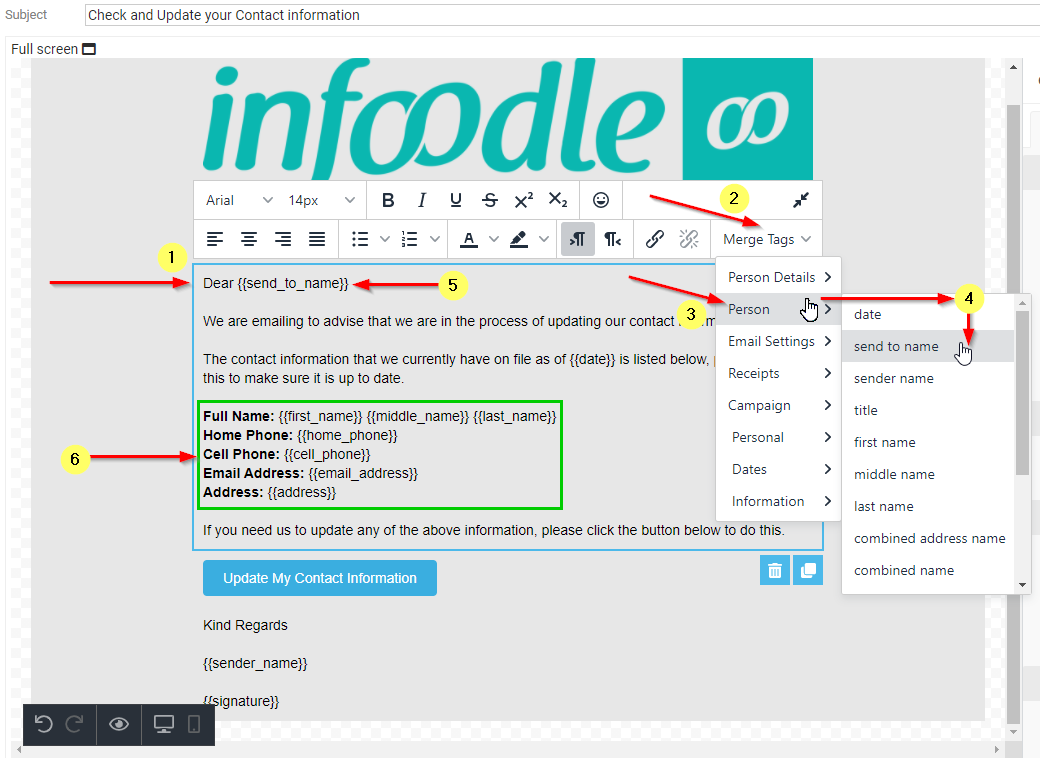
- Click on the Content block you wish to add merge Tags to, and click the section in the text where you want to insert that merge tag
- On the Text Toolbar, click on the Merge Tag menu icon to expand the dropdown menu
- As you move you mouse over the Headings, you will see the Available merge tags for that heading appear as a side menu
- Move your cursor accross to the side menu, then down and click on the merge tag that you want to add from the list
- Merge tags will be added in on the left side of where your cursor is currently located in the content block
- In the below example, you can see we have used many different merge tags as part of an "Update Your Information" email.
Adding Merge Tags using the search function
Another option for adding merge tags in the designer (if you are familiar enough with them) is to use the search function.
When you are typing in a text content block, you can add in a curly bracket { then start typing to trigger a search for a merge tag.
In this case, because the Email Designer doesn't automatically add in a signature merge tag we can type {sig to search for it (1).
As we type after the bracket, the search window will pop up, and automatically filter down options based on what text is entered; you can then click the desired tag to add it in (2).
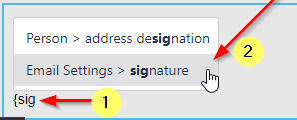
Note that the results are listed in the format Merge Tag Heading > Merge Tag Name and the searched for text will be highlighted in bold.
If no results are diplayed, then a match to your query hasn't been found.
Here is what the example email that we have sent will look like when the recipient opens it.
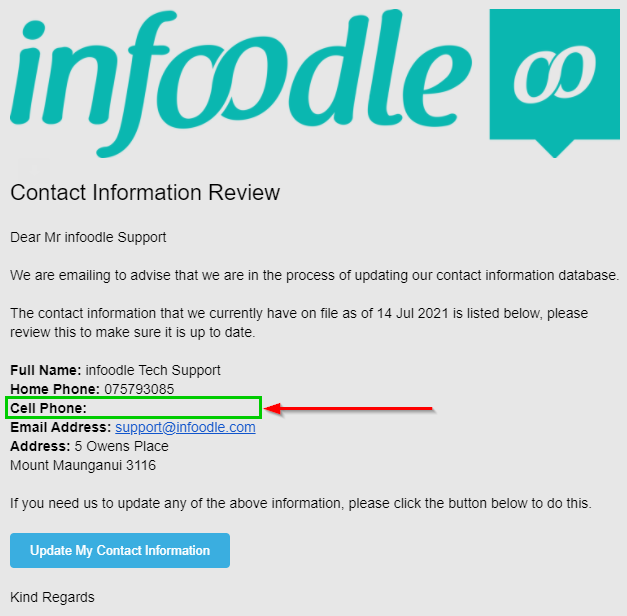
Note that this particular recipient does not have a Cell Phone number listed on their Profile page.
As a result, the {cell_phone} merge tag has simply left a blank space in the email.
When you insert the {email_address} tag to insert the contact's email, and if the contact has more than one active email address, then all of those addresses will be inserted into the email.
To insert only the address being used for this email, use this tag instead: {{address.email}}. This tag is not included in the list of merge tags and will need to be manually added.
If you are sending an email to all of the contact's active email addresses, then each email will display only the email address for this email.
Click here for information on Using Merge Tags in the Basic Email.