The Templates screen is where you create, edit, duplicate, delete, and organise the email templates available on your site. A template stores a subject line and email body that you (or anyone else, if the template is Global) can reuse whenever you send an email, respond to a form, or send an email step in a workflow. This article covers managing templates from the Templates screen itself. For how to pick up an existing template while composing an email, see Using Email Templates.
Role Permissions
- Contact people (needed to open the Contact area)
- Contact people by email (needed to see the Templates screen and the rest of the Email section)
- Maintain common templates (only needed to create, edit, or delete Global templates and categories; not required for your own Private templates)
For a full list of role permissions and what they mean, see People role permissions.
The Templates screen
Open the Templates screen by clicking or hovering on Contact on the main menu on the left, then Templates under the Email section.
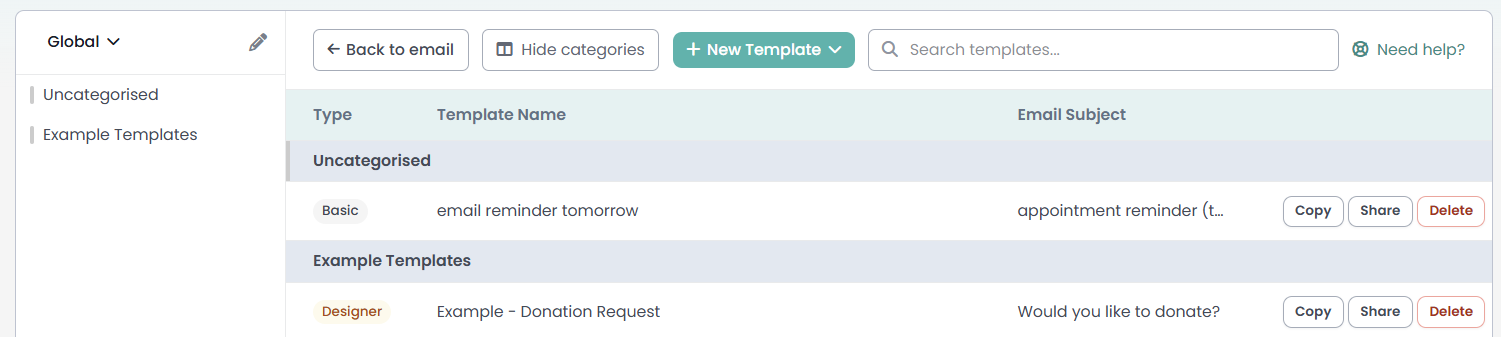
The screen has three parts:
- Global/Private switch: at the top of the category panel, this switches between your Global templates (shared with everyone on your site) and your Private templates (visible only to you).
- Category panel: lists your template categories. Every site starts with a single Uncategorised bucket; categories you create appear below it. Click a category to jump to it in the template list.
- Template list: your saved templates, grouped by category and sorted alphabetically within each category. Each row shows the template's type (Basic, Designer, or Mailchimp), its name and email subject, and a Copy, Share, and Delete action for that template. Share emails the template to someone at another infoodle site, with a token they use to add their own copy of it to their templates; see Sharing a template for the full steps. A row also shows a lightning bolt icon if the template is used in a workflow, and a dollar icon if it is set up as a receipt template.
Use the search box above the template list to find a template by name. It searches both your Global and Private lists but only matches on template name, not email subject.
![]()
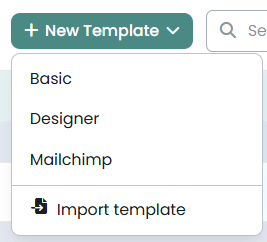
Creating a template
Click New Template and choose Basic, Designer, or Mailchimp, or choose Import template to bring one in from a file. This opens the same compose screen you would use to send a one-off email.
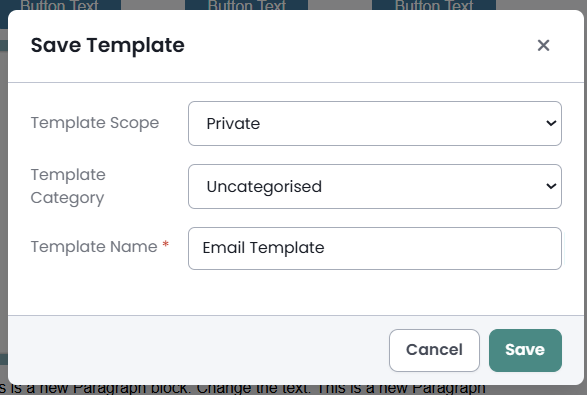
Fill in the subject and email body as you would for any email, then click Save as Template. A dialog opens for you to set:
- Template Scope: Private (only you can use it) or Global (everyone on your site can use it). Setting a template to Global requires Maintain common templates.
- Template Category: the category the template will appear under. Defaults to Uncategorised.
- Template Name: the name shown in the template list. This is separate from the email subject.
Editing a template
Click any template in the list to open it in the same compose screen. The Template field at the top confirms which template is loaded. Make your changes and click Save as Template again to update it.
Only users with Maintain common templates can edit a Global template and keep it Global. If you edit a Global template without that permission, infoodle saves your changes as a new Private copy instead of overwriting the original.
Duplicating a template
Click Copy on a template's row to create a duplicate. The copy appears immediately, with "- Copy" added to its name, no confirmation prompt needed. Everything about the original carries over to the copy, subject, body, attachments, category, and receipt settings, except its link to a workflow: a duplicated template is never itself attached to a workflow step, even if the original was.
The scope of the copy depends on your permissions: copying your own template keeps the same scope it already had. Copying a Global template without Maintain common templates gives you a Private copy instead.
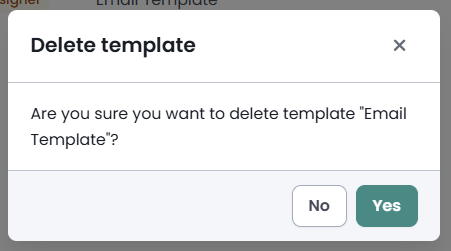
Deleting a template
Click Delete on a template's row. A confirmation dialog asks you to confirm before the template is removed from the list.
Deleting a template removes it from the list, but does not stop it from being used. If a workflow step already points at this template, the workflow keeps sending that template's saved content with no error or warning, since deleting a template does not check whether anything is using it. Check the lightning bolt icon in the template list before deleting; if a workflow uses the template, edit that workflow's email step to point at a different template, either before or after you delete this one.
Organising templates into categories
Click Edit Categories to switch the category panel into edit mode.
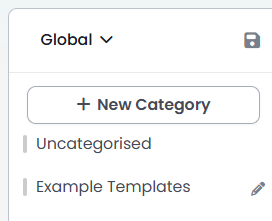
From this mode you can:
- Create a category: click New Category, then set a name and colour in the Maintain Category dialog.
- Edit a category: click the pencil icon next to a category to rename it or change its colour.
- Reorder categories: drag a category in the panel to change its position in the list.
- Move a template to a different category: drag the template using the handle on the left of its row and drop it onto the category you want to move it to.
Click the save icon at the top of the category panel when you are finished, to leave Edit Categories mode.
Common questions
Does deleting a template stop a workflow from using it?
No. Deleting a template only removes it from your Templates list. If a workflow step already points at that template, it keeps sending the same saved content indefinitely, with no error and no warning, since infoodle does not check whether a template is in use before letting you delete it. This is easy to miss because the deleted template no longer appears anywhere in the Templates screen for you to check what it contained. If you want a workflow to send something different, edit that workflow's email step and choose a new template, either before or after you delete the old one. Deleting the template by itself will not change what the workflow sends.
Can a deleted template be restored?
There is no restore button in the Templates screen. Contact infoodle support if you have deleted a template you need back.
Who can create or edit a Global template?
Anyone with the Maintain common templates role permission. Without it, you can still use Global templates, but any template you save is kept Private to you.
What happens to templates in a category I delete?
They move to Uncategorised. Deleting a category never deletes the templates inside it.
Can I delete a category that was set up when my data was imported?
No. Categories brought in as part of a data import cannot be deleted.
Does the "Copy" action ask me to confirm?
No. Copy creates the duplicate immediately, unlike Delete, which asks you to confirm first.
Next steps
Once you have templates set up the way you want, see Using Email Templates for how to apply one when sending an email, responding to a form, or setting up a workflow step.