When generating your receipts(or statements), you will need to tell infoodle what text and data to include on the receipt(or statement). This process is done by setting up a receipt(or statement) template and then directing infoodle to use that template.
The steps to setting up a receipt or statement template are the same. Here's how:
- Click Finance on the Navigation Menu.
- Click Receipts or Statements (depending on which template you are setting up).
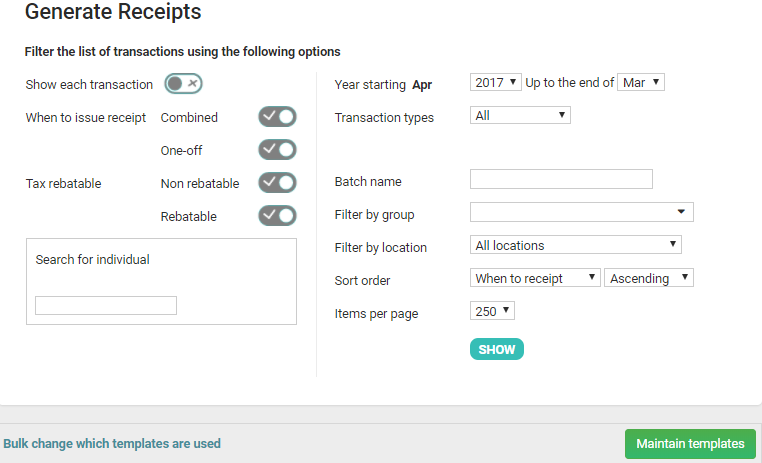
- Click Maintain templates (if setting up a Receipt template) or Templates (if setting up a statement template).
- Choose Receipt templates or Statement templates.
- You will need to add a design first before adding the receipt or statement template. A design is a PDF that you can prepare in advance and upload to infoodle to be used with either a receipt template or a statement template. A design is required (and needs to be set up first before setting up the receipt or statement template) as the design acts as the background layout and sets your margins for your receipt or statement template. Click here to find out how to do this.
- The Bulk Update Designs button allows you to change the designs for more than one template at a time. Click here for more information.
- To create a new template click Add.
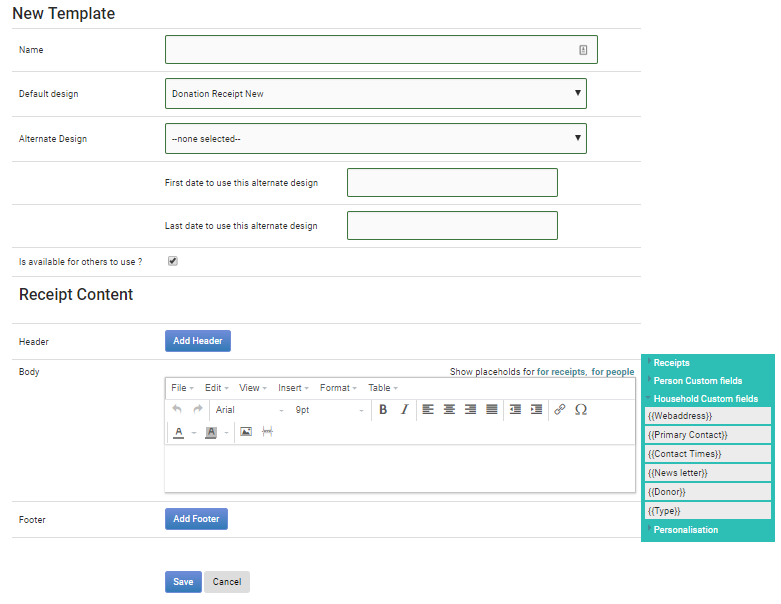
- Enter a Name for your receipt template.
- Select a Default design. A design is a PDF that you can prepare in advance and upload to infoodle to be used with either a receipt template or a statement template. A design is required (and needs to be set up first before setting up the receipt or statement template) as the design acts as the background layout and sets your margins for your receipt or statement template. If you have not yet loaded a design then click here to find out how to add a design.
- Select an Alternate design. This is optional and is a way that you can have a different design for your receipt which can be used during a specified time period - e.g. you can have a design for a Christmas appeal which you prepare and schedule in November which is only active during December.
- Select the First date to use this alternate design and Last date to use this alternate design if applicable.
- Tick the box to make this available to other users. If you do not tick this box then only you will be able to see this receipt template to edit or use to generate receipts.
- Add a Header if applicable. This will appear at the top of the page based on the Design you have setup. You can either add your logo, header and or footer in the design or you can add it here in the header. If you choose to add your logo, header or footer to the receipt (or statement) templates and not in the design, then you will still need to add a design because it is required for your margins but then you can just add a blank pdf as your design to set your margins.
The receipt details are determined by the tax authority in your country or state.
New Zealand - details required by the Inland Revenue Department (IRD) can be found here (along with other information): Requirements for creating donation receipts
Australia - if your organisation is designated as a Deductible Gift Recipient (DGR) you can issue receipts to your donors when they provide gifts or contributions. Details of what should be included on the receipt can be found here: Keeping a record of your donation - this is from the perspecitve on the donor but it makes it clear what they need to have from you.
UK - refer to Gift Aid
USA - consult your local tax authorities as to what's required
Other countries - please let us know so we can include a link to those requirements here
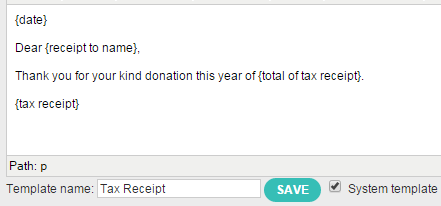
- Add content to the Body content box. To add personalisation fields (mail merge) simply click in the position in the body of the content where you want the personalisation to appear and then click on the personalisation field on the right. You have access to a number of personalisations available on the right hand side, in addition there is a link for Receipts. Click this to show a further list of personalisations that you can use in your receipts. If you wish to use the receipt block personalisations that infoodle has prepared in advance which includes the receipting organisation, receipt number, amounts, transactions and the receiver of the receipt, then you need to ensure that the Finance settings are correctly established. This is done by clicking Administrations | System | Finance. This screen allows you to enter, amongst others things, the charitable number and organisation details.
- Type the content of the receipt ie if you want to say thank you or anything else, and then include the relevant receipting information. You will need to ensure the content contains personalisations so that infoodle knows where to put items such as the amounts and who the receipt is for, etc. Using the personalisations on the right you can ensure that a letter is generated with the person or organisations name, who the receipt is for (receipt to fields), etc.
- Images can be loaded into the template using the image icon in the list of icons. Be aware that they will make the generated files quite large and can slow the process down. The best format is PNG although JPG is acceptable. Its much better to get the size of the image about right before loading into to infoodle rather than taking a large image and shrinking it in infoodle.
- Add a Footer if you wish to. This can be useful if you wish to have a tear off strip at the bottom of your receipts with receipt information. Its position is based on the settings in the design and is locked to the bottom of the page regardless of the content above it.
- Click Save.
- To preview the changes click Receipts to go to the receipts screen. Make sure the new template is selected from the template dropdown and click on Preview alongside one of the receipts waiting to be generated.
Here is an example of a receipt template:
Click here for more receipt template examples.
The process of converting these content pages to a receipt template is complex and there are some limitations to be aware of:
- If you wish to use a table to layout the content more easily, please ensure that all cells only have 1 line in each row. If you have one cell with 3 lines and a cell next to it with 1 it can cause issues.
- Another limitation is that the range of fonts available is fairly limited but you can select the ones from the list, and change the font sizes.
To see how to edit a receipt template click here.
To see how to delete a receipt template click here.