This article covers the auto-approval settings on the Approval tab. For manual approval settings on the same tab, see Form Manual Approval Workflows and Form Entry Deletion Settings.
What is auto-approval?
Auto-approval lets infoodle process incoming form entries automatically — creating or updating a contact record, adding them to groups, and triggering workflows — without anyone needing to manually approve each entry. This is especially useful for high-volume registration or sign-up forms.
Before you start
Before setting up auto-approval, make sure you have:
- Admin access to the form builder (Forms menu)
- The form already built and saved — see Adding a Form
- At least one email address field or Person Safe ID field included in the form (auto-approval requires one of these to match against existing contacts)
- Any workflows you plan to trigger already created — see Workflow Triggers
Auto-approval is only available on forms that contain a single person field. Forms that include a Repeating People Block do not support auto-approval.
Step 1: Open the Form
- Go to Forms and click the form you want to configure, then click Edit.
- Click the Approval tab inside the form builder.

Step 2: Enable Auto-Approval
Set Auto approve form entries where possible to Yes.
If you see this warning:
"Auto approve feature unable — This form does not permit auto approval because no email address OR person safe id field found"

infoodle requires at least one of the following fields in the form before auto-approval can work:
- An email address field, or
- A Person Safe ID field
Go to the Build tab, add one of these fields, then return to the Approval tab to continue.
Step 3: Enable Auto-Approval

Under Auto approved by user, search for and select the person who should be recorded as the approver when entries are automatically processed.
If no one is selected, infoodle will use the person who created the form.
Step 4: Configure each match scenario
infoodle uses the email address or Person Safe ID in the form entry to search for existing contacts. Based on what it finds, one of three scenarios applies. Configure each scenario below.
- Scenario 1 - No match found (new contact)
- Scenario 2 - Exact match found (existing contact)
- Scenario 3 - Multiple matches found
Scenario 1 — No match found (new contact)
This applies when infoodle cannot find any existing contact matching the form entry.
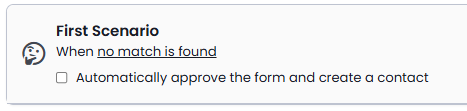
Action:
Tick Automatically approve the form and create a contact if you want infoodle to create a new contact record from the entry.
Workflows:
Select any workflows that should run when a new contact is created. Only workflows with the "When a person is added" trigger will appear in the list.

Click + Add Workflow to add workflows, and drag to reorder them.
Scenario 2 — Exact match found (existing contact)
This applies when infoodle finds exactly one existing contact matching the form entry.
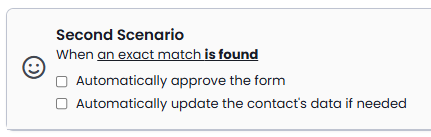
Action:
You have two independent options — tick either or both:
- Automatically approve the form — approves the entry without manual review
- Automatically update the contact's data if needed — overwrites the existing contact's fields with data from the form entry
Person's Data Fields:

Any form field that should update the existing contact's record must be listed here. Click + Select field to add each relevant field — including group fields.
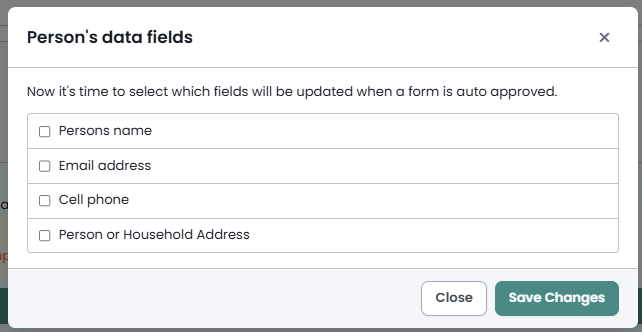
If a form field is left blank by the submitter, infoodle will update that field on the contact with an empty value — it will not preserve the contact's existing value. Only add fields here that the form will reliably capture.
This is the most common reason auto-approval doesn't update existing contacts correctly. Any field not listed here will be ignored for existing matched contacts.
Workflows:
Select any workflows that should run when an existing contact is updated. Only workflows with the "Manually, from the Person or Form Approval Screen" trigger will appear in the list.

Click + Add Workflow to add workflows, and drag to reorder them.
Scenario 3 — Multiple matches found
This applies when infoodle finds two or more existing contacts matching the form entry — for example, when duplicate contacts share the same email address.
No action can be taken automatically. The entry will always require manual approval and no workflows can be run.
See more info below under Understanding "No Auto Approval Action Taken" emails
Notifications:
Under Notify internal users or groups when form is submitted and no auto-approval action taken, search for and select the internal user or group who should be alerted when an entry can't be auto-approved.
Select an internal group only (e.g. staff). Do not select a community group.
If you are receiving frequent notifications for this scenario, check your database for duplicate contacts sharing the same email address. Resolving duplicates will allow those entries to auto-approve correctly.
Step 5: Save and publish
Click Save to apply your settings, then go to the Publish tab to push your changes to the live form.
Sending an email when a form is auto-approved
The form's Email Response tab sends a confirmation to the submitter at the point of submission — it does not wait for approval. To send an email specifically when the entry is approved:
- Create an email template — go to Contacts → Email and save the email as a Template
- Create a workflow — in Administration → Workflows, build a workflow with a Send Email step that uses your template
- Attach the workflow to this form — on the Approval tab, add the workflow to the relevant scenario's workflow list
Understanding "No Auto Approval Action Taken" emails
These alert emails are triggered by Scenario 3 — when an entry cannot be automatically processed because multiple contacts match. They are sent to the user or group configured in the Scenario 3 notification setting above.
These alerts cannot be turned off individually. They exist specifically to flag entries that need manual attention.
If you are receiving too many:
- Check for duplicate contacts — the most common cause. Resolve duplicates and the alerts will stop for those submitters
- Review your matching field — if the field is not reliably unique, consider switching to Person Safe ID
- Disable auto-approval if it is not needed — all entries will go through manual approval with no alert emails
Troubleshooting
| Symptom | Likely cause | Fix |
|---|---|---|
| "Auto approve feature unable" warning shown | Form has no email or Person Safe ID field | Add an email or Person Safe ID field on the Build tab |
| Existing contacts not being added to groups | Group field not in Person's Data Fields | Add the group field to Person's Data Fields under Scenario 2 |
| Receiving "No Auto Approval Action Taken" emails | Multiple contacts share the matching value | Resolve duplicate contacts |
| Workflow doesn't run on auto-approval | Wrong workflow trigger type | Use When a person is added (Scenario 1) or Manually, from approval screen (Scenario 2) |
| Auto-approval was working, now it's not | Form edited but not re-published | Click the green Publish button after saving |