This article explains every field and setting on the transaction entry form. The same fields appear across the individual, collective, and bulk transaction screens — refer back to this page whenever you need a detailed explanation of a specific setting.
Transaction Settings
This section controls how the transaction is grouped and where it sits in your financial records.

Batch (required)
A batch is a container that groups related transactions together — for example, "Sunday 1 June Collections" or "May Direct Credits". Every transaction must belong to a batch.
- Select an existing open batch from the dropdown, or
- Click + New to create a new batch without leaving the screen. You'll be prompted to enter a batch code and optional description.
Batches are used to organise transactions for reconciliation and reporting. For more details, see Adding a Batch.
Bank Account
Select the bank account that received the money. This links the transaction to the correct account for reconciliation and financial reporting.
This field is optional but recommended — particularly if your organisation operates multiple bank accounts. Leaving it blank means the transaction won't be associated with a specific account in reconciliation views.
Collective Transaction — Allow line-specific recipients and receipt settings
This checkbox enables collective transaction mode, where each individual line within a single transaction can be receipted to a different person with different receipt settings.
Tick this option when:
- One person has presented donations on behalf of multiple other people, and each person needs their own receipt
- Some lines should be receipted and others should not
When this option is ticked, the Who to receipt and When to receipt fields move from the Transaction Info section down to each individual transaction line.
For a full walkthrough of entering a collective transaction, see Adding a Collection of Transactions.
Transaction Info
This section captures the core details of the transaction.
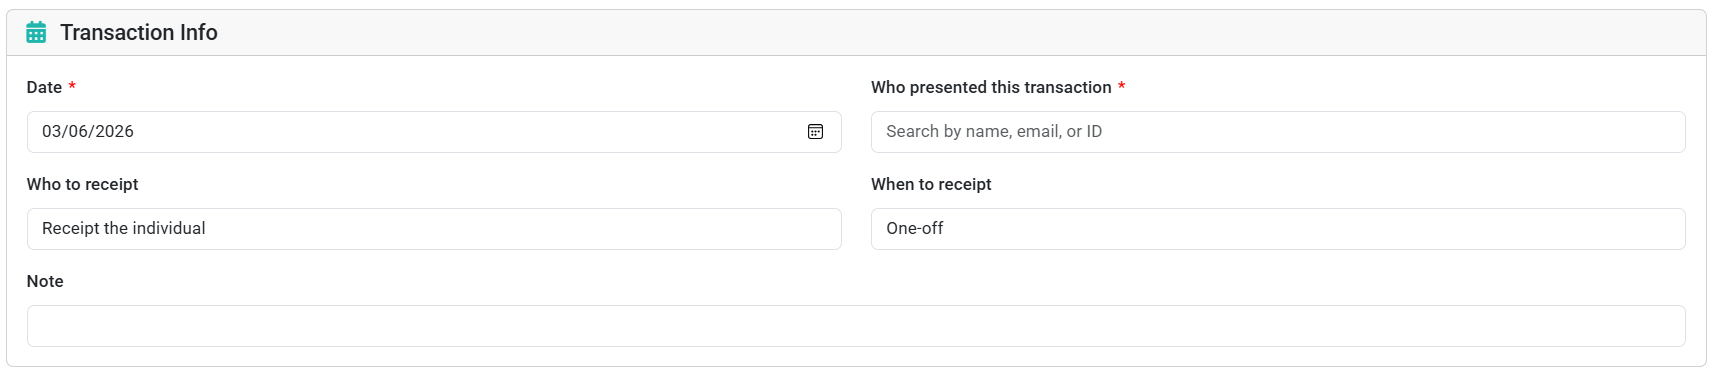
Date (required)
The date the money was received, or the date on the cheque. Click the calendar icon to select a date, or type it directly.
This date is used in all financial reports, receipts, and donor statements. Make sure it reflects when the money was actually received, not when you are entering it into the system.
Who presented this transaction (required)
Search for the contact who gave or presented the money. Start typing their name, email address, or contact ID and select the correct match from the list that appears.
This field records the payer — the person the transaction is attributed to. On a collective transaction, this is the person who physically handed over the combined amount, even if the individual lines are receipted to different people.
If the person is not yet in infoodle, use Quick Add to create a basic contact record. You can fill in further details on their profile later.
Who to receipt
Controls whose name appears on the receipt for this transaction. Options are:
| Option | When to use |
|---|---|
| Receipt the individual | Receipt in the donor's own name — the most common choice |
| Receipt the household | Receipt in the name of the household the donor belongs to — useful when a couple files jointly for tax purposes |
| No receipt | No receipt will be generated for this transaction — for example, anonymous cash, loose plate collections, or non-tax-deductible income |
When Allow line-specific recipients and receipt settings is enabled, this field moves to each transaction line instead.
When to receipt
Sets the receipting timing preference for this transaction. This is used as a filter on the Receipts screen and has no other automated effect.
| Option | When to use |
|---|---|
| One-off | Receipt this transaction on its own, when it is ready |
| Combined | Hold this transaction to be included in a combined year-end receipt run |
For example, if a donor prefers a single annual receipt rather than one per gift, set their transactions to Combined so they are grouped together when you run your end-of-year receipting.
When Allow line-specific recipients and receipt settings is enabled, this field moves to each transaction line instead.
Note
An optional free-text field for any relevant information about this transaction — for example, a cheque number, a reference, or a description of the gift. Notes are visible in the transaction list and batch report but do not appear on receipts unless your receipt template is designed to include them.
Payment Method
Payment method (required)
Select how the money was received. The options available depend on how your organisation has configured its payment methods.

Common options include:
| Method | Additional fields that may appear |
|---|---|
| Cheque | Cheque number, branch code — useful for the batch report as a payment slip |
| Cash | No additional fields |
| Card / Credit card | Card type. Important: never store full card numbers in infoodle |
| Bank transfer / Direct credit | Reference field; branch code (for NZ six-digit bank codes) |
| Direct debit | Reference field |
| Online | No additional manual fields — used when a payment gateway processed the transaction |
Payment methods are configured in your system by a Finance Admin. To add or edit payment methods, see Payment Methods.
Transaction Details
This section controls the financial coding — how the money is allocated in your accounts.
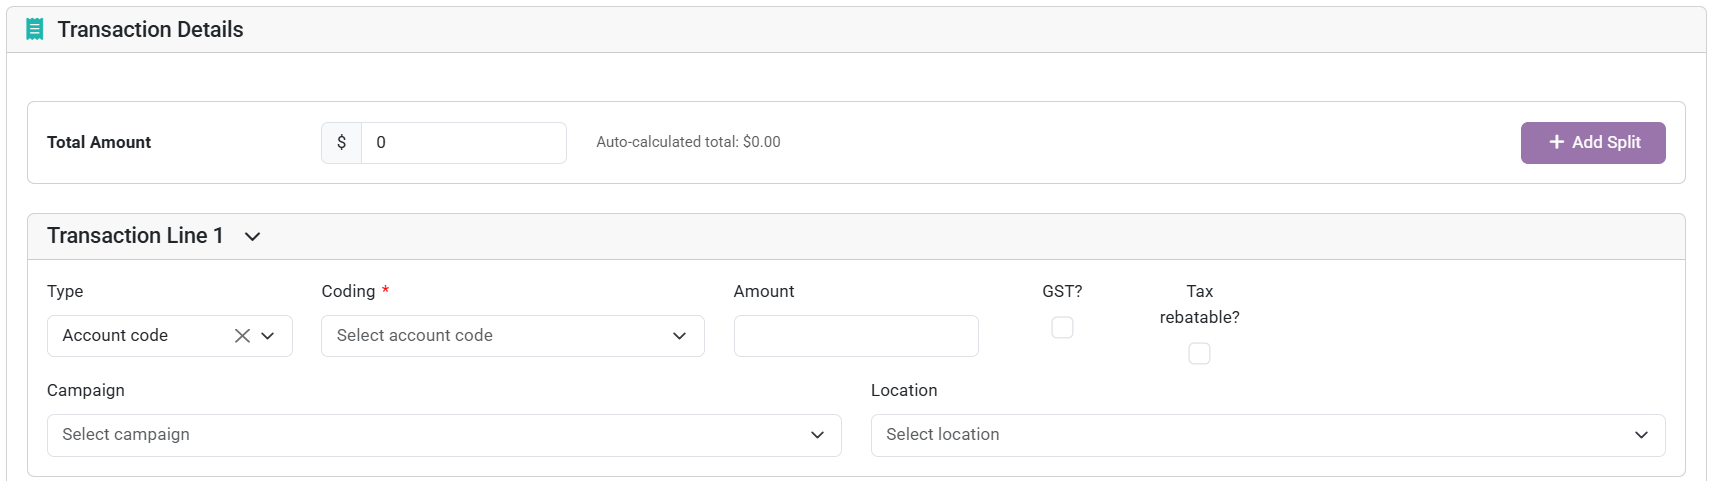
Total Amount (required)
The total amount of money received in this transaction. Enter the full amount here.
As you fill in the transaction lines below, infoodle shows an Auto-calculated total alongside this field. The transaction cannot be saved until the sum of all line amounts equals the total amount you entered here.
+ Add Split
Click this button to add a second (or further) transaction line. Use splits when a single payment needs to be allocated across multiple account codes, campaigns, or giving categories.
Example: A donor gives 500 dollars: 300 dollars for the General Fund and 200 dollars for the Building Appeal. Enter 500 as the Total Amount, then create two lines: one for 300 dollars coded to General Fund and one for 200 dollars coded to Building Appeal.
Transaction Line fields
Each transaction line (Line 1, Line 2, etc.) has the following fields:
Type
Defines what category of financial record this line is allocated against. The default is Account code (a standard income allocation). Other options may include:
| Type | Use |
|---|---|
| Account code | Standard income allocation against a fund or income category |
| Stock item | Allocation against a stock item (e.g. books or merchandise sold) |
| Event | Allocation against a specific event |
| Membership | Allocation against a membership type |
| In-kind | Non-cash contribution |
Coding (required)
Select the specific account code, stock code, event, membership, or other record this line is being posted to. The available options depend on the Type selected above.
This is the most important field for financial reporting — it determines which fund, category, or project this money is counted against. If you are unsure which code to use, check with your Finance Admin.
Amount
The dollar amount for this line. If you have only one line, this should match the Total Amount. If you have added splits, the amounts across all lines must add up to the Total Amount.
GST?
Tick this box if the amount on this line is subject to GST (Goods and Services Tax). This flag is used in GST reporting and affects how the transaction is treated in tax calculations.
Leave unticked for transactions that are not subject to GST — for example, most donations.
Tax rebatable?
Tick this box if the donor is eligible to claim a tax rebate on this amount. This flag is used for tax reporting — for example, NZ IRD donation tax rebates or UK Gift Aid claims.
Only tick this for genuine tax-deductible donations where your organisation is authorised to receive them. This setting affects which transactions are included in tax rebate reports and receipts marked as tax-deductible.
Campaign
Optionally link this line to a campaign. Campaigns let you track income raised for a specific purpose or appeal — for example, a building fund drive or a mission trip appeal.
Assigning a campaign here means this transaction line will appear in campaign-specific reports and donor statements filtered by that campaign.
Campaigns are separate from account codes. An account code determines the accounting category; a campaign determines the purpose or appeal. A single account code can receive income from multiple campaigns.
Location
Optionally assign this line to a location. Locations let you track income by physical site — for example, if your organisation operates across multiple branches or campuses.
Like campaigns, locations are used for filtering in financial reports and statements.
Saving the transaction
Once all fields are complete:
- The Auto-calculated total must match the Total Amount you entered
- All required fields (marked with a red asterisk) must be filled in
Click Save Transaction to save. The transaction is added to the selected batch and becomes available for receipting.
Next step: If you are ready to issue receipts, see Receipts.
Adding a Batch
Adding Individual Transactions
Adding a Collection of Transactions
Adding Bulk Transactions
Payment Methods
Receipts