All finance transaction entry screens share the same fields in respect to the transaction detail. The detail represents a single combination of the transaction e.g. an amount for a specific account code, or ticket type.
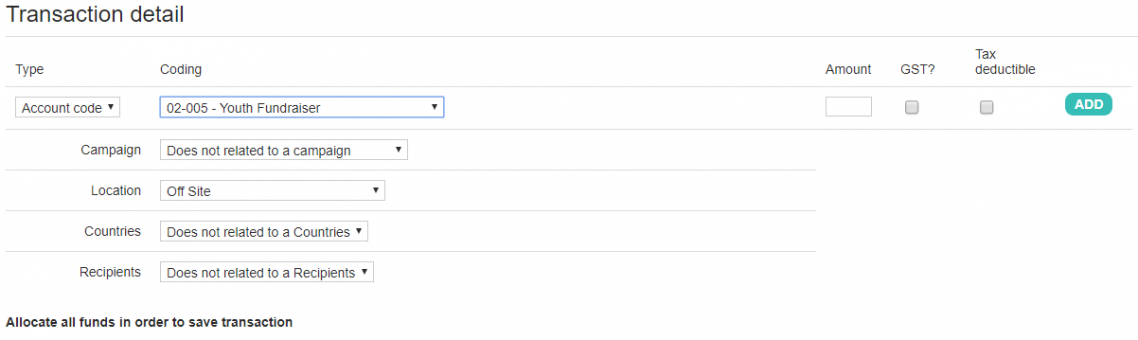
- Select the Type of transaction from the drop down.
- Depending on which Type you choose the Coding area to the right will change to present a relevant choice, e.g. an account code type brings up a list of available account codes that have been loaded. The Stock item type will display a list of all the stock items for sale in infoodle. If you have the 'Events' module you are able to select event as a type. You are presented with a search box to type in the name of the event. Once an event is found, you click it (or press enter) and infoodle will then load the list of ticket types (if available) or a field to enter the amount of the donation (if an account code is entered in the event for this). Changing either of these will update the amount box to the right. Clicking 'details' will show the details of the event in a popup window.
See How do I deal with In Memorial gifts to see how to tag transactions as gifts in Memorial. - In the Amount field enter the figure of the total amount that is to be allocated to the specified account code, or type. This value is auto filled from the total amount for the first item.
- The GST field tells infoodle whether this transaction includes GST or not so load it as the GST INCLUSIVE price.
- The Tax deductible check box tells infoodle whether this transaction will receive the tax rebate or not. Depending on the country selected in Administration the wording relating to GST(NZ & Australia), Sales Tax (USA) and VAT (UK) will be different. Please see Terminology for different countries.
- Select the relevant Campaign and Location option from the Drop downs. If you have the Finance module then you are able to choose which campaign and location this transaction relates to. Click here for more information on adding a campaign.
- The Countries and Recipients fields relate to Tracking categories.
- When working with individual or collective transactions you are able to split the transaction between different activities if the single amount received represents different items. Go to splitting transactions for more information.
- NOTE: Remember, if you are adding a collection of transactions, you will need to add another person and allocate the funds before saving the transaction. Go back to add a collection of transactions to continue adding the rest of the people.
- If you do not need to split the transaction then click SAVE TRANSACTION. This button is only shown when the total amount entered at the top of the screen matches the amounts listed in the transaction detail(s). If this button is not visible it means that you have not allocated all of the Total Amount above. The amount remaining to be allocated will be shown in the coloured box saying Amount to allocate as in the screenshot below. Once it has all been allocated then the Amount to allocate will be 0.00 and the button will appear enabling you to save the transaction.
