Gift Aid lets a UK charity claim back the basic rate tax on a donation, adding 25p to every £1 given by a donor who has made a Gift Aid declaration. infoodle keeps the declarations, works out which donations qualify, builds the claim for each period, and sends it to HMRC for you.
Before you start
Role Permissions
- Access to Finance area
- Manage, Read and report on transactions
- Manage finance configurations (needed for the Gift Aid Settings screen)
- List all roles (needed to open the Packages & Views screen in Step 1)
To learn what each of these permissions does, see Finance Permissions and People Permissions.
You will also need:
- The Gift Aid package active on your infoodle site.
- Your charity's HMRC Gift Aid number, your regulator, and your charity number.
- The HMRC Government Gateway user ID and password for your Authorised Official.
- A signed Gift Aid declaration from each donor you intend to claim for.
Gift Aid is a UK only scheme, so the Gift Aid package is only offered to UK sites. If you are a member of a cluster you can open Claims and Summary and review a claim, but you cannot file a claim, reset a claim, or open Small Donation Scheme or Settings.
Where Gift Aid lives
Everything sits under Finance on the main menu on the left. Click or hover on Finance, then click Gift Aid to open the four sub-items.
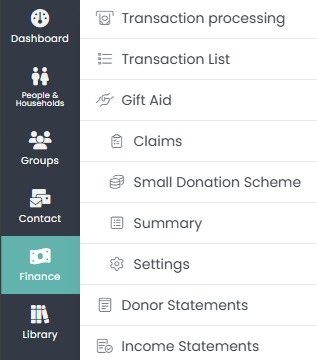
| Menu item | What you use it for |
|---|---|
| Claims | Set up your claim periods, review each claim, and file it to HMRC. |
| Small Donation Scheme | Claim a top-up on small cash donations under the Gift Aid Small Donations Scheme (GASDS). |
| Summary | See how many of your donors have a Gift Aid declaration recorded. |
| Settings | Enter your charity details and your Authorised Official. |
The order to do things in
Work through the steps below in order. These are the ones that have an article of their own:
- Gift Aid Settings, for every field on the Settings screen.
- Valid Field Formats, for the name, address and postcode rules.
- Gift Aid Approval, for recording each donor's declaration.
- Transactions Included in a Gift Aid Claim, for what goes into a claim and what is left out.
- Filing to HMRC, for both ways of sending a claim.
Setting up Gift Aid
Step 1: Turn on the Gift Aid package
If Gift Aid already appears under Finance on the main menu, skip to Step 2.
- Click the administration cog in the top right hand corner.
- Click Packages & Views.
- Find the Gift Aid for UK Charities section in the Packages list.
- Click Make Active on the Gift Aid row beneath it.
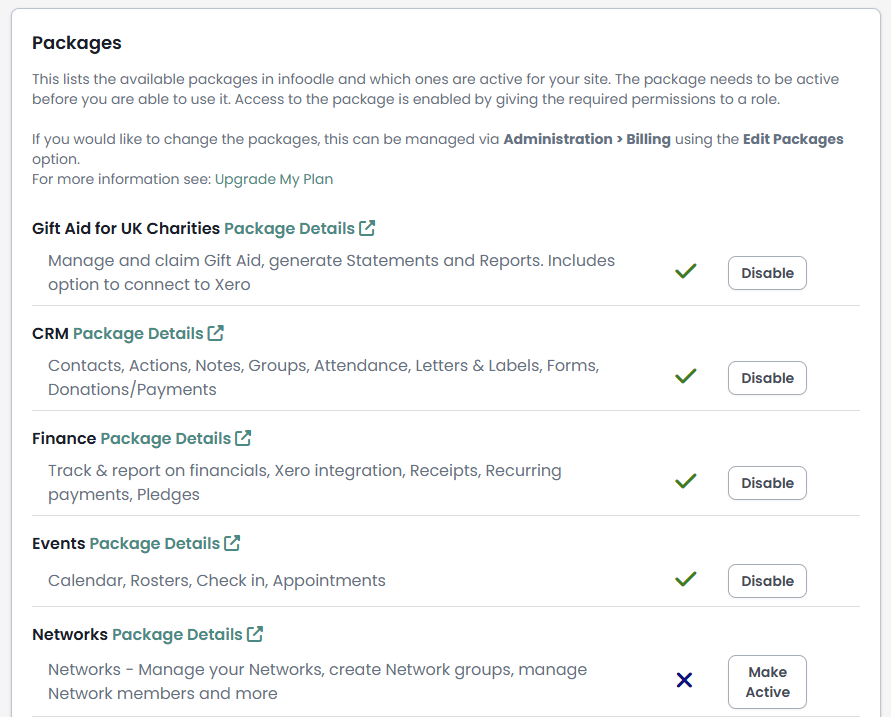
The Make Active button only appears for the login your site was originally set up with. Everyone else sees Call infoodle to make this active in its place, so contact infoodle and we will turn the package on for you. You can review which packages you hold under Administration → Billing using the Edit Packages option.
Step 2: Enter your charity details
HMRC checks these details every time you file, so fill them in before you build your first claim.
- Click or hover on Finance on the main menu, then click Gift Aid.
- Click Settings.
- Open the Charitable Organisation tab.
- Type your charity's name into Name of organisation.
- Type your HMRC Gift Aid number.
- Choose your Regulator.
- Type your Charity number.
- Set Submission mode to Test while you are practising, or to Live when you are ready to send a real claim. Step 10 covers when to change it.
- Choose your Organisation type, either Charity or Community Amateur Sports Club (CASC).
- Click Save.
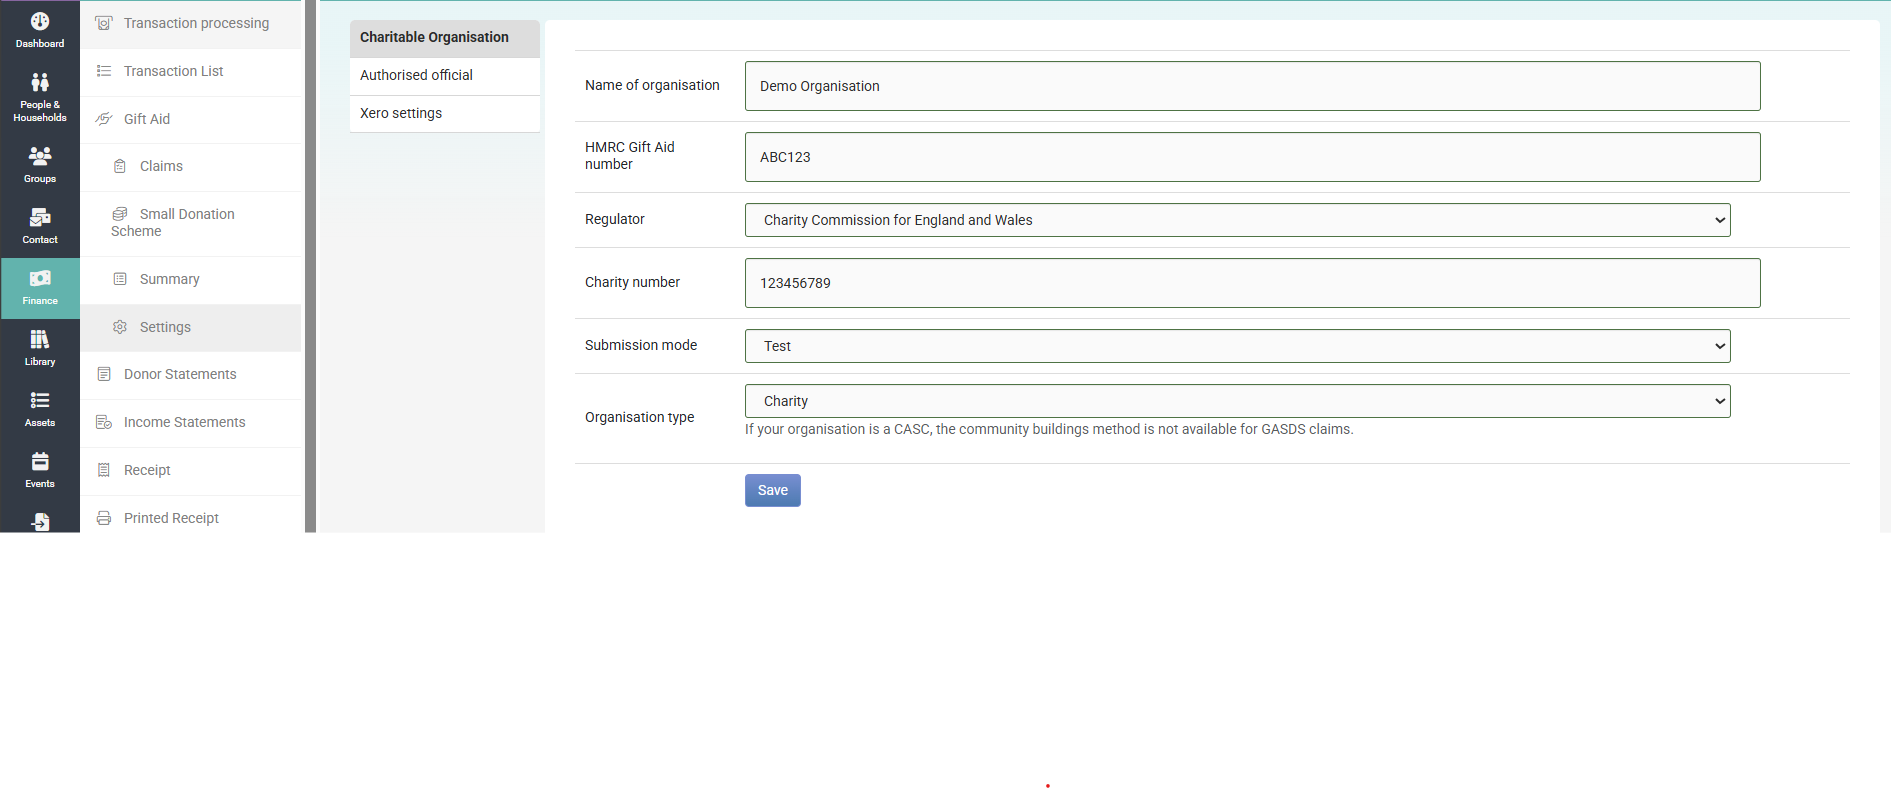
Set Submission mode to Live before you file a real claim. A claim filed while the mode is Test goes to HMRC's test service instead of the real one, so no money is claimed, but infoodle still marks the claim Filed to HMRC and treats its donations as claimed. Those donations are then left out of every later claim, and the only way to get them back is to reset the claim. The File Gift Aid screen does not show which mode you are in, so check it here first.
Two boxes on this tab hold numbers that look alike. HMRC Gift Aid number is the reference HMRC gave you, and it is the same value as Charity number under Administration → System, so it also fills the {charity number} placeholder on your receipts. Charity number on this tab is your regulator's registration number and is used only for Gift Aid. Name of organisation is shared with your receipts too.
Step 3: Enter your Authorised Official
Your Authorised Official is the person HMRC has registered to make claims on the charity's behalf.
- Open the Authorised official tab.
- Enter their Government Gateway id.
- Enter their Government Gateway Password.
- Enter their Title, Firstname and Lastname.
- Enter their Phone and Postcode.
- Click Save.
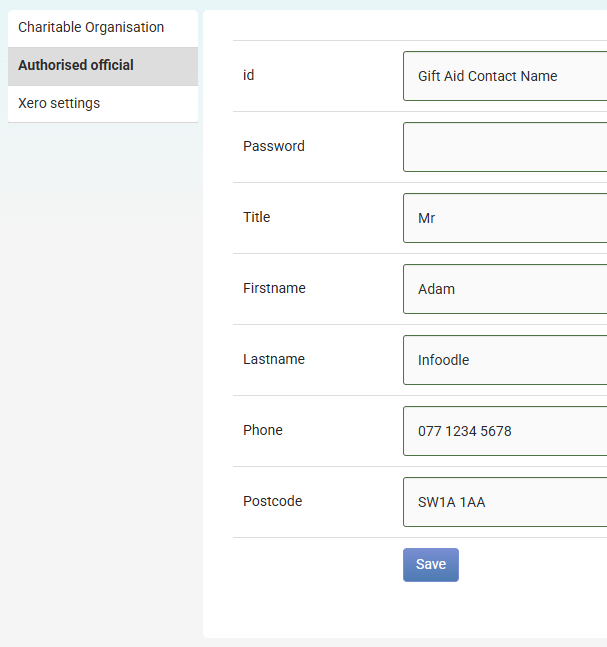
The Password box shows the password as ordinary text rather than as dots, so anyone looking at your screen can read it. Close the tab when you have saved, and avoid sharing your screen while it is open.
For a full description of every field on this screen, see Gift Aid Settings. If your site is connected to Xero there is a third tab, Xero settings, holding a Xero contact name and an Account code. Both are needed before infoodle can raise a Xero invoice for a claim. See Generate Xero Invoice For Gift Aid Claims.
Step 4: Mark the account codes you can claim on
infoodle only includes a donation in a claim if the account code it was given to is marked as reclaimable.
- Click or hover on Finance on the main menu, then click Account Codes.
- Look at the Tax reclaimable column.
- Click Edit beside any code that should say Yes but does not.
- Set Tax reclaimable to Yes.
- Click Save.
See Editing account codes for more about the other settings on an account code.
Step 5: Get your donors and donations in
There are three ways to bring donors and donations into infoodle. Most charities use more than one.
- Add them by hand: use the + icon at the top of any page to add a person, then add their donations one at a time.
- Import a file: load a spreadsheet of people or of bank transactions. See Starting your Import.
- Connect Xero: infoodle imports your Xero contacts and transactions on a schedule, and creates any contact it needs. See How to connect to Xero.
Whichever way you choose, every UK donor needs a house name or number and a valid postcode on their address. infoodle will not let you finalise a claim while any UK donor is missing them.
If your donations come from Xero, set Process UK address formats on the Xero settings screen so infoodle can separate the house name or number from the rest of the address. Without it, every UK donor arriving from Xero lands on the Errors tab of your claim. See How to connect to Xero.
The rules HMRC applies to names, addresses and postcodes are set out in Valid Field Formats.
Step 6: Record each donor's Gift Aid declaration
A donation is only claimable if the donor has a Gift Aid approval covering the date it was given.
-
Search for the donor using the search box at the top of the screen.
-
Open their profile.
-
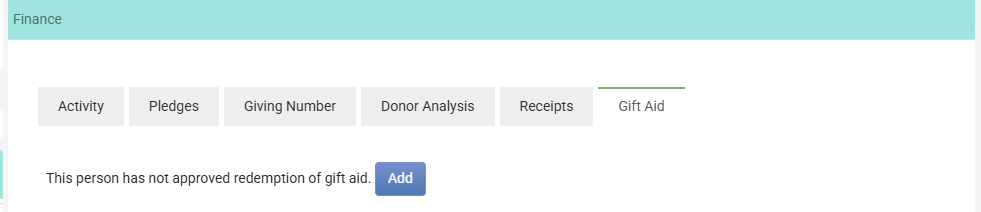
Scroll to the Finance panel.
-
Open the Gift Aid tab.
-
Click Add.
-
Enter the Date approval signed.
-
Enter the Date approval starts (inclusive).
-
Leave Date approval ends (inclusive) empty if the declaration is open ended.
-
Enter the Oldest date for historic transactions to claim on donations given before the declaration was signed. HMRC allows four financial years.
-
Upload a scan of the signed declaration under Evidence of approval.
-
Click Save.
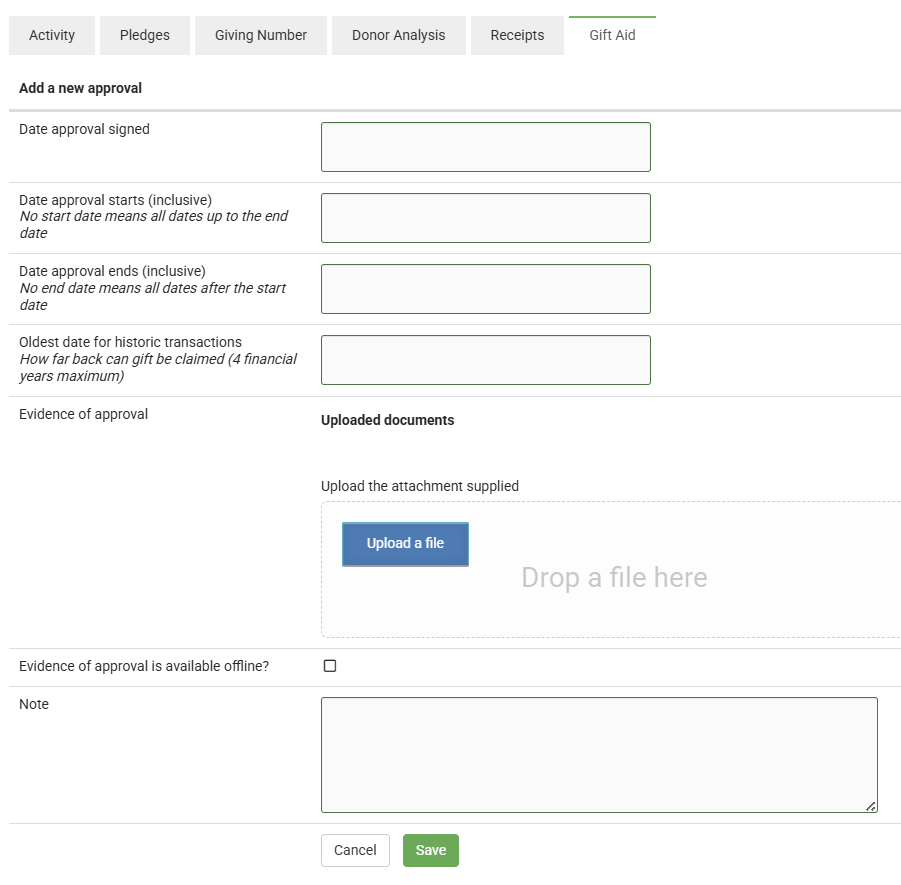
Every field on this form is explained in Gift Aid Approval. To load approvals for many donors at once, choose Gift aid approvals as the import type and follow Importing Gift Aid Approvals. If your contacts come from Xero, the Xero settings screen also has Add Gift aid approval to all contacts added this way, which records an approval for every contact Xero brings in.
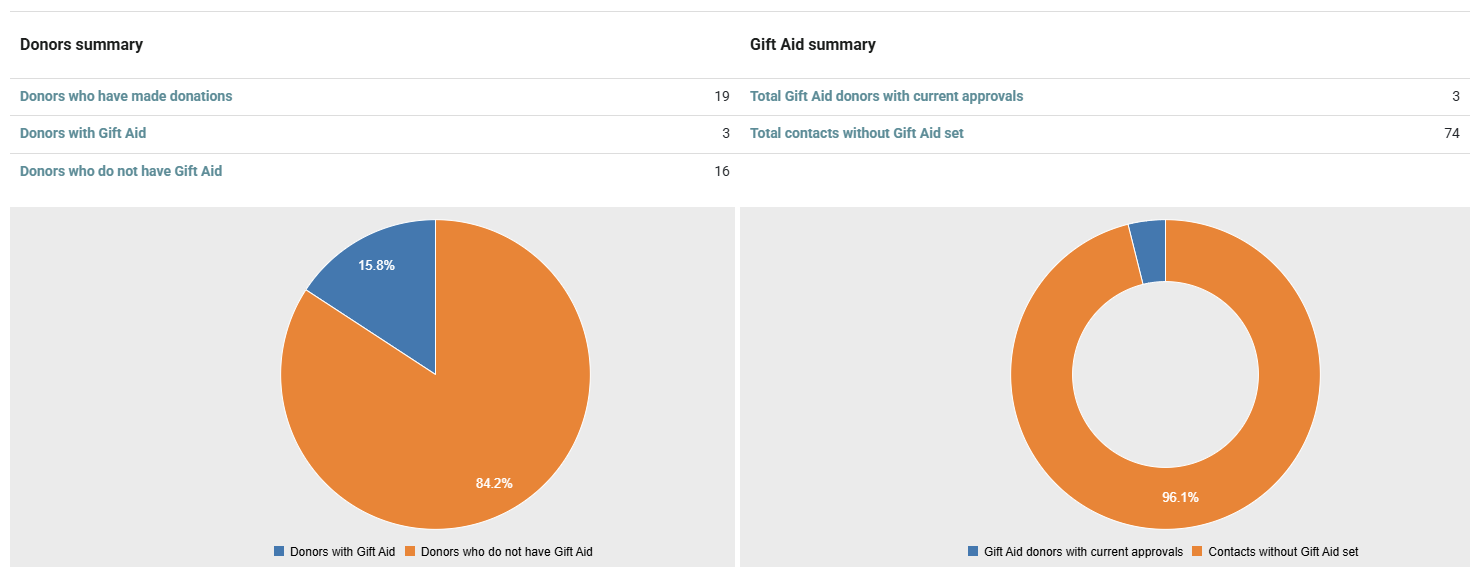
To see how far you have got, go to Finance → Gift Aid → Summary. It counts your donors, and how many of them have a current approval.
Step 7: Set up your first claim period
The first time you open Claims, infoodle asks you to choose the period your claiming starts from.
- Click or hover on Finance on the main menu, then click Gift Aid.
- Click Claims.
- Enter the date you want to start claiming from into Period start.
- Choose how many months each claim covers under Claim period. Choose 3 to file quarterly, 12 to file yearly.
- Click Save.
infoodle takes you straight into that first claim, and uses the same length for every claim after it.
The setup screen says transactions before your chosen date are assumed to have been claimed already. Your first claim will still pick up every donation that has not been claimed yet, up to the end of the claim period and back as far as four financial years. So expect to see older donations on the Claimable tab, and check them before you finalise.
To change how often you claim later, open Finance → Gift Aid → Claims and click the pencil beside Gift Aid claim frequency at the top right of the list.
Step 8: Review the claim
The Claims screen lists every period. Value is the total of the donations in the claim, and Claim is the 25% of that value you are asking HMRC for.
- Click Action beside the period you are working on.
- Click Review ....
- Open the Errors tab and fix anything listed there. A claim cannot be filed while errors remain.
- Open the Claimable tab to see the donations going into the claim.
- Open the Not claimable tab to see what has been left out. Each row gives the reason.
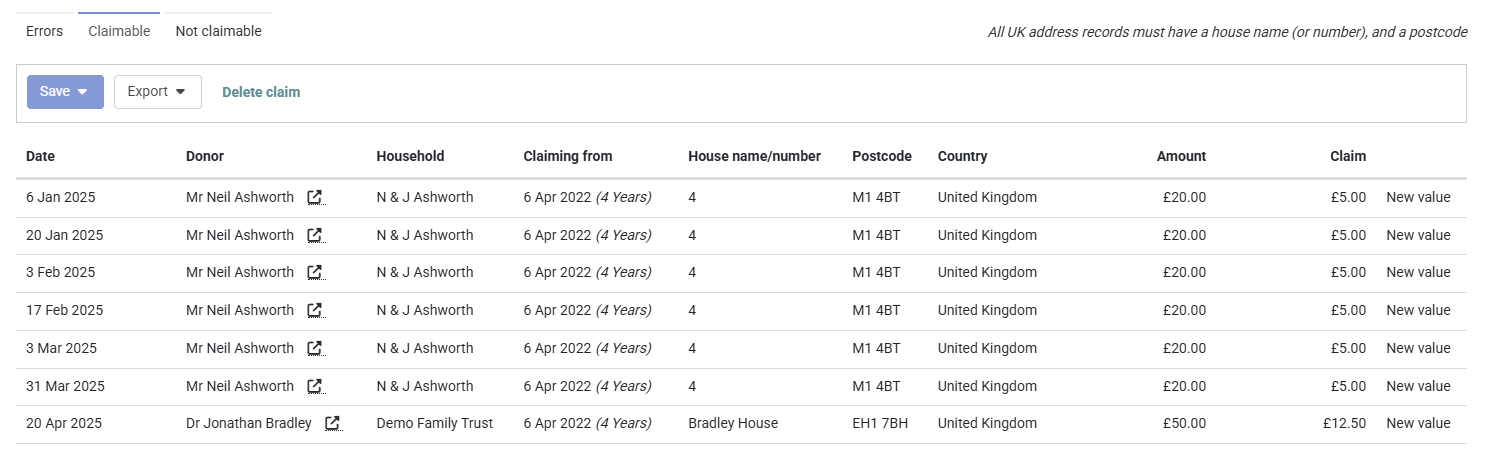
On the Claimable tab, the Claiming from column shows the earliest date infoodle can claim from for that donor, and says which rule set it: (Approval) for the date their declaration starts, (Historic) for the oldest date for historic transactions on their approval, and (4 Years) for the four financial year limit.
For the full list of what makes a donation claimable, see Transactions Included in a Gift Aid Claim.
Step 9: Save the claim as final
- Click Save on the review screen.
- Click as Final.
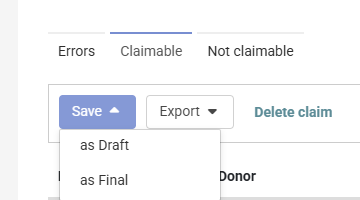
The claim status changes to Finalised, and File to HMRC ... appears on its Action menu.
To come back to the claim later instead, click Save and then as Draft. The claim keeps the donations you have reviewed and stays editable.
If as Final is not on the Save menu, work through these two checks:
- Open the Errors tab and clear every record listed there. The review screen also shows a message when errors are present.
- Check the claim's Period end date has already passed. A claim covering a period that has not finished yet cannot be finalised, and the claim screen shows With these dates, this claim cannot be filed yet. Either wait for the period to end, or change the dates using the pencils beside Period start and Period end.
Delete claim sits directly beneath the Save button on the review screen, and it removes the claim straight away with nothing to confirm first. If you click it by mistake, see Deleted Draft Gift Aid Claim? How to recover.
Step 10: File the claim
Start by checking you are set to send a real claim.
- Go to Finance → Gift Aid → Settings.
- Open the Charitable Organisation tab.
- Set Submission mode to Live.
- Click Save.
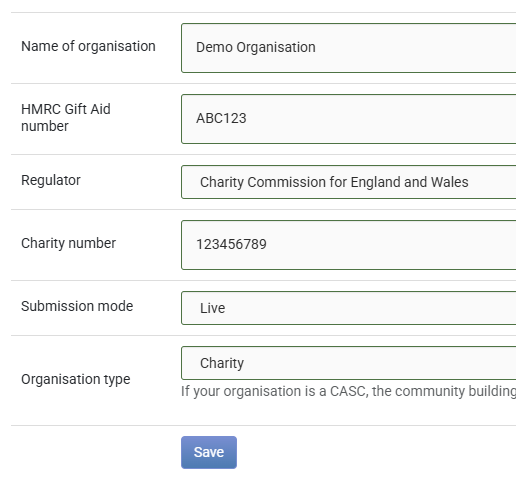
Do this before every real claim. If Submission mode is still Test, infoodle sends the claim to HMRC's test service using HMRC's own test credentials, so HMRC receives nothing and you are paid nothing. The claim is still marked Filed to HMRC and its donations are treated as claimed, which leaves them out of every later claim. Only a reset puts them back, and the File Gift Aid screen does not tell you which mode you are in.
Then open the claim:
- Go to Finance → Gift Aid → Claims.
- Click Action beside the finalised claim.
- Click File to HMRC ....

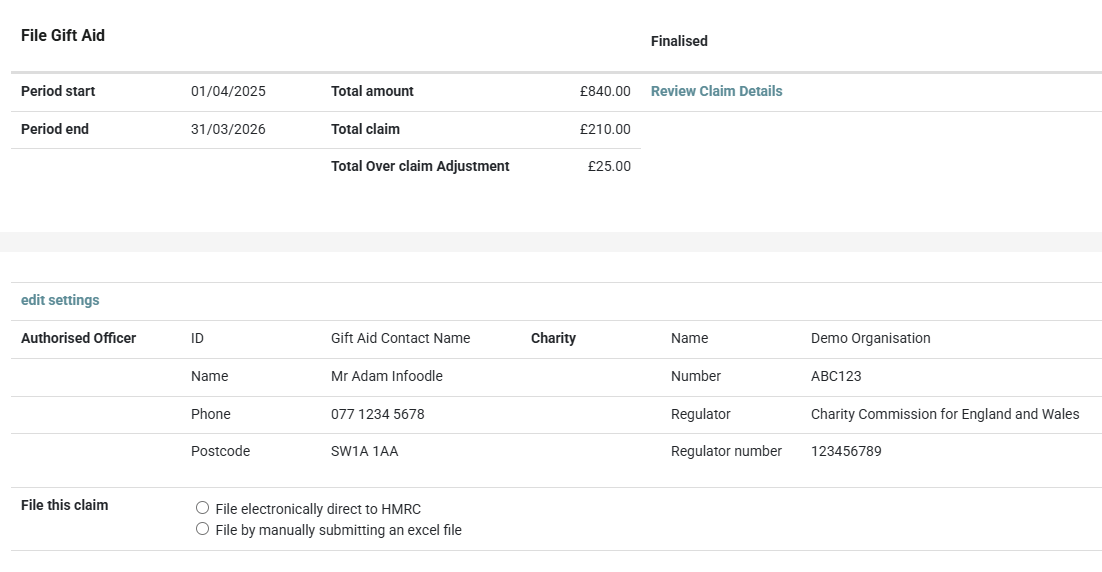
To file straight from infoodle
- Under File this claim, choose File electronically direct to HMRC.
- Click Submit to HMRC.
To file on HMRC's website instead
- Under File this claim, choose File by manually submitting an excel file.
- Click Download.
- Submit the downloaded spreadsheet on HMRC's own website.
- Come back to infoodle and click Mark this claim as filed.
Either way the status becomes Filed to HMRC, and infoodle records the date and who filed it. The next period opens for claiming.
Both filing methods are covered step by step in Filing to HMRC.
If you use Xero, Create Invoice appears once the claim is filed, so you can raise an invoice in Xero for the amount HMRC will pay you. See Generate Xero Invoice For Gift Aid Claims.
What each claim status means
| Status | What it means |
|---|---|
| Waiting for previous claim to be filed | The period exists but you cannot work on it yet. File the claim before it first. |
| Started | The period is open and you can review it. |
| Draft | You have saved a set of donations to come back to. |
| Finalised | The claim is complete and ready to file. You can still delete it or change its dates until it has been filed. |
| Filed to HMRC | The claim has gone to HMRC. |
Small cash donations
Cash gifts of £30 or less can be claimed under the Gift Aid Small Donations Scheme without a declaration from the donor. These are handled separately, under Finance → Gift Aid → Small Donation Scheme, and are organised by UK tax year. You can add the current tax year and the two before it.

Start with Gift Aid Small Donations Scheme (GASDS).
Common questions
Why is a donation showing as not claimable?
Open the claim, then the Not claimable tab. Each row shows one of these reasons:
- No Gift Aid approval: the donor has no approval covering the date of the gift. That covers a donor who has never given you a declaration, and a donor whose declaration started after the gift or ended before it.
- Gift Aid approval starts [date]: the gift is earlier than the oldest date for historic transactions on the donor's approval.
- Account code [X] not refundable: the account code the gift went to is not marked Tax reclaimable.
- In kind donation: the gift was recorded as goods rather than money.
- Amount not positive: the transaction is zero or a refund.
A donation is on neither the Claimable nor the Not claimable tab. Where has it gone?
A donation is removed from both lists, without a reason being shown, when any of these apply. Only the first and the last mean the tax has actually been reclaimed.
- It is already attached to a claim you have filed.
- It is sitting in another claim that is still open, so finish or delete that claim to release it.
- It is older than the four financial years HMRC allows, so it can no longer be claimed at all.
- It has been claimed under the Gift Aid Small Donations Scheme instead.
Can I claim on donations given before the donor signed their declaration?
Yes. Set Oldest date for historic transactions on the donor's approval. HMRC allows up to four financial years.
I changed my mind about the period length. Can I change it?
Yes. Open Finance → Gift Aid → Claims and click the pencil beside Gift Aid claim frequency at the top right.
I deleted a claim I still needed. What now?
See Deleted Draft Gift Aid Claim? How to recover.
I need to start a claim again from scratch.
Click Action beside the claim and choose Reset Claim .... Reset only works on a claim that has already been filed. On a draft or finalised claim the option still appears on the menu, but choosing it returns you to the claims list and changes nothing. See Resetting a Claim.
Who can see the Gift Aid screens?
- Claims: the Claims menu item appears for people with Manage, Read and report on transactions. Someone with only Read and Report on Transactions can open the claims screens by their address, but has no menu link to them.
- Summary: needs Manage, Read and report on transactions, the same as Claims.
- Small Donation Scheme: needs Access to Finance area and either Manage, Read and report on transactions or Read and Report on Transactions. Cluster members do not see it.
- Settings: needs both Manage, Read and report on transactions and Manage finance configurations. Cluster members do not see it.
Next steps
Once your charity details are saved, go on to Gift Aid Approval and record a declaration for your first donor.