What happens after an email is sent using infoodle?
After you have sent an email from infoodle, or if you schedule an email to be sent, those emails will be stored in the Sent Mail folder.
You can review these emails by going to the Sent & Scheduled page. This page gives you the ability to take additional actions, such as:
- At a glance, review some Email Statistics
- Edit the email or schedule
- Forward the email to other recipients
- Accessing extended Email Reports.
Document Content
- Sent & Scheduled Overview
- Adding Emails to a Campaign
- Open and Bounce Rate Percentages
- Action Button Functions
- Search Function
1. Sent & Scheduled Overview
From here you can view information such as:
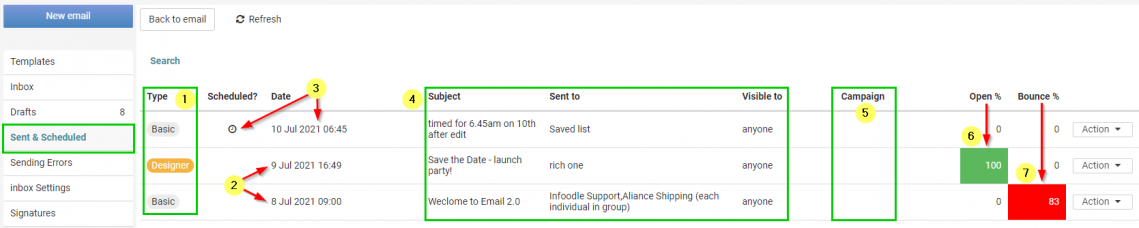
- What Type of email was sent. For example, Basic, Designer or Mailchimp (1).
- The Date and Time it was sent (2), or for a Scheduled email when it will be sent (3).
- The email Subject, Who the email was sent to and Who the email will be visible to in infoodle (4).
- Which campaigns (if any) the email is assigned to (5).
- You can also view the Open Percentage (6) and Bounce Percentage (7).
2. Adding Emails to a Campaign
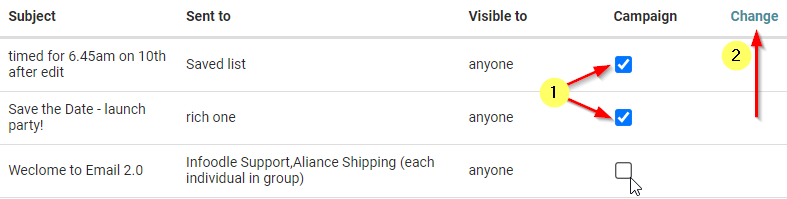
If you want to add emails to a campaign you can do this here:
-
Select one or more tick boxes under the Campaign column.
-
Select Change to bring up the Set Campaign window.
-
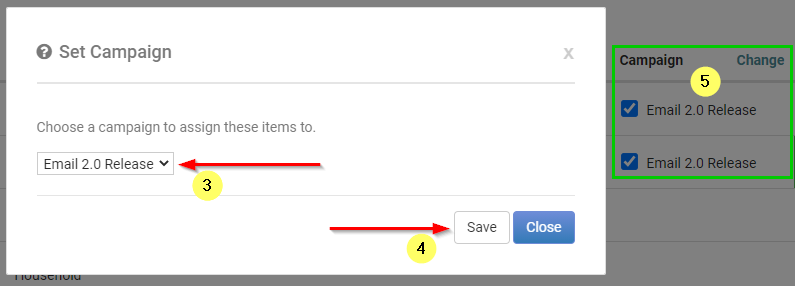
Use the drop-down menu to select the Campaign to apply.
-
Select Save to make the changes.
-
You will now see the Campaign(s) listed.
3. Open and Bounce Percentages
These two Statistics can be very useful for quickly assessing the sucess and effectiveness of your email communication.

Taking a closer look at the statistics we can determine the following:
-
The first email batch is showing Zero for each statistic. Note however the Clock icon in the Scheduled? column. This indicates that the emails have not yet been sent. They are currently due to send at 6:45am on the 10th of July.
-
The second email batch shows a 100% Open rate, which means all emails that were sent successfully have been opened. The 0% Bounce rate tells us that none of the emails we sent Bounced back, all were successfully delivered to the recipients.
-
For the final email batch, the 0% Open indicates that none of the emails sent have been opened yet. The 83% Bounce rate shows that the majority of emails queued to be sent in this batch could not be delivered successfuly.
To review the high failure in sending emails we could go to Sending Errors to review any issues, highlighted there.
For Detailed information and statistics, we can access the Email Report from the current page using the Action button.
4. Action Button Functions
Clicking the Action button next to a Sent or Scheduled email will give you four options:
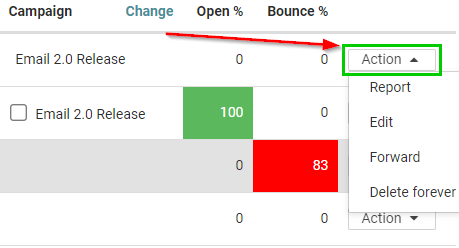
- Report - provides detailed Email Report and Statistics.
For more information, see Email Report
-
Edit - use to edit a scheduled Email before it has been sent, or edit an email that was previously sent. Additionally, you can save the sent email as an Email Template.
-
Forward - use this to forward a copy of a previously sent email to new recipients, or to re-send it to the previous address.
-
Delete Forever - permanently deletes a sent email.
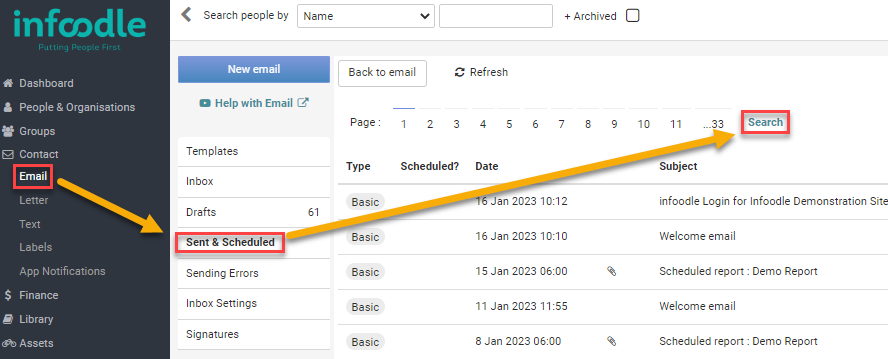
5. Search Function
Sent & Scheduled is also where you can search for a specific subject, content or date range sent, from either yourself or that others have sent.
Navigate to Email > Sent and Scheduled and select Search:
To select the email or emails of interest enter the appropriate date into one or more of the associated search fields:
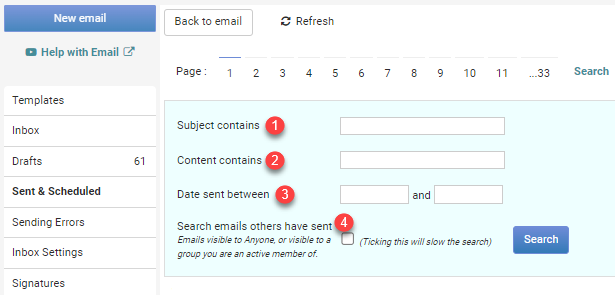
When complete, select Search and the results will be displayed.