This article outlines how to perform specific tasks in infoodle. All task descriptions assume you have logged in, and that are starting from the first page or Dashboard.
Changing My Username & Password
There are a number of ways to access the page where you can change your Usename and Password:
While on your infoodle Dashboard:

- Select My Account
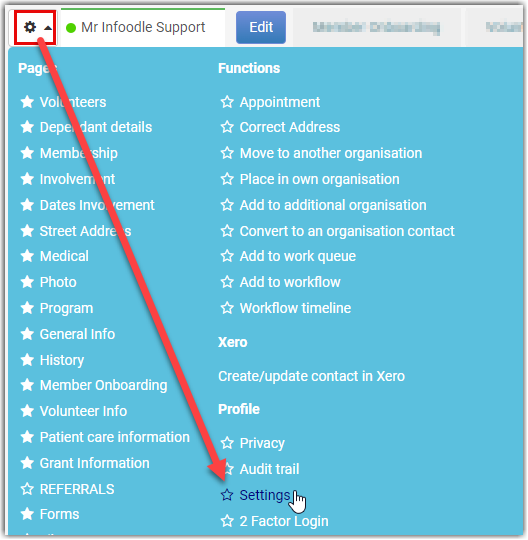
- Alternatively, select My Profile, then select the Settings Cog icon on the left hand side and from the drop down menu and choose Settings. This reveals the settings screen for your profile

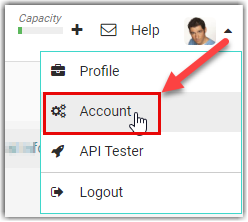
- Finally, while on any infoodle page, on the upper right corner, select the dropdown and select Account

Once you arrive at your Account and Role settings page, you can:
- Change your Log In name by entering a new username in the Login text box
- Select the New Password text box to enter a new password
- To confirm your password, retype your password into the Confirm new password text box
When complete, scroll down to near the bottom of the page and select Save.
Creating a Member
- From the top right of the screen there is a + icon, click that and Add people or households
- Enter name details and click Address at the bottom
- Enter address details (or tick unknown) and click Save
Adding a Family Member
- Search for the existing family member using the Search Box at the top of the screen (or the person you just added will be listed on the ‘most recently used’ list shown at the top of the screen)
- Click Add new member from button in household details
- Enter name details
- Click Save
Creating a Group & Adding a Member
- From the top right of the screen there is a + icon, click that and Add a group
- Enter group name and click Save. You are added by default (untick if you don’t want to be)
- Click Add a member on this group screen and search for members names. Click View only as the permission and then Save
Removing a Person From the Database
infoodle encourages you to Archive people rather than delete. When you delete a person all of the history for that person is also deleted and this data can't be recovered.
Due to the person's history being deleted, they will no longer appear in any reports. If you are sure that you still want to remove them from the database, then click here to find the steps to deleting a person.
Taking Attendance for a Group
If you would like to keep track of attendance this can be done manually via Groups.
- Click Groups on the left
- Click the group name you want to add attendance for
- Click Attendance
- Click Add to add an event
- Enter the date, a title, then Save
- Click the Pencil icon to edit the created event
- Click the people who have attended
Scheduling an Event/Worship Service/Training
- Click Rosters
- Click Add
- Enter the first and last date for the rosters (can be the same date for 1 event)
- Enter any details for the event
- Search for the group (or groups if you have created more) to add
- Click Create roster
- On the roster screen you have ‘Position 1’. You need to create as many positions as you need to fill (singer, bass, guitar etc.) Click the + below to add more and edit the names as you need
- For each date of event there is a column and a list of +’s below. Click the + Then from the now revealed left menu with a list of people in that group, click the name to go in that slot
- Repeat the above step for each person and slot required
- You can now download or email this roster by clicking Roster on the left hand panel and then the appropriate Menu item
- If you need to setup Reminders, then clicking the ‘group’ from the left hand panel and choose Settings (or click the triangle in the coloured group header to get to this screen too)
To Create an Event:
- Click + top right of the screen and Add Event
- Enter the title, and select dates
- Enter the date and time, click location
- Click the auditorium, click Save
Recording a Donation
There are several ways to achieve this, but we will show you two.
The Quickest Way:
- Reconcile a transaction in xero.com (online accounting system not associated with infoodle but we are an add-on partner). This will now automatically bring that transaction down to infoodle and connect to the individual with no further user interaction – 0 clicks!
This is dependant on what configuration you set up in infoodle. For more information on setting up infoodle and Xero, view this help documentation
The Manual Way:
- Click Finance
- Click Transactions, then click Add a transaction to add an individual transaction
- To create a new batch, click Create new, enter details and Save to save the batch name
- Enter the details required on the form, then Save transaction
Running a Membership Report
To Produce a Directory Report:
- Click Reports
- Click Printed directory
- Click Generate
To Produce a List of People in a Specific Group:
- Click Reports
- Click People
- Click Add criteria
- Choose Group from the criteria drop down
- Click Generate results
- Click Show (or download if you prefer)