This is useful when you have simple or complex transactions to enter into a batch. It is designed to cater for situations when you wish to enter a single transaction or one amount needs to be split between multiple activities, account codes, membership, etc. If you have the events full module, you are able to create a ‘collective’ transaction. This is used when a single entity provides an amount which is on behalf of other people and those other people require the receipts.
Here is how to add an individual transaction:
- Click Finance on the Navigation Menu.
- On the Transaction Processing screen, click Transactions and then Add a transaction.
- You have the option to choose an open batch to add transactions to, or create a new batch or Rename a batch . Select the batch that you wish to add transactions to.

- Click CHOOSE.
- Enter the date that the transaction was processed or the date on the cheque.
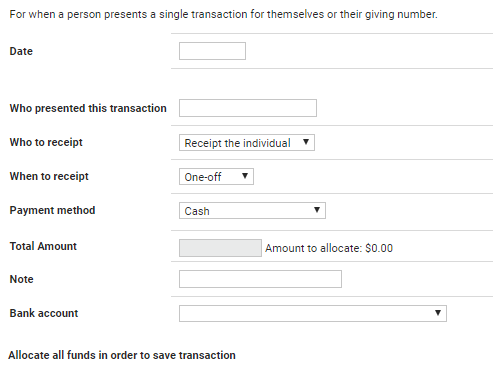
- Search for the person who will be receipted by starting to type the first few letters of their name in the drop down. As you type, infoodle will search and show a list of possible matches. If a match is found, highlight and click on the one you want. To view a popup containing more information about the person, click Details.
- If the person you want is not currently in the database, then as you search you will have the option to click Quick Add. This uses the words you used to search to populate a simple form to enable you to add a person with their name and optionally their address. If you want to add more detail to the person, then this can be done later.
- Select who to receipt. This allows you to choose whether to issue the receipt in the name of the individual(s) or the household(s) or organisation(s). The third option of 'No Receipt' marks the transaction as not requiring a receipt. When issuing a receipt to a household (or organisation), infoodle will use the Household name (or Organisation name). However, if you have a Receipt alias setup in the profile then the alias will be used instead.
- From the Drop down options, select when to receipt. This gives you the option to select whether the transaction is to be receipted at the end of the year(Combined), ad-hoc(One-off) or no receipt at all (no receipt). It is only used to filter the transactions on the receipts screen and has no specific meaning other than that.
- Choose the Payment method from the drop down. Depending on the method you have chosen, will show you different additional and optional fields you can complete if you wish. Most often this is a reference used in the batch report and the reference fields are also searchable when looking for people who presented you with a donation.
The Cheque method allows you to store the cheque details which will show in the batch report. This is useful if you wish to use the batch report as a payment slip. The Branch code field is loaded with a current list of all NZ bank branches. Type in the 6 digit code for the bank or branch and then click on the match in the box that is shown. If the code is not found then you will need to enter it manually.
When using the Credit Card method make sure that you do not store credit card details in infoodle as we are not authorized to do this.
If choosing an In kind payment method infoodle allows you to enter a zero amount $0.00.
The list has been expanded to include Charity Voucher and Other as options. Click here for the Charity voucher website. - Total amount: This is the total amount presented. As you type in the number, the screen adds further fields to be completed.
- Add a Note.
- Select the Bank account.
- Once you have selected the bank account complete the Transaction Details. See Transaction Details for more information on these fields. See How do I deal with In Memorial gifts to learn how to tag transactions as gifts in Memorial.
- Click SAVE TRANSACTION.
Note
If you are ready to receipt then click here for the next step.