This screen allows you to import transactions from a file you have downloaded from your bank or accounting system (one other than Xero). This may be for a day or month, whichever works for you.
Transactions imported this way are imported into infoodle, but don’t appear in a batch until you have reconciled the transactions.
infoodle can be set to auto-reconcile transactions imported through Statement Import, however this option can only be enabled by infoodle Support. If you would like this enabled, create a support ticket or send an email request through to support@infoodle.com and let us know that this is what you require.
Once enabled, infoodle will automatically reconcile all transactions that it can, with the remainder being displayed for manual reconciliation on the Reconcile screen.
-
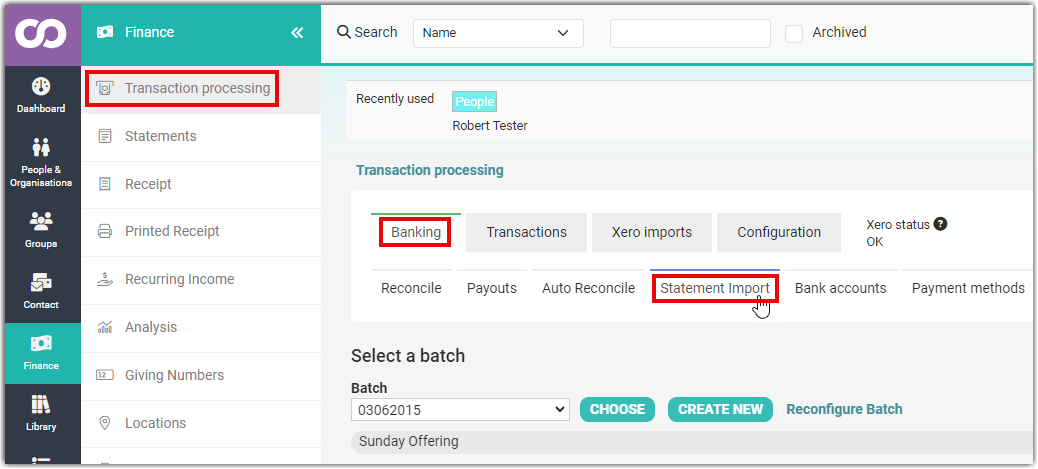
On the Navigation Menu, select Finance, then on the Transaction Processing screen, select Banking then Statement Import.
-
You have the option to:
- Choose an open batch to add the bulk transactions to,
- Create a New Batch or
- Rename a Batch.
Creating a new batch for each import is probably helpful.
-
Select the batch that you wish to import the statement to and select CHOOSE.

-
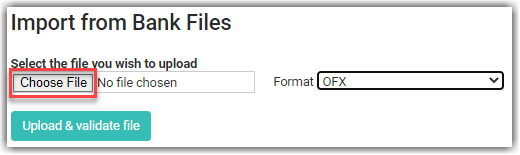
With the file saved on your computer, select Choose File to choose the bank file for importing.
-
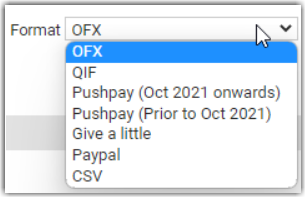
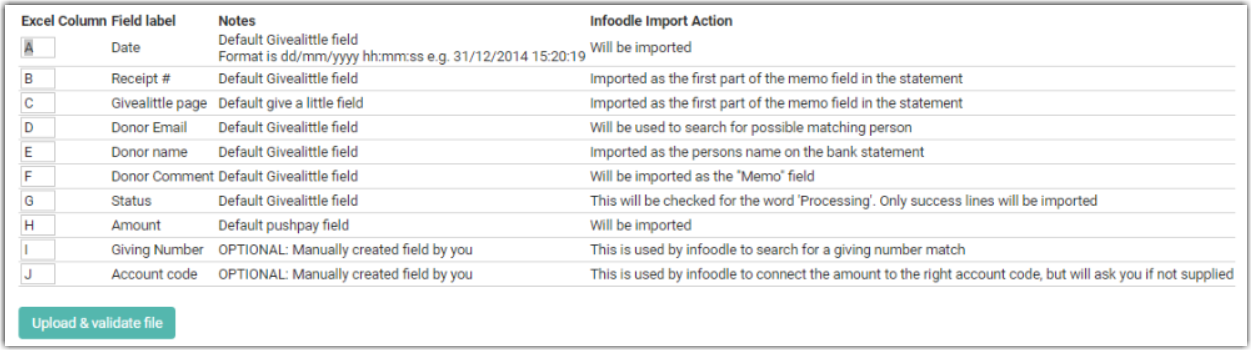
Select the relevant format based on what you are importing. For example, select Give a little if you are importing transactions from Give a Little.
-
Pushpay, Give a little, Paypal and CSV options will present you with more information to complete to ensure that it matches with infoodle requirements.
-
Select the bank account that you wish to import this to. If you don't have one you can create a bank account by selecting Add new bank account.

-
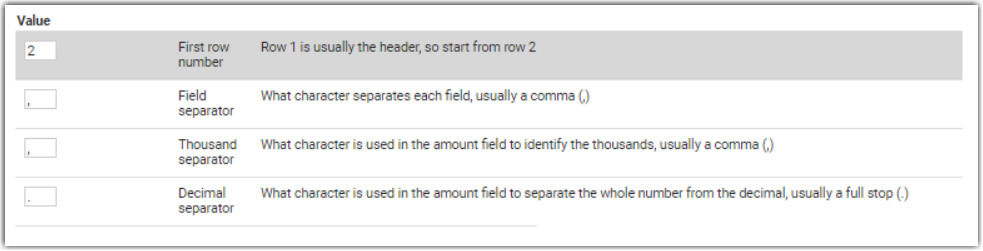
Depending on the format you chose you may be presented with different choices or options. If you have alternative settings for your field separator, or in the amount field - the thousand and decimal separators, specify these during the import. By default they are: comma for the field, comma for the thousand, and full stop (period) for the decimal place separator.
-
Check the fields and columns you have setup.
-
Select Upload & validate file.
-
infoodle will load the file and show you the first few records to give you the chance to verify that the import looks OK.
-
If all records validate you'll be presented with these two options:

- Create people not found in infoodle - select this option to create contacts in infoodle when the import file contains contacts that don't exist in infoodle
- Include Donor Name requirements when matching contacts - this controls how strict the system is when automatically matching imported bank transactions to existing contacts in infoodle.
When UNCHECKED (default):
- The system matches contacts using only one criterion — either a giving number OR an email address
- This is a simpler, more lenient matching approach
When CHECKED:
- The system requires BOTH the donor name AND the giving number or email to match
- For giving number matches: infoodle looks for contacts with matching first name, last name, AND giving number
- For email matches: infoodle looks for contacts with matching first name, last name, AND email address
If you're importing transactions from a CSV file you have the option of matching transactions to donors directly if your transaction data also includes the donor's Unique ID number. If Unique ID is used the Include Donor Name requirements when matching contacts selection is bypassed.
Using Unique ID results in the following:
- If Unique ID exists and is valid → match directly on Unique ID only (ignore donor name requirement)
- If Unique ID exists but is invalid → return empty (no match, no new contact created)
- If no Unique ID → then apply the "Include Donor Name" rule (if checked, require firstname + lastname match)
- To begin the import of transactions, select Import data.
- Once a successful import occurs, you are presented with the first page of transactions that need reconciling. Reconciling is the process of checking that the data is OK and matches the contact records loaded with existing contacts. You can select Quick add to add the contact.
- You can close this screen if you are not able to complete the reconcile of these transactions at this time. To return here at any point to select this batch and reconcile, or to continue with the reconciliation process. See Reconciling Transactions.
These records do not form part of the batch totals at this point because you still need to reconcile transactions. If any errors occur during the import – a code and message will be displayed. You may need to contact us at infoodle if you have any questions about this.
While infoodle is importing it checks to see whether the transaction has already been imported and if so – ignores that transaction.