Overview
Creating forms in infoodle enables your organisation to collect data and/or payments quickly and efficiently. Once someone has filled in a form it then needs to be processed. If this is part of your role you may be set up to be notified by email when an entry is completed. Alternatively you can check for form entries in the Forms area.
Let's look at how to process a form here.
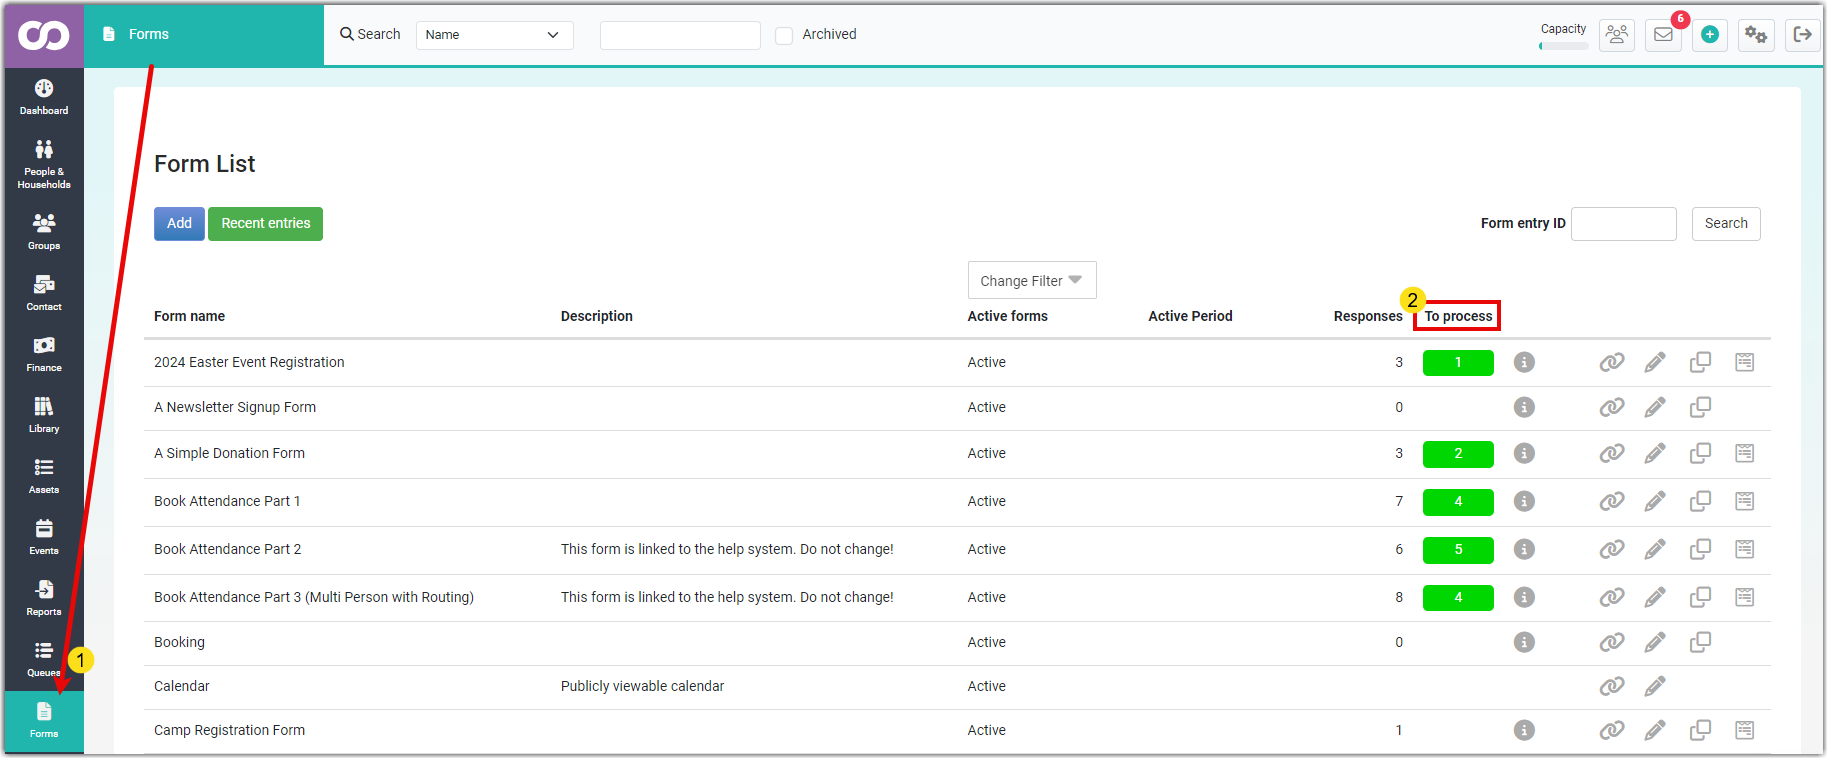
Click on Forms in the Navigation bar/menu to view the Form List.
The To Process column will show a Green box with a count inside, to indicate the number of From Entries available to be approved for that form.
Viewing Form Entries
To find the form entries waiting to be processed, scroll down to the form you are interested in. If any entries have been received it will have the entries icon beside it.

Click on the Entries icon to access the Form Entries screen for this form.
You will then be able to process and approve any new entries (See Processing Entries)
If you see a red envelope in the forms screen list (as in the screenshot below) then this means that there were errors detected whilst sending the response email to the person who completed the form. Clicking on the envelope will take you to a new screen which will list those errors.

When you click the Entries icon for a form will bring up a list of all the form entries; starting with the most recently submitted entry listed first.
You can filter the Form entries list by using the drop down at the top left of the screen to show:
- All Active Entries
- To be approved
- Approved
- Not yet paid
- Paid
- Deleted
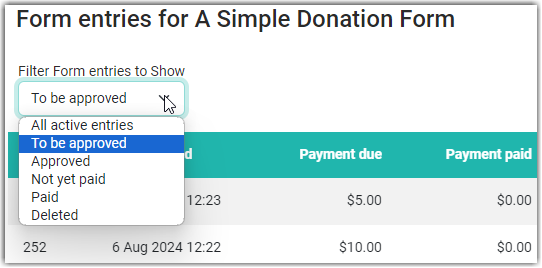
The Not Paid and Paid options will only show if the form includes Financial Fields.
The Deleted option will only show when there are Deleted Entries for that form
Exporting Form Entries
If you want to view or print a list of entries just click the 'Export' button (top right). Choose from Excel or CSV format. You can also choose to include deleted forms in the export.

Recent Entries
Rather than viewing just the entries for a specific form, you may want to see the recently submitted form entries across all your forms.
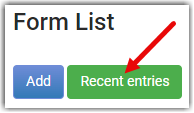
On the Forms screen, click on the Recent entries button.
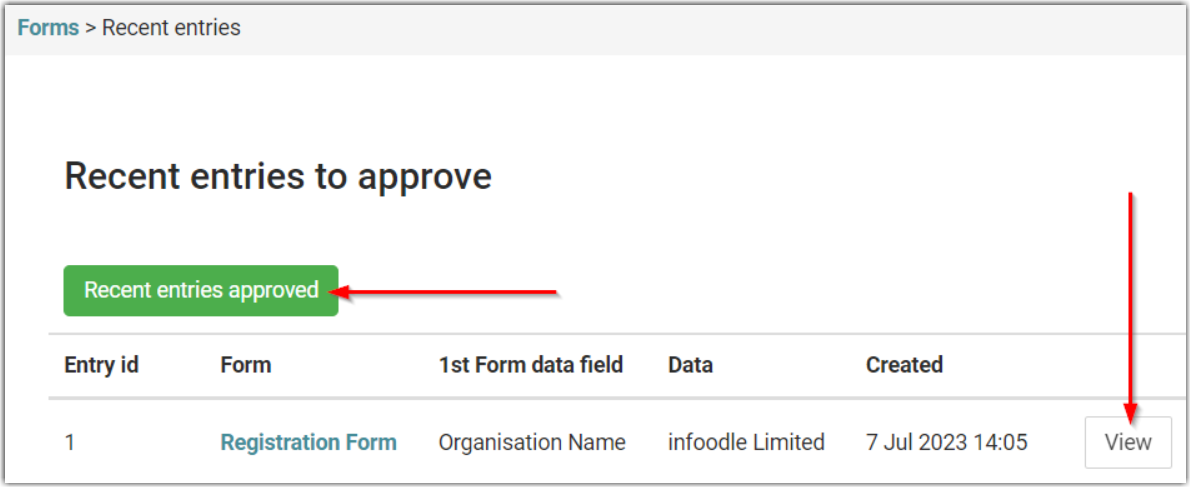
This takes you to a list of the most recent (25) entries that you can see, that are awaiting approval. You can also switch to see recently approved entries using the Recent Entries Approved button. Click View to view and approve the form entry.
Search For Specific Entry
There is also a search box on the forms list screen which allows you to enter the Form Entry ID and go directly to the form entry in question whether it has been approved or not.

Adding Notes to Entries
There may be a need to record notes against specific form entries. A note can be added as follows:
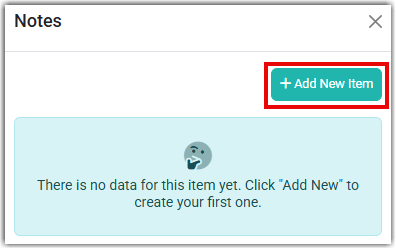
Identify the entry you want to add the note to, select Action then Notes

Select the Add New Note button
In the Note Text area enter the required note details and format as required with the tools available. If you intend to paste text from outside of infoodle instead of the usual paste function (keyboard shortcut Ctrl-V), paste as plain text instead (Shift -Ctrl-V).
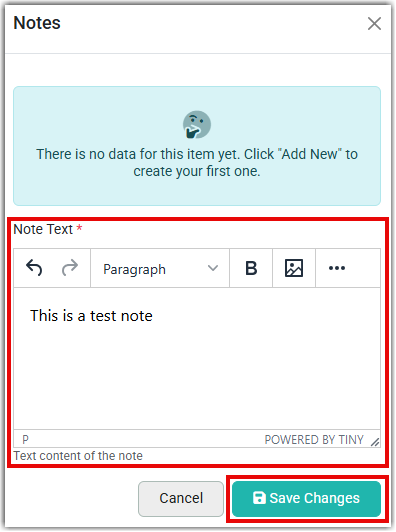
Select the Save Changes button to save the note.
From here you can add another note, edit or delete an existing note, or close the Notes window
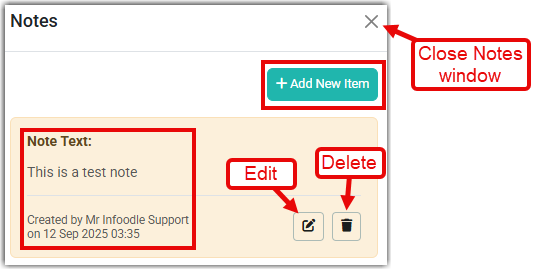
The Notes feature displays Notes added to an entry in the date order in which they were added, and you'll be able to see who added any existing note.
Processing Entries
When Viewing the Form Entries list, click on one of the entries and the approval form will open up starting with the form Entry ID no.

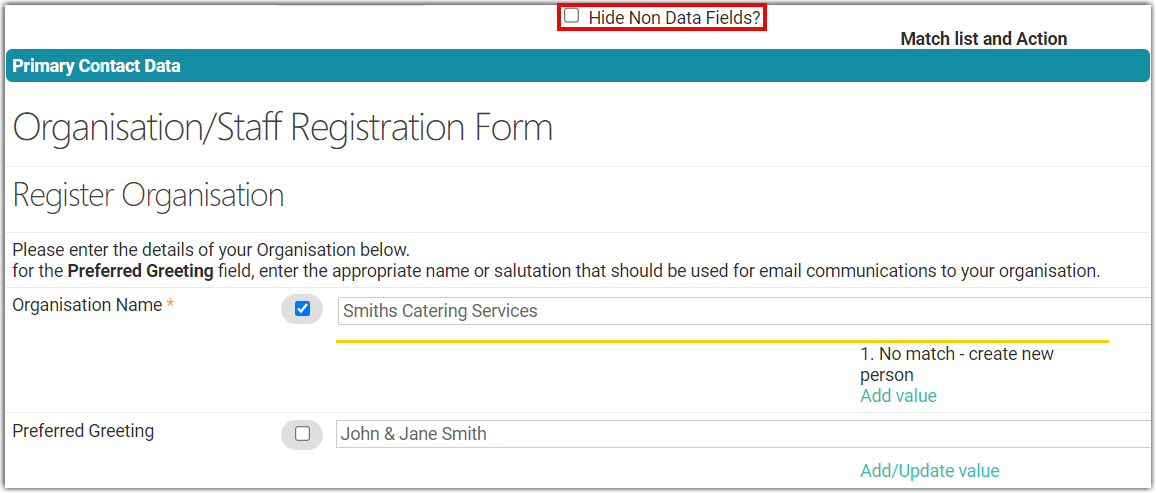
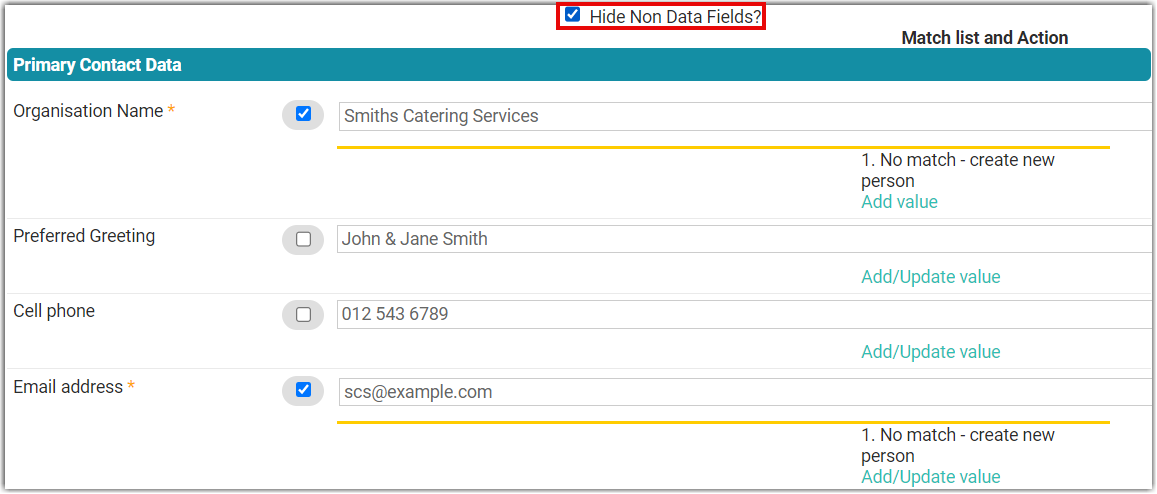
When looking at a Form entry, you can simplify the information displayed by hiding all fields on the form that do not relate to data entered using the Hide Non Data Fields? tick box at the top of the page.

This option can make entry processing much easier, especially on forms that use a lot of Text, images or other informational content.
Below is a comparison of the same form entry with non-data fields shown and hidden:
| Show Non-Data Fields | Hide Non-Data Fields |
|---|---|
 |
 |
Review Data
-
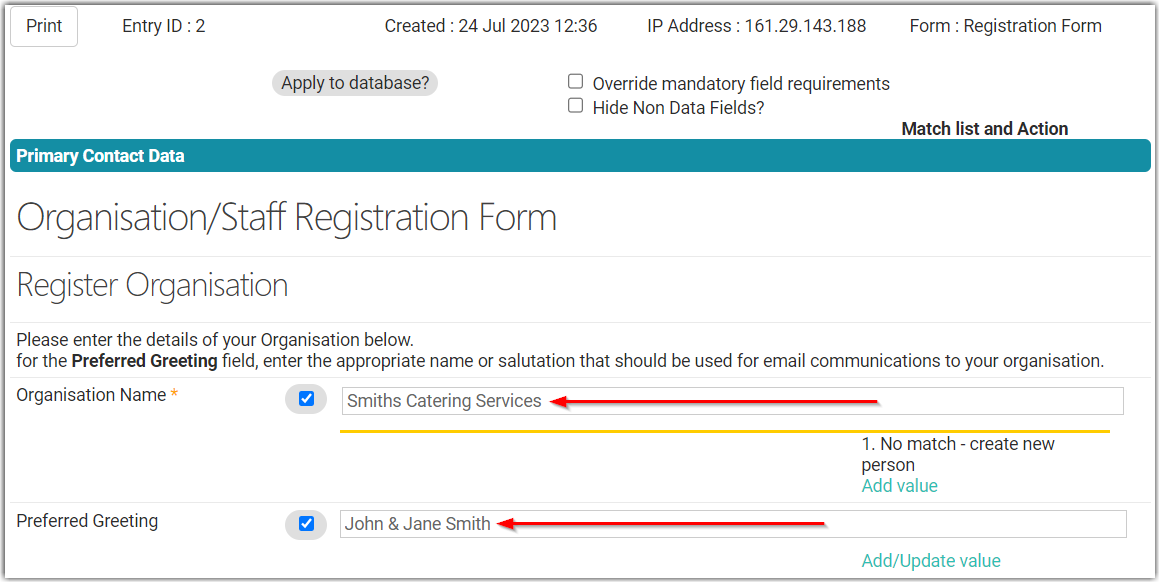
Once the form entry screen is displayed you can review the entered fields and edit them if needed. For example, there may be a spelling mistake or an incorrect value.
-
If you have made any changes or corrections to the data, be sure to click the Save Form Changes button near the bottom of the page, to apply the corrections

-
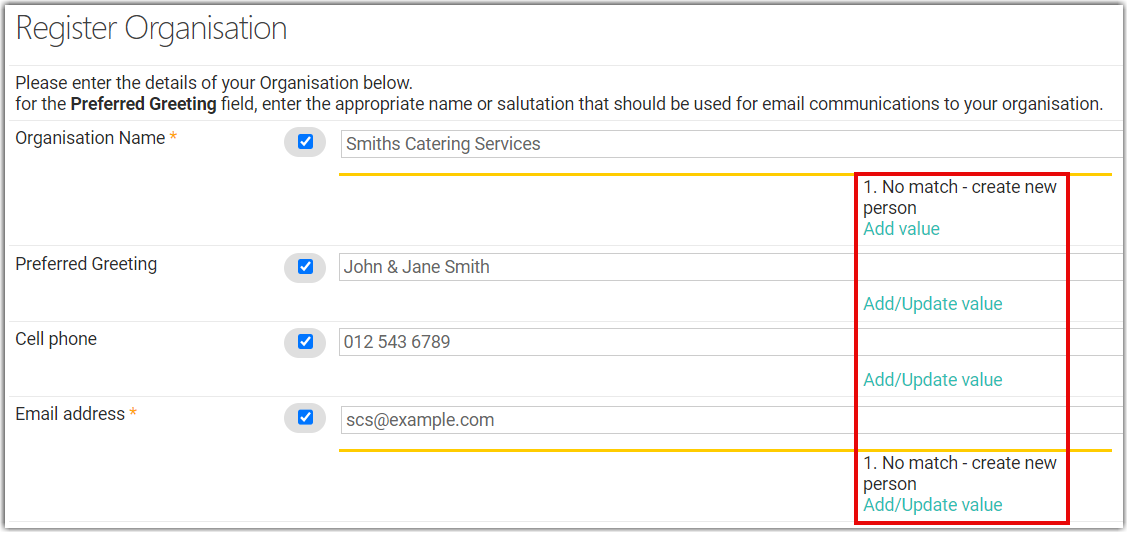
To the right of each field you will see a note by infoodle telling you what will happen with the data when approved. Possible matches to existing contacts (if found)will also be listed next to the relevant data field.
-
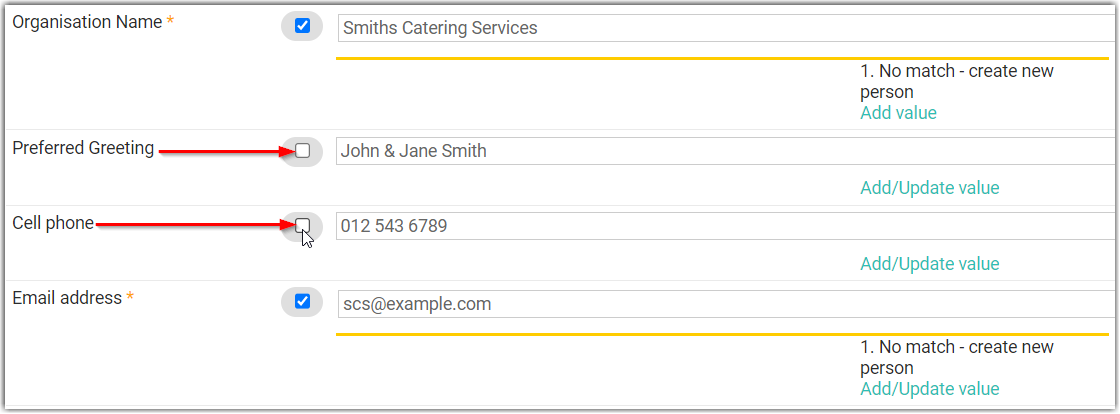
If data in a certain field is not required, you can untick this field.
-
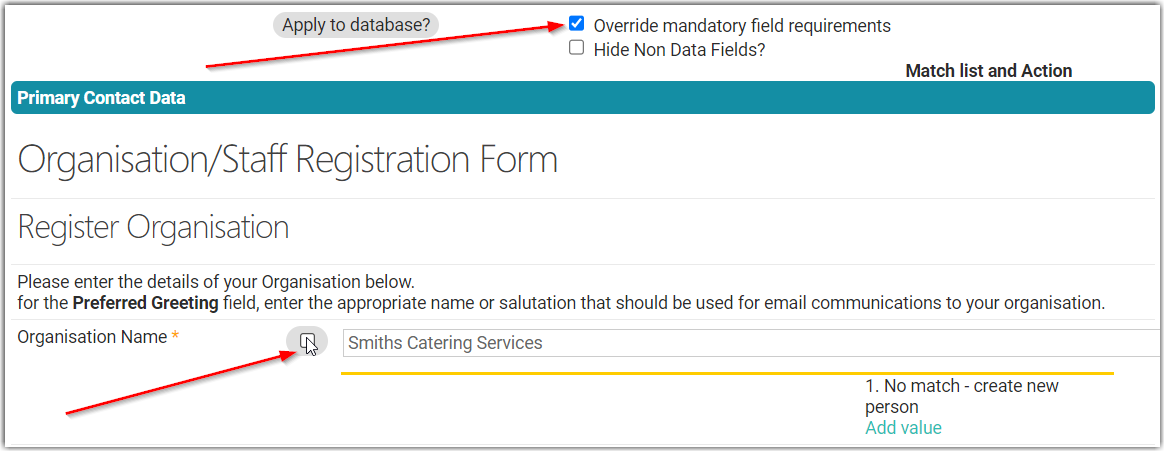
Mandatory data fields are indicated with an asterisk and are underlined yellow.

-
Normally, Mandatory fields cannot be unselected, and cannot be left blank when approving a form, but you can use the Override Mandatory Fields option in order to be able to unselect mandatory fields.
-
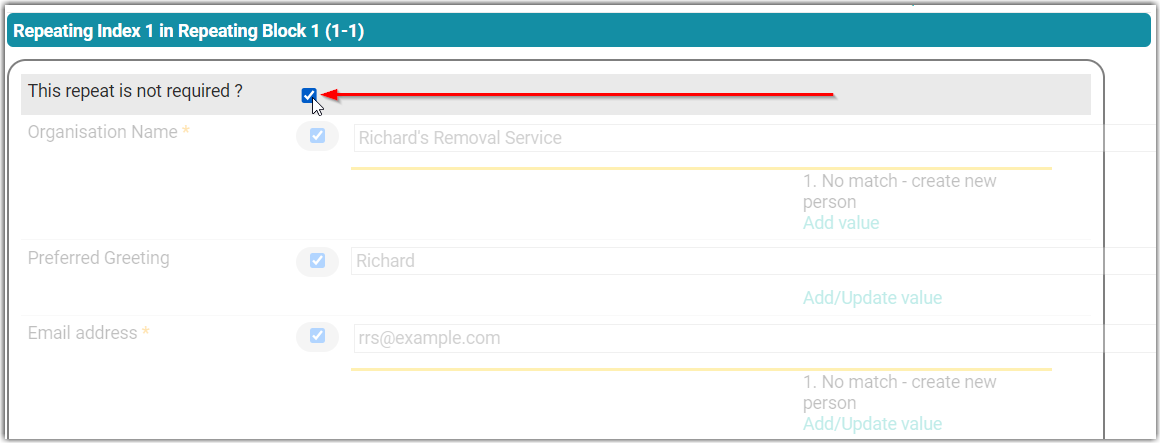
If you have added the Repeating people block field (when building your form) in order to allow multiple people to be added to one form, then you have the ability to ignore or cancel one or more of the multiple people entered onto the form if need be for any reason. Simply tick the This repeat is not required box.
See Repeating people block for more information
Once you have reviewed and edited the form enrty, scroll down that page to the Approve this form section of the form entry screen.
Form Approval
When approving a Form Entry, for each contact that is going to be created or updated from the form entry, you have the option of choosing How to process this contact.

We cover the various different options in detail in a separate help page.
See How to Process Contacts during Form Approval for more information.
For now we will use the Create or update and existing contact option.
Data from the form entry will be either added to or updated for an existing contact, or it will be used to create a new contact record.
There can be a number of options presented for how to Process the form data
-
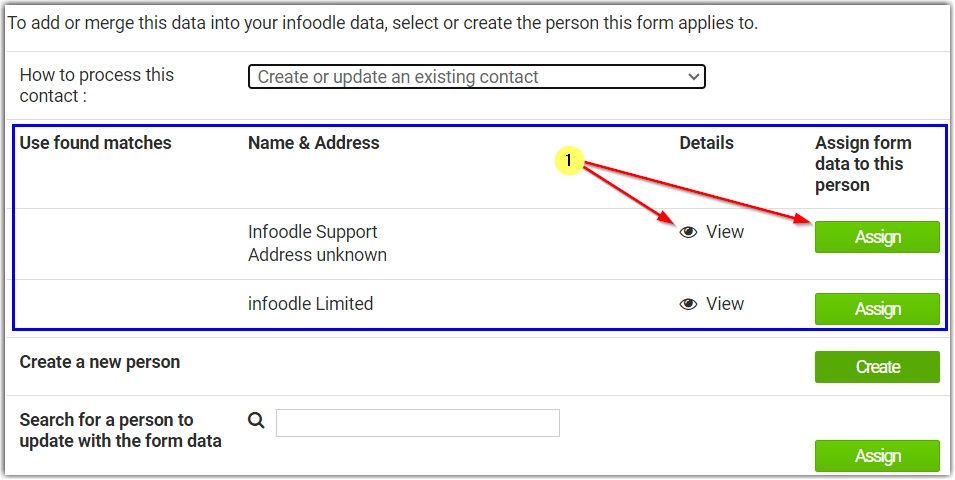
Use Found Matches: - If there is Name or email address data in the form that matches an existing contact in your database, you will be show a list of possible matches. Click the View icon to preview that contact, or click Assign to allocate the form to this contact. Only one contact can be selected for each form section.
-
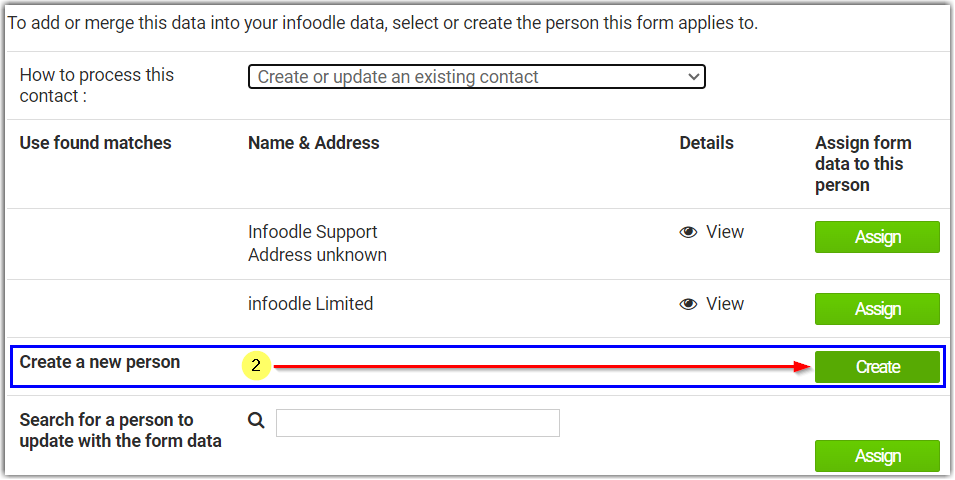
Create a new person - This option available for any form that ues the Persons Name form field, and is used to create a new Contact Record.
-
Search for person to update with the form data - This option works the same as Assigning to a found match, but allows you to search for the existing record that you wish to assign the form entry to.

-
Create a new Organisation/Household Contact - If you have a from that only uses the Organistion/Houshold Name field, and not the Persons Name field, then you are not able to use the Create a new person option. Instead you will see Create as a new household or update existing contact option under "How to process this contact".
You can assign this form to a found, or searched contact as normal, or can use the option to create a new Organisation/Household Contact. This Contact will not have the First name/Last name fields, and the Organisation/Household name will become the name of the contact.

See What is an organisation contact for more information
- Approve the form - Once you have made you selection for each contact on the form, click the Approve the Form Button to complete the form approval process.
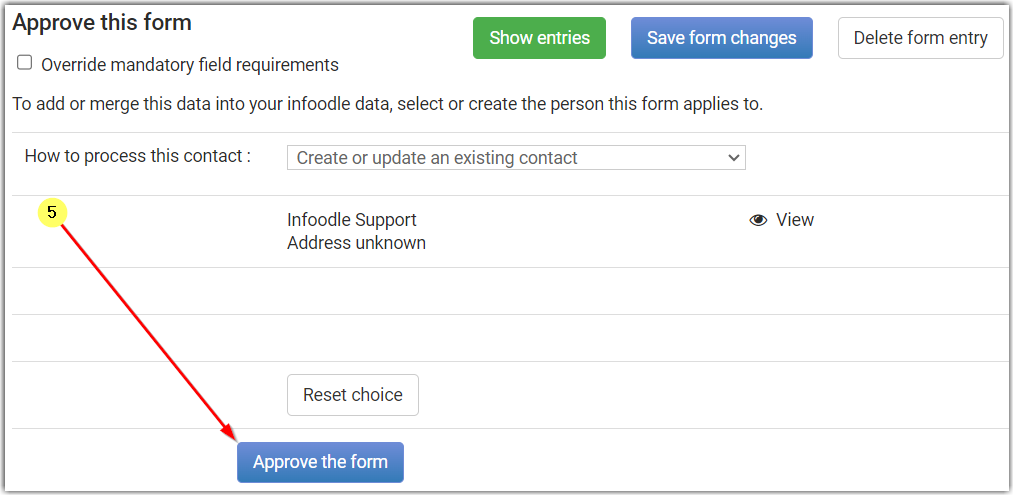
-
If your site uses workflows, then you may see an additional step for selecting a Workflow when approving Form Entries. This will display after selecting Create/Assign but before Clicking Approve the Form
See Trigger Workflows via Forms for more information. -
If there are Financial elements to your form then there may be some additional things to check and assign during the form approval process.
See Process financial form entries for more information
You can use the Reset Choice option, prior to approving a form, if you need to change how the contact is assigned.
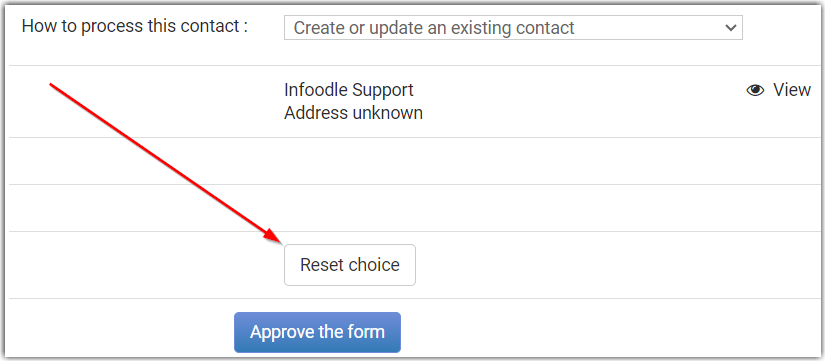
Deleting Form Entries - Pre-approval
You can use the Delete form entry option if this form entry is not required. Deleted form entries cannot be linked to a contact, or used to create a contact, but they can still be found using the Deleted option on the Form Entries page. You can also Un-delete a form entry at a later date if needed.

If you select Delete form entry the form entry will be marked as deleted and all the associated information will not be added to your CRM.
Do not delete a form unless you are sure it is junk or not needed.
On the Forms Entries screen you can filter to show those forms that have been deleted. You can then show that form and 'undelete' it.
Deleting Form Entries - After approval
If a form has been assigned to a contact and approved, you will first need to disconnect the user from the form before you can delete the form entry.
If the form relates to a recurring pledge, deleting the form will not automatically delete the pledge and you will have to manually do this. For information on how this is done, see: Deleting a pledge.
Identify the form entry you want to delete from the list of Approved form entries:

Select the form and scroll down until you can see the Disconnect from this user button on the right:
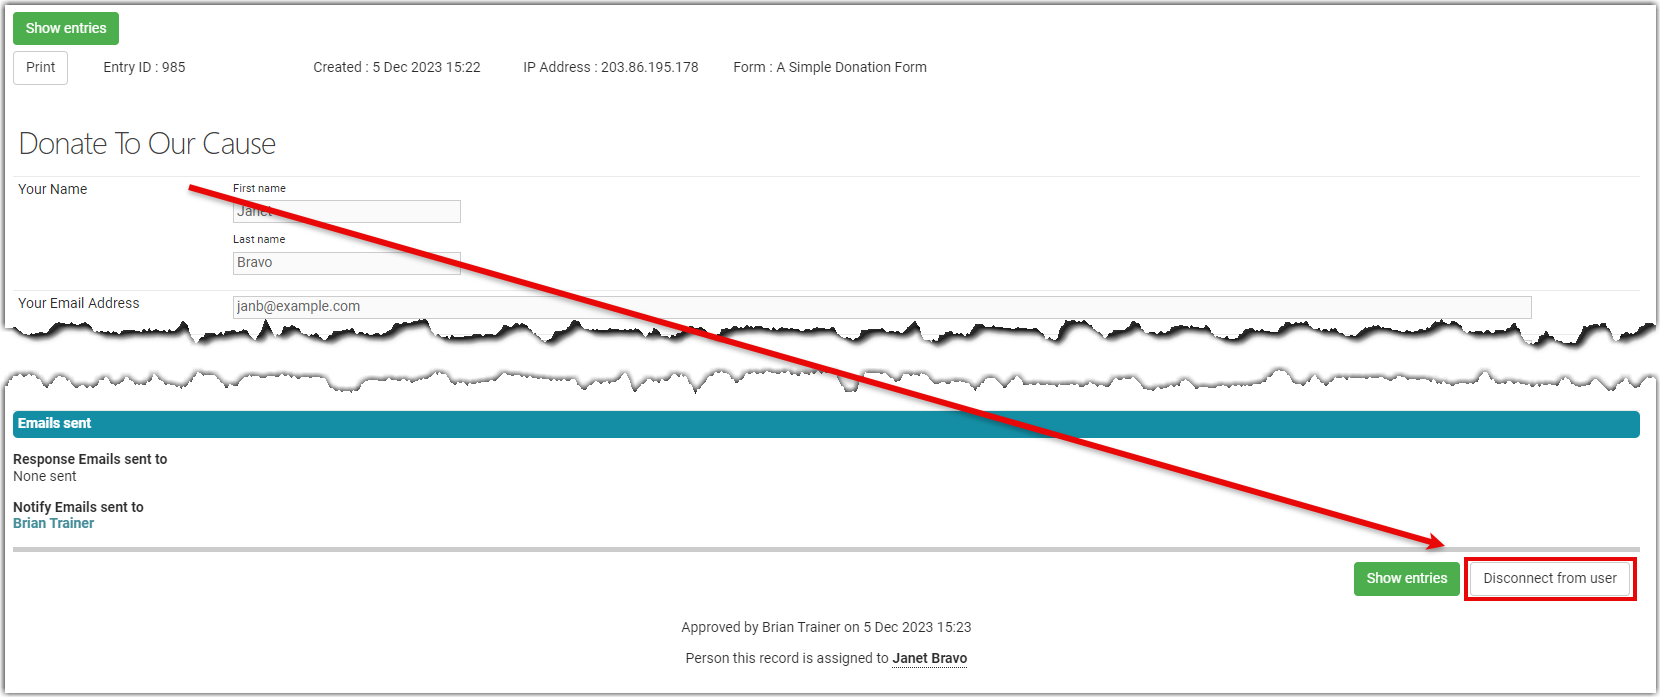
When you select this button you will be presented with this warning message:
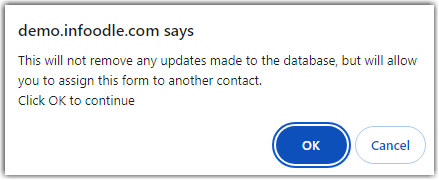
Once the disconnection is complete you will find that the form is no longer in the Approved forms list and is now in the To be approved list:

Select the form and scroll down until you see the Delete form entry button on the left:
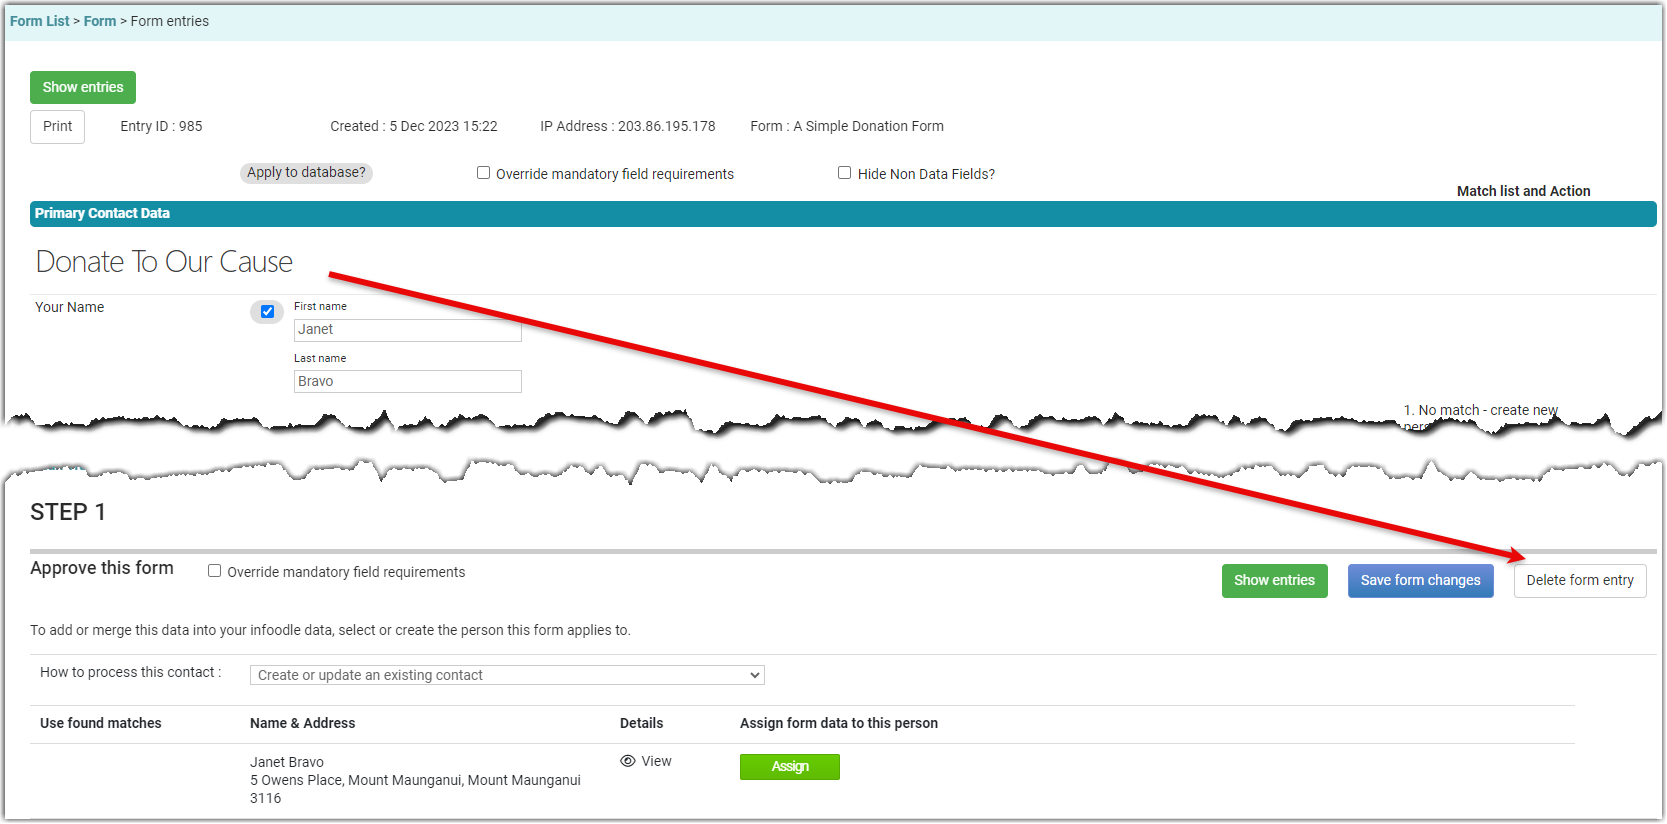
Deleted form entries cannot be linked to a contact, or used to create a contact, but they can still be found using the Deleted option on the Form Entries page. You can also un-delete a form entry at a later date if needed.
If you select Delete form entry the form entry will be marked as deleted and all the associated information will not be added to your CRM.
Do not delete a form unless you are sure it is junk or not needed.
On the Forms Entries screen you can filter to show those forms that have been deleted. You can then show that form and 'undelete' it.
Approving Forms with Multiple Contacts
If your form uses one or more Repeating People Block sections, then the the Primary Form and each Repeating Block section can each be processed as a separate infoodle contac so long as it contains a Persons Name field and/or and Organisation/Household Name Field.
For Multi-Contact forms, the Approve this form section will show one Tab for the Primary Form, as well as a Tab for each added Repeating Block.

Repeating blocks are labeled Repeat (Block No. - Index No.)
For example, Repeat 2-3 is from Repeating Block 2, and is the 3rd repeat of that block.
For Each Repeating Tab:
-
Select how to process this contact

-
Choose to create a contact, or assign to an existing record

-
Once all repeating tabs are assigned, click Approve this form
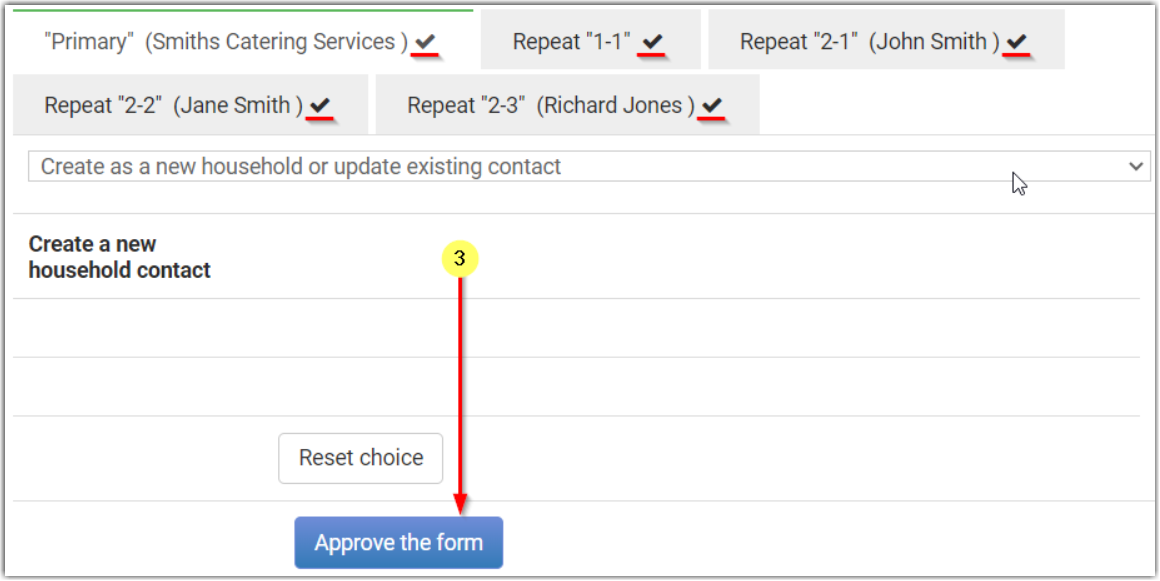
Unassigned Repeating Tabs - If there are still Repeating Tabs not yet processed on this form, you will see the below error message, and will need to select an action for any unassigned tabs in order to proceed.

Inactive Repeating Tabs - If there is a Repeating Tab that has no Person or Organisation/Household Name data, then this will show with a Strikethrough, as shown for the Primary Tab below.

This will also be what is displayed if you use the This Repeat is not Required option for any repeating section, as has been done for Repeat 2-1 and Repeat 2-2 tabs in the above example.
In either the No Data or Not Required scenarios, you will be able to ignore these inactive Repeating tabs, and will be able to approve the form once the active repeating tabs have been processed.
If you do not have at least one Repeating tab that is configured to Create/update a contact record, then you will not be able to Approve that form Entry.
-
If your site uses workflows, then you may see an additional step for selecting a Workflow when approving Form Entries. This will display after selecting Create/Assign but before Clicking Approve the Form
See Trigger Workflows via Forms for more information. -
If there are Financial elements to your form then there may be some additional things to check and assign during the form approval process.
See Process financial form entries for more information